How To Glaze Ribs In The Oven For Mouthwatering Flavor
Learning how to glaze ribs in the oven is one of the simplest ways to get restaurant-quality results at home. This guide walks you through choosing the right rack, building a sticky sweet glaze, and baking ribs low and slow until they are perfectly caramelized. You will discover easy tips, common mistakes to avoid, and a foolproof recipe that works every single time.
Key Takeaways
- Oven glazed ribs are easy: You do not need a smoker or grill to get amazing flavor.
- A simple glaze makes all the difference: Brown sugar, honey, and BBQ sauce create a sticky masterpiece.
- Low and slow is the key: Baking ribs at 275 to 300 degrees Fahrenheit keeps them tender and juicy.
- Wrapping in foil halfway through helps: It locks in moisture and speeds up the cooking process.
- Apply the glaze in layers: Multiple coats build a thick, caramelized shell on the outside.
- Let the ribs rest before serving: Resting allows the juices to redistribute for the best bite.
📑 Table of Contents
- Opening Summary
- Introduction
- What Makes Oven Glazed Ribs So Irresistible
- Choosing the Best Ribs for Oven Glazing
- Building the Perfect Rib Glaze
- How To Glaze Ribs In The Oven: Step-by-Step
- Tips for Perfectly Caramelized Ribs Every Time
- Common Mistakes to Avoid When Glazing Ribs
- Frequently Asked Questions
- Conclusion
Opening Summary
Learning how to glaze ribs in the oven is one of the easiest ways to turn a simple rack of pork ribs into a show-stopping meal. Whether you are cooking for a family dinner or a weekend gathering, oven glazed ribs deliver big flavor without the hassle of outdoor equipment. The process is straightforward, the ingredients are pantry staples, and the results are always impressive. In this guide, you will learn every step from selecting the best ribs to applying the perfect glaze. By the end, you will feel confident enough to make oven glazed ribs like a seasoned pitmaster.
Introduction
There is something magical about how to glaze ribs in the oven that makes the whole house smell incredible. The sweet and sticky coating caramelizes in the heat, creating a crust that is both crunchy and tender underneath. Many people think you need a smoker or a charcoal grill to achieve that sticky, finger-licking finish. But the truth is, your kitchen oven can produce equally mouthwatering results with the right technique. This article covers everything you need to know, from picking the right rack of ribs to nailing the glaze every time.
If you have ever wondered why your BBQ ribs recipe at home never tastes quite like the ones from your favorite restaurant, the secret often lies in the glaze and the cooking method. Oven baking gives you more control over temperature and timing. It also lets you focus on building layers of flavor without worrying about flare-ups or uneven heat. Let us dive into the details and get you started on making the best oven baked ribs you have ever tasted.
What Makes Oven Glazed Ribs So Irresistible
When you think about how to glaze ribs in the oven, it helps to understand what makes this dish so special. The combination of slow heat, a sweet glaze, and caramelized edges creates a texture and flavor profile that is hard to beat. Here is why oven glazed ribs win over so many other cooking methods.
The Magic of Caramelization
When sugar-based glazes hit the hot surface of the ribs, they undergo caramelization. This is a chemical reaction that turns simple sugars into complex, rich flavors. The outer layer of the glaze becomes deep amber and slightly crispy, while the meat underneath stays moist and tender. This contrast between the crunchy exterior and the soft interior is what makes oven glazed ribs so addictive.
Why Oven Baking Works So Well
Baking ribs in the oven gives you consistent heat from all sides. Unlike a grill where hot spots can cause uneven cooking, the oven surrounds the ribs with steady warmth. This makes it easier to achieve fall off the bone ribs without drying them out. You also have full control over the temperature, which is essential for building a great glaze.
Another advantage is convenience. You do not need to monitor a fire or manage charcoal. You can set the oven, prep your glaze, and focus on other things while the ribs cook. This indoor ribs recipe approach is perfect for anyone who wants delicious results without the outdoor setup.
Choosing the Best Ribs for Oven Glazing
The first step in how to glaze ribs in the oven is selecting the right cut of meat. Not all ribs are created equal, and the type you choose affects both the cooking time and the final texture.
Baby Back Ribs vs. Spare Ribs
Baby back ribs come from the top of the rib cage near the spine. They are leaner, more tender, and cook faster than other cuts. Baby back ribs are a great choice for beginners because they are forgiving and hard to mess up. They also absorb glaze beautifully.
Spare ribs, on the other hand, come from the belly side of the rib cage. They have more fat and more connective tissue, which means they need a longer cooking time. Spare ribs have a richer, more robust flavor that pairs wonderfully with sweet and smoky glazes. Both types work great for oven baking, so choose based on your preference.
What to Look for at the Butcher
When shopping for pork ribs, look for a rack with even coloring and a good layer of fat. The meat should be firmly attached to the bone and not dried out at the edges. A well-marbled rack will stay juicy throughout the long bake. If you are unsure, ask your butcher for a recommendation. They can point you toward the freshest and best-looking rack of ribs available.
How Much Ribs to Buy
A good rule of thumb is to plan for about half a pound of raw ribs per person. If you are feeding a crowd, buy one full rack per two to three guests. Remember that ribs lose about 30 to 40 percent of their weight during cooking, so plan accordingly. Leftover oven baked ribs make fantastic sandwiches the next day.
Building the Perfect Rib Glaze
The glaze is the heart and soul of any great rack of ribs. A well-made rib glaze adds sweetness, depth, and that beautiful sticky coating that everyone loves. Making your own glaze from scratch is easier than you might think.
Essential Ingredients for a Great Glaze
Most sweet glaze for ribs recipes share a few common ingredients. Here is what you will need for a classic and delicious glaze:
- Ketchup or tomato paste – forms the tangy base of the glaze
- Brown sugar – adds sweetness and helps with caramelization
- Honey – brings a floral sweetness and helps the glaze stick
- Apple cider vinegar – adds a tangy brightness that balances the sweetness
- Worcestershire sauce – contributes umami and depth
- Liquid smoke – adds a smoky flavor without a smoker
- Garlic powder and onion powder – build a savory foundation
- Salt and black pepper – enhance all the other flavors
These ingredients come together to create a BBQ sauce-based glaze that is sweet, tangy, and deeply flavorful. You can adjust the ratios to suit your taste. If you prefer a spicier glaze, add a pinch of cayenne pepper or some hot sauce. For a more smoky profile, increase the amount of liquid smoke slightly.
Making the Glaze Ahead of Time
One of the best things about making oven glazed ribs is that you can prepare the glaze in advance. Mix all the ingredients in a saucepan over medium heat and stir until the brown sugar dissolves. Let it simmer for about 10 minutes until it thickens slightly. Store it in a jar in the refrigerator for up to a week. When you are ready to cook, simply warm it up and start brushing it on.
How To Glaze Ribs In The Oven: Step-by-Step
Now that you have your ribs and your glaze ready, it is time to put everything together. This step-by-step guide to how to glaze ribs in the oven will walk you through the entire process from start to finish.
Step 1: Prep the Ribs
Start by removing the membrane from the back of the rack of ribs. This thin, papery layer can be tough and chewy, so it is best to peel it off before cooking. Use a butter knife to loosen one corner, then grab it with a paper towel and pull it off. It should come away in one clean piece.
Next, pat the ribs dry with paper towels. This helps the rib rub stick better and creates a better surface for the glaze to adhere to. Season both sides generously with your favorite rib rub or a simple mix of salt, pepper, garlic powder, and paprika.
Step 2: Set Up the Oven
Preheat your oven to 275 degrees Fahrenheit. This low temperature is the secret to tender, juicy oven baked ribs. A higher temperature will cook the meat too quickly and dry it out before the glaze can do its job. Place a rack in the center of the oven so the heat circulates evenly around the ribs.
Step 3: Wrap in Foil
Place the seasoned ribs meat-side down on a large sheet of heavy-duty aluminum foil. Wrap them tightly, sealing the edges so no steam escapes. This foil wrapped ribs method traps moisture and creates a steaming effect that breaks down the connective tissue. It is one of the easiest ways to achieve fall off the bone ribs in the oven.
Place the wrapped ribs on a baking sheet and put them in the oven. The ribs cooking time at 275 degrees is about 2.5 to 3 hours for a full rack. Baby back ribs may be done in about 2 hours, while spare ribs might need the full 3 hours.
Step 4: Unwrap and Apply the Glaze
After the first round of baking, carefully remove the ribs from the oven. Open the foil and let the steam escape. Be careful, as the ribs will be very hot. Now it is time for the first layer of glaze.
Using a pastry brush or a spoon, spread a thin, even coat of the rib glaze over the entire surface of the meat side. Do not worry about being too precise at this stage. The goal is to build up layers gradually. Place the unwrapped ribs back in the oven, uncovered, and continue baking for another 30 minutes.
Step 5: Add More Layers of Glaze
Repeat the glazing process two more times. Every 30 minutes, pull the ribs out, brush on another coat of glaze, and return them to the oven. Each layer builds on the last, creating a thick, sticky, and beautifully caramelized shell. This layering technique is what separates average BBQ ribs recipe results from truly outstanding ones.
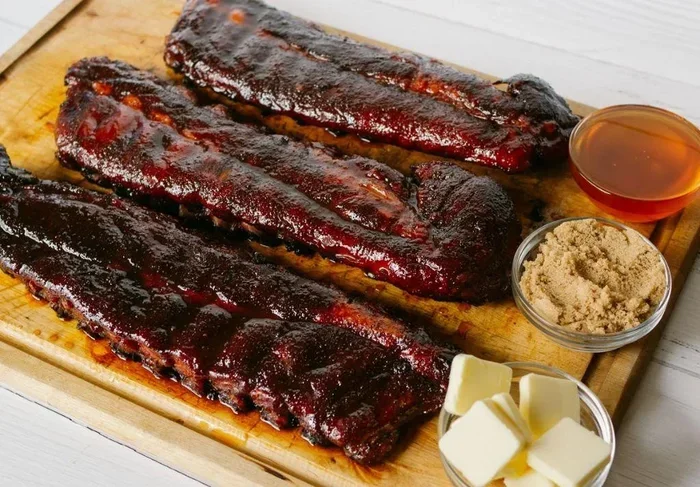
By the final round of glazing, the ribs should have a deep reddish-brown color and a glossy, sticky finish. The internal temperature should reach about 195 to 205 degrees Fahrenheit, which is the sweet spot for tender, pull-apart meat.
Step 6: Rest and Serve
Once the ribs are done, remove them from the oven and let them rest for 10 to 15 minutes. This resting period allows the juices to redistribute throughout the meat, making every bite moist and flavorful. Slice between the bones and serve with extra glaze on the side.
Tips for Perfectly Caramelized Ribs Every Time
Mastering how to glaze ribs in the oven takes a little practice, but these tips will help you nail it every time.
Keep the Oven Temperature Consistent
Fluctuating temperatures can cause the glaze to burn or the meat to dry out. Avoid opening the oven door too often, as this lets heat escape. If you need to check on the ribs, do it quickly and close the door right away. A reliable oven thermometer can help you verify that the temperature is accurate.
Use Parchment Paper Under the Foil
Lining your baking sheet with parchment paper makes cleanup much easier. It also prevents the foil from sticking to the ribs or the pan. This small trick saves time and keeps your indoor ribs recipe experience stress-free.
Brush the Glaze on Thin Layers
It can be tempting to slather on a thick layer of glaze, but thin coats work better. Thick layers take longer to set and can become sticky or gummy instead of caramelized. A thin, even coat bakes on perfectly and builds up beautifully with each pass.
Add a Final Broil for Extra Crispiness
If you want an extra-crispy, deeply caramelized top, switch your oven to the broil setting for the last 2 to 3 minutes. Watch the ribs closely during this time, as the sugar in the glaze can go from perfectly golden to burnt very quickly. This quick burst of high heat gives the glaze a beautiful lacquered finish.
Common Mistakes to Avoid When Glazing Ribs
Even experienced cooks can make mistakes when learning how to glaze ribs in the oven. Here are the most common pitfalls and how to avoid them.
Skipping the Membrane Removal
Leaving the membrane on the back of the ribs is one of the most common mistakes. It blocks the glaze from penetrating the meat and creates a chewy, unpleasant texture. Always take the time to peel it off before seasoning.
Applying the Glaze Too Early
If you brush the glaze on too soon, the sugars in it will burn during the long bake. The best approach is to apply the glaze in the last 1.5 to 2 hours of cooking. This gives the sugars time to caramelize without scorching.
Using Too Much Liquid Smoke
Liquid smoke is a powerful ingredient. A little goes a long way, and too much can make the ribs taste artificial and bitter. Start with just a few drops and taste the glaze before applying it. You can always add more, but you cannot take it away once it is in the pot.
Cutting Into the Ribs Too Soon
It is tempting to peek at the ribs as soon as the timer goes off, but resist the urge. Cutting into the meat too early releases all those precious juices, leaving the ribs dry and less flavorful. Let them rest for at least 10 minutes before slicing.
Not Letting the Ribs Come to Room Temperature
Placing cold ribs directly into the oven can lead to uneven cooking. Take the ribs out of the refrigerator about 30 minutes before baking. This small step helps the meat cook more evenly and reduces the overall ribs cooking time slightly.
Frequently Asked Questions
Can I use store-bought BBQ sauce instead of making my own glaze?
Absolutely. Store-bought BBQ sauce works perfectly well if you are short on time. Look for a high-quality sauce with real ingredients and avoid ones that are overly sweet or thin. You can also enhance a store-bought sauce by simmering it with a little brown sugar, honey, and apple cider vinegar to deepen the flavor. This simple upgrade makes a noticeable difference in your oven glazed ribs.
How do I know when the ribs are done?
The best way to check is by using a meat thermometer. The internal temperature should read 195 to 205 degrees Fahrenheit for tender, juicy meat. You can also test by inserting a toothpick into the thickest part of the meat. If it goes in with little resistance, the ribs are done. Another sign is when the meat starts to pull back from the edges of the bones by about a quarter inch.
Can I glaze ribs in the oven the night before a party?
Yes, you can! In fact, oven baked ribs often taste even better the next day after the flavors have had time to meld. Cook the ribs fully, let them cool, and store them in an airtight container in the refrigerator. Reheat them in the oven at 300 degrees Fahrenheit until warmed through, then apply a fresh layer of glaze and broil for a few minutes to refresh the sticky coating.
What is the best way to reheat leftover glazed ribs?
The oven is the best method for reheating leftover oven glazed ribs. Wrap them in foil with a splash of apple juice or broth to keep them moist. Heat at 300 degrees Fahrenheit for about 15 to 20 minutes. Avoid using the microwave, as it tends to dry out the meat and make the glaze rubbery. A quick pass under the broiler after reheating can also help restore that caramelized finish.
Do I need to flip the ribs during cooking?
Because you are wrapping the ribs in foil and baking them low and slow, flipping is not necessary. The foil traps the heat and steam, which cooks the meat evenly from all sides. When you unwrap the ribs to apply the glaze, you can rotate the pan 180 degrees if you want to ensure even browning, but this is optional.
Can I freeze cooked glazed ribs?
Yes, oven baked ribs freeze very well. Let them cool completely after cooking, then wrap them tightly in plastic wrap and aluminum foil or place them in a freezer-safe bag. They will keep in the freezer for up to 3 months. To reheat, thaw them in the refrigerator overnight and warm them in the oven at 300 degrees Fahrenheit until heated through. Add a fresh coat of glaze before serving for the best results.
Conclusion
Learning how to glaze ribs in the oven is a skill that will elevate your home cooking and impress everyone at the table. From choosing the right rack to building a sticky, sweet glaze and baking low and slow, every step is simple and rewarding. The beauty of this method is that it gives you full control over the flavor and texture of your ribs without requiring any special equipment.
Remember to take your time, build the glaze in layers, and let the ribs rest before serving. These small efforts make a huge difference in the final result. Whether you are a beginner or a seasoned home cook, oven glazed ribs are a dish that never fails to delight. So fire up your oven, grab a rack of pork ribs, and get ready to enjoy some of the most delicious BBQ ribs recipe results you have ever had. Your family and guests will be asking for this recipe again and again.