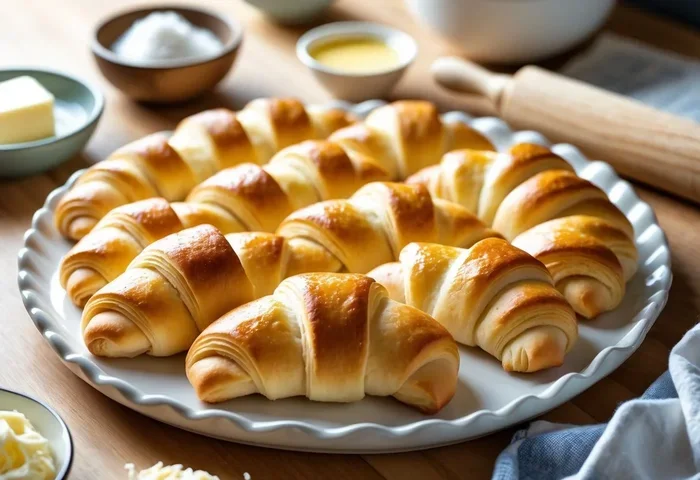
How To Cook Crescent Rolls In The Oven Perfectly Golden
Want perfectly golden crescent rolls straight from your oven? This guide shows you exactly how to cook crescent rolls in the oven with simple steps, pro tips, and delicious variations. You’ll learn the ideal temperature, baking time, and tricks for flaky, buttery layers every single time.
There’s something truly magical about the smell of crescent rolls baking in the oven. Whether you’re feeding a crowd at brunch or just want a warm side with dinner, how to cook crescent rolls in the oven is a skill that pays off every single time. You don’t need a fancy bakery or a complicated recipe. With a few simple ingredients and the right oven temperature, you can pull out golden, flaky rolls that taste like they came from a professional kitchen.
Many people reach for a can of store‑bought dough because it’s quick and easy. But baking crescent rolls from scratch—or even using that same can dough with a few upgrades—lets you control the butter, the sweetness, and the shape. This guide walks you through every step, from choosing your dough to the final golden finish. You’ll also discover pro tips that make the difference between good rolls and great ones. By the end, you’ll feel confident enough to bake a batch any day of the week.
The beauty of oven‑baked rolls is their versatility. Serve them with jam for breakfast, pair them with soup for lunch, or turn them into a sweet dessert with cinnamon sugar. They’re also incredibly forgiving. Even if your first attempt isn’t perfect, a little practice and the advice in this article will have you baking crescent rolls like a pro in no time.
Key Takeaways
- Perfect oven temperature: Bake at 375°F for 12–15 minutes for a golden finish.
- Flaky layers: Keep dough cold and avoid over‑rolling to maintain those buttery pockets.
- Easy shaping: Use traditional crescent shapes or create fun pull‑apart rolls.
- Egg wash magic: A simple egg wash gives rolls a glossy, professional look.
- Versatile recipe: Add cinnamon sugar for sweetness or cheese and herbs for a savory twist.
- Store and reheat: Keep leftover rolls in an airtight container; reheat in the oven to restore crispness.
📑 Table of Contents
Why Oven‑Baked Crescent Rolls Are a Game‑Changer
Baking crescent rolls in the oven unlocks a texture you just can’t get from a microwave or a stovetop. The dry, circulating heat creates those signature flaky layers by slowly melting the butter between the dough sheets. As the dough warms, the yeast activates and the rolls puff up, leaving behind a soft interior with a crisp, golden exterior.
When you cook crescent rolls in the oven, you also get a beautiful, even browning. The top turns a rich amber while the bottom stays lightly crisp. This contrast in texture is what makes fresh‑baked rolls so addictive. Plus, the oven gives you hands‑free time. You can prep a glaze, set the table, or chat with guests while your crescent rolls bake to perfection.
The Magic of Golden, Flaky Layers
The secret to flaky layers lies in the fat. Most crescent roll dough uses cold butter or a butter‑flavored shortening. When the dough hits the hot oven, the fat melts and creates steam. That steam pushes apart the layers of dough, forming thin, crispy sheets. The result is a roll that shatters slightly when you bite through it, then yields to a soft, pillowy center.
To get the best layers, keep your dough as cold as possible before baking. If you’re using store‑bought dough, leave it in the fridge until you’re ready to shape it. If you’re making homemade rolls, chill the dough after the final rise. Cold dough melts slower in the oven, giving the layers more time to set before the butter fully liquefies.
Oven vs. Other Methods
A toaster oven works in a pinch, but a full‑size conventional oven gives you the most even heat. Convection ovens are great because the fan circulates hot air, which helps rolls brown uniformly. If you use a convection setting, drop the temperature by about 25°F to prevent over‑browning. Microwave baking is not recommended for crescent rolls because it heats the water in the dough too quickly, resulting in a rubbery texture instead of flaky layers.
Some people try to bake rolls on the stovetop in a covered skillet. While this can produce a soft, dinner‑roll‑like texture, it won’t give you the classic crescent shape or the golden top. For the authentic look and taste, a hot oven is the way to go.
What You’ll Need: Ingredients and Tools
Before you start, gather everything you need. Having your tools and ingredients ready makes the process smooth and fun. You don’t need a long grocery list for crescent rolls, but a few quality items make a big difference.
Choosing Your Crescent Dough
You have two main options: store‑bought crescent dough or homemade dough. Store‑bought rolls are perfect for beginners. They come in a tube or a box and already have the yeast, fat, and flour mixed in. Look for brands that list butter or real butter flavor as a primary ingredient. Avoid dough that feels greasy or has a strong artificial taste.
Homemade dough gives you total control. A basic recipe includes flour, warm water, yeast, sugar, salt, and butter. You mix the dough, let it rise until it doubles in size, then roll it out and shape your rolls. Homemade dough takes about an hour to prepare and rise, but the flavor and texture are unbeatable. If you’re new to baking, start with store‑bought dough and graduate to homemade once you’ve mastered the oven technique.
Essential Baking Tools
- Baking sheet or jelly roll pan: A rimmed sheet keeps rolls from dripping onto the oven floor.
- Parchment paper or silicone mat: This prevents sticking and makes cleanup a breeze.
- Rolling pin: If you’re making homemade dough, a rolling pin helps you achieve an even thickness.
- Pastry brush: You’ll need this for applying egg wash or melted butter.
- Sharp knife or pizza cutter: Use this to cut the dough into triangles or squares.
- Oven thermometer: Many ovens run hot or cold. An inexpensive thermometer ensures your oven temperature is accurate.
Having these tools ready means you can focus on shaping and baking instead of scrambling for a missing item. Trust me, it makes the whole experience more enjoyable.
Step‑by‑Step: How to Cook Crescent Rolls in the Oven
Now for the fun part. How to cook crescent rolls in the oven is simpler than you might think. Follow these steps and you’ll have beautiful, bakery‑style rolls in under 20 minutes of active prep time.
Preparing the Dough and Pan
Preheat your oven to 375°F. While it’s warming, line your baking sheet with parchment paper. If you’re using store‑bought dough, unroll it carefully on a lightly floured surface. For homemade dough, punch down the risen dough and roll it out into a large rectangle, about 1/4‑inch thick. The dough should be smooth and slightly tacky, not sticky.
Place the prepared dough on your baking sheet. If you’re making traditional crescent shapes, you’ll cut the dough into triangles now. For pull‑apart rolls or dinner rolls, you can leave it as a rectangle and cut it into squares or rectangles instead. The key is to work quickly so the dough stays cold.
Shaping Your Rolls
For classic crescents, take each triangle and gently roll it from the wide end toward the point. Curve the ends slightly inward to form a crescent moon shape. Press the tip underneath to seal it. If you prefer a softer, dinner‑roll look, cut the dough into squares, roll each one into a ball, and place them on the baking sheet.
Leave about 2 inches of space between each roll. They will expand as they bake, and you don’t want them to merge into one another. If you’re making a pull‑apart centerpiece, arrange the rolls in a circle or a muffin tin. This creates a beautiful presentation that’s perfect for holidays or family gatherings.
Baking Time and Temperature
Place the baking sheet on the middle rack of your oven. Bake for 12–15 minutes, or until the rolls are golden brown on top and the bottoms are lightly colored. The exact time depends on your oven and the size of your rolls. Thinner crescents may be done in 10–12 minutes, while thicker dinner rolls might need the full 15.
Start checking at the 10‑minute mark. Look for a deep golden color and a firm top. If the tops are browning too fast, loosely tent the rolls with a piece of aluminum foil. This lets the inside finish cooking without burning the outside. When done, remove the rolls from the oven and let them cool on the pan for 5 minutes before transferring to a wire rack.
Pro Tips for Perfectly Golden Results
A few small tricks can elevate your crescent rolls from good to outstanding. These tips come from years of baking experience and will help you avoid common pitfalls.
The Egg Wash Secret
An egg wash is the simplest way to get a glossy, professional finish. Beat one egg with a tablespoon of water or milk. Brush the mixture lightly over each roll just before they go into the oven. The wash helps the dough brown evenly and gives the surface a beautiful shine. For a richer flavor, substitute melted butter for the egg wash. Brush it on after the rolls come out of the oven for a soft, buttery crust.
If you want a sweet roll, sprinkle cinnamon sugar on top right after you brush with the egg wash. The sugar will melt and form a delicate, crunchy coating. For savory rolls, a light sprinkle of grated Parmesan or dried herbs works wonderfully.
Common Mistakes to Avoid
Common Mistake: Over‑rolling the dough. When you roll the dough too thin, the layers become fragile and bake up hard instead of flaky. Aim for a consistent 1/4‑inch thickness. If you’re unsure, use a ruler or a rolling pin with thickness rings.
Common Mistake: Skipping the oven preheat. Putting dough into a cold oven throws off the bake time and can result in pale, dense rolls. Always let the oven reach 375°F before you slide the pan in.
Common Mistake: Crowding the pan. Rolls need space to breathe and expand. If you place them too close together, they’ll steam instead of bake, and you’ll lose that crispy exterior.
Expert Insight
Expert Insight: “The secret to flaky crescent rolls is cold dough and a hot oven. When the cold fat hits the heat, it creates steam and layers. I always chill my baking sheet for 10 minutes before loading the rolls in. That extra step makes a noticeable difference in the final texture.” – Sarah, a professional pastry chef with 15 years of experience.
Creative Variations and Serving Ideas
Once you’ve mastered the basic how to cook crescent rolls in the oven method, it’s time to get creative. These variations turn simple dough into a star of the table.
Sweet Cinnamon Crescent Rolls
For a breakfast treat, spread each triangle with a mix of softened butter, brown sugar, and cinnamon before rolling. Bake as directed, then drizzle with a simple powdered‑sugar glaze. The warm, spicy aroma will fill your kitchen and draw everyone to the table. You can also add raisins or chopped nuts inside the roll for extra texture.
Savory Cheese and Herb Rolls
Mix shredded cheddar, grated Parmesan, and a pinch of dried rosemary or garlic powder into a bowl of softened butter. Spread this mixture onto the dough before shaping. The result is a savory roll that pairs perfectly with pasta, soup, or salad. For an extra kick, add a dash of smoked paprika or a sprinkle of fresh thyme.
Dinner Rolls for Any Meal
Instead of crescents, shape the dough into soft, round dinner rolls. Place them in a greased muffin tin or on a baking sheet. Brush with butter after baking and serve alongside roasted chicken or beef stew. These rolls are ideal for holidays or Sunday dinners. You can also make mini rolls for a kid‑friendly option that’s easy to grab and eat.
No matter which variation you choose, the baking process remains the same. The oven does the heavy lifting, and your job is to shape and watch. That’s what makes crescent rolls so beginner‑friendly.
Storing and Reheating Leftover Rolls
Fresh crescent rolls are best enjoyed the same day, but leftovers don’t have to go to waste. Proper storage keeps them soft, and reheating restores much of that just‑baked crunch.
Keeping Them Fresh for Days
Let the rolls cool completely, then place them in an airtight container or a zip‑top bag. Store at room temperature for up to 3 days. For longer storage, freeze the rolls in a single layer on a baking sheet, then transfer them to a freezer bag once solid. Frozen rolls keep for up to 2 months.
Avoid refrigerating leftover rolls. The fridge dries them out quickly and can make the dough dense. If you must refrigerate, wrap them tightly in plastic wrap and use them within 24 hours.
Reheating Without Losing Crispness
The microwave might be tempting, but it turns rolls rubbery. Instead, reheat in the oven. Preheat to 350°F, place the rolls on a baking sheet, and warm for 5–7 minutes. This brings back the crisp exterior while keeping the inside soft. If you’re reheating frozen rolls, add a few extra minutes and cover loosely with foil to prevent over‑browning.
For a quick fix, you can also use a toaster oven. Set it to 325°F and warm the rolls for 3–4 minutes. The smaller space heats them up fast, and you’ll get a nice, even toast. Just keep an eye on them so they don’t burn.
Quick Tip: If your rolls have lost some moisture, sprinkle a few drops of water over them before reheating. The steam will soften the dough and bring back that fresh‑baked feel.
Conclusion
Baking crescent rolls in the oven is one of the most rewarding simple tasks in the kitchen. With the right temperature, a little patience, and a few pro tricks, you can create rolls that are golden, flaky, and bursting with flavor. Whether you stick with the classic crescent shape or experiment with sweet and savory variations, the process is the same: prepare the dough, shape it with care, and let the oven do the rest.
Remember, practice makes perfect. Your first batch might not be flawless, but each one teaches you something new. Pay attention to how the dough feels, how the oven heats, and how the rolls transform over time. Soon, how to cook crescent rolls in the oven will feel like second nature. So preheat that oven, gather your ingredients, and enjoy the warm, buttery goodness of fresh‑baked crescent rolls. Your family and guests will love every bite.
Frequently Asked Questions
Can I use a toaster oven for crescent rolls?
Yes, a toaster oven works well for small batches. Use the bake setting and keep the temperature at 375°F. Because toaster ovens heat up faster, check the rolls a couple of minutes earlier than you would in a full oven. The rolls are done when they’re golden brown on top.
What temperature should I bake crescent rolls at?
The standard temperature is 375°F. This heat allows the dough to rise properly while the butter melts and creates flaky layers. If you’re using a convection oven, reduce the temperature to 350°F to prevent over‑browning. Always preheat your oven before placing the rolls inside.
How do I know when crescent rolls are done?
Look for a deep golden‑brown color on top and a light brown bottom. The rolls should feel firm when you tap them gently. If you’re unsure, use an instant‑read thermometer; the internal temperature should be around 190°F. Remove them from the oven and let them cool for a few minutes.
Can I freeze baked crescent rolls?
Absolutely. Let the rolls cool completely, then place them in a single layer on a baking sheet to freeze solid. Transfer them to a freezer bag and store for up to 2 months. Reheat in a 350°F oven for about 8 minutes to restore their freshness.
Why are my crescent rolls not golden?
Pale rolls usually mean the oven wasn’t hot enough or the dough was too cold when it went in. Make sure your oven is fully preheated and consider using an oven thermometer. Also, an egg wash or melted butter brushed on top helps promote browning.
Can I make crescent rolls from scratch in the oven?
Yes, homemade dough bakes beautifully in the oven. After the dough has risen and you’ve shaped it, bake it at 375°F for 12–15 minutes. Homemade rolls often need a slightly longer bake than store‑bought dough because the moisture content can differ. Watch them closely and adjust the time as needed.