How Long To Bake Precooked Ham In Oven For Perfect Results
Baking a precooked ham in the oven is simple when you know the right time and temperature. Most precooked hams need about 10 to 15 minutes per pound at 325°F to heat through safely. This guide covers everything from oven-baked ham timing to glaze recipes, so your ham turns out juicy and flavorful every single time.
Key Takeaways
- Bake at 325°F: This is the recommended oven temperature for precooked ham to heat evenly without drying out.
- Plan for 10 to 15 minutes per pound: Baking time depends on ham size, whether it is bone-in or boneless, and your oven.
- Use a meat thermometer: The internal temperature should reach 140°F for store-bought fully cooked ham.
- Glaze in the last 20 minutes: Applying a brown sugar or honey glaze too early can cause burning.
- Let the ham rest: Resting for 15 minutes after baking keeps the juices locked inside the meat.
- Leftover ham reheats well: You can reheat sliced ham in the oven or microwave for quick meals all week.
📑 Table of Contents
- How Long To Bake Precooked Ham In Oven
- What Temperature To Bake Precooked Ham
- Step-By-Step Ham Baking Instructions
- Best Glazes For Oven-Baked Ham
- How To Tell When Your Ham Is Done
- Tips For Perfect Leftover Ham
- Common Mistakes When Baking Precooked Ham
- Expert Tips for the Perfect Oven-Baked Ham
- How Much Ham To Buy Per Person
- Frequently Asked Questions
- Conclusion
How Long To Bake Precooked Ham In Oven
There is nothing quite like a golden, oven-baked ham filling the kitchen with a sweet, savory aroma. Whether you are preparing for Thanksgiving, Easter, or just a weekend family dinner, a precooked ham makes the job so much easier. The question most people ask is simple: how long to bake precooked ham in oven?
The short answer is about 10 to 15 minutes per pound at 325°F. But there is a lot more to it than just setting a timer. The type of ham, whether it has a bone, the glaze you choose, and your oven all play a role. This guide walks you through every detail so your ham comes out perfect.
A fully cooked ham only needs to be reheated, not cooked from scratch. That means you are mainly warming it up and adding flavor. This makes oven-baked ham one of the easiest main dishes to prepare for a crowd. You can spend more time with your guests and less time worrying over the stove.
Let us dive into the full process. By the end of this article, you will feel confident baking a precooked ham like a pro.
Why Baking Precooked Ham Is So Easy
When you buy a precooked ham from the store, it has already been cured, smoked, or roasted. All you need to do is reheat it. This is different from raw ham, which requires much longer cooking times and careful food safety handling.
Most hams labeled “fully cooked” or “ready to eat” can go straight into the oven. You just need to warm them to a safe internal temperature. This saves a ton of time and takes the stress out of holiday cooking.
Spiral hams are a popular choice because they are already sliced and easy to serve. Bone-in hams tend to stay juicier during baking. Boneless hams are easier to carve. Each type works great in the oven, and the baking time is similar across all of them.
What Temperature To Bake Precooked Ham
The standard oven temperature for baking precooked ham is 325°F. This low and steady heat warms the meat evenly without drying it out. Too high a temperature can burn the outside while leaving the inside cold.
Here is a quick look at the recommended temperatures for different types of ham:
- Fully cooked ham: Heat to 140°F internal temperature.
- Cook-before-eating ham: Heat to 160°F internal temperature.
- Spiral ham: 325°F for about 10 minutes per pound.
- Bone-in ham: 325°F for 12 to 15 minutes per pound.
Always use a meat thermometer. It is the only way to know for sure that your ham has reached the right internal temperature. Guessing can lead to undercooked or overcooked meat.
Why 325°F Is the Sweet Spot
At 325°F, the ham heats slowly and evenly. The fat renders gently, keeping the meat moist. Higher temperatures can cause the glaze to burn before the inside is warm enough. Lower temperatures take too long and can make the ham rubbery.
If your oven runs hot or cold, adjust accordingly. An oven thermometer is a cheap and handy tool that takes the guesswork out of baking. Place it inside your oven before you start to make sure the dial matches the actual temperature.
Step-By-Step Ham Baking Instructions
Follow these simple steps for a perfectly baked precooked ham every time. The process is straightforward and hard to mess up.
Step 1: Remove the Ham From the Package
Take the ham out of the refrigerator about 30 minutes before baking. Letting it come to room temperature helps it cook more evenly. Remove any packaging and discard the juices or glaze packet if you are not using them.
If your ham has a net covering, you can leave it on or remove it. Some people keep it on to help the ham hold its shape. Others remove it so the glaze can coat the meat directly.
Step 2: Score the Ham
Use a sharp knife to make shallow diamond cuts across the outside of the ham. This is called scoring. Scoring helps the glaze seep into the meat and gives the ham a beautiful presentation.
Make the cuts about a quarter-inch deep. Do not cut too deep or you will remove too much of the outer layer. The goal is to create pockets for the glaze, not to cut into the meat itself.
Step 3: Preheat the Oven
Set your oven to 325°F and let it preheat fully. A preheated oven ensures the ham starts cooking right away. Placing a cold ham into a cold oven adds extra time and can result in uneven heating.
Step 4: Place the Ham in a Baking Pan
Put the ham cut-side down in a roasting pan or baking dish. Add about a cup of water, apple juice, or broth to the bottom of the pan. This creates steam that keeps the ham moist during baking.
You can also wrap the ham in foil for the first part of baking. This traps moisture and speeds up the reheating process. Remove the foil in the last 20 to 30 minutes to let the glaze brown and crisp up.
Step 5: Bake and Monitor
Place the ham in the oven and set a timer. For a 10-pound ham, expect about 2 to 2.5 hours of baking time. Check the internal temperature with a meat thermometer after the first hour and a half.
Rotate the pan halfway through if your oven has hot spots. This helps the ham brown evenly on all sides.
Step 6: Apply the Glaze
Brush the glaze on during the last 20 to 30 minutes of baking. This timing is important. If you add the glaze too early, the sugars in it will burn and turn bitter.
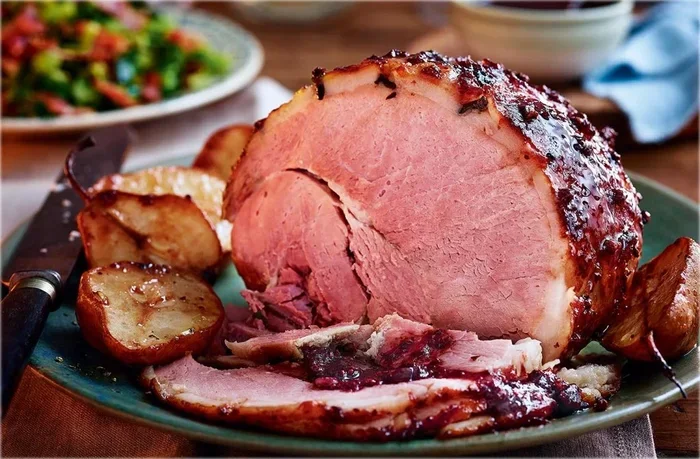
Apply two to three coats of glaze for the best flavor and color. Let each layer set for a few minutes before adding the next. This builds a beautiful, caramelized finish.
Step 7: Rest Before Serving
Once the ham reaches 140°F internally, take it out of the oven. Cover it loosely with foil and let it rest for 15 to 20 minutes. This allows the juices to redistribute throughout the meat, making every slice tender and juicy.
Best Glazes For Oven-Baked Ham
The glaze is what turns a good ham into a great one. A sweet, sticky glaze adds flavor and creates that beautiful caramelized crust everyone loves. Here are some of the best options for your oven-baked ham.
Classic Brown Sugar Glaze
Mix one cup of brown sugar with a quarter cup of mustard and a tablespoon of apple cider vinegar. Spread this over the ham during the last 20 minutes of baking. It is simple, sweet, and absolutely delicious.
Honey and Pineapple Glaze
Combine one cup of honey with half a cup of pineapple juice and a teaspoon of cinnamon. This tropical glaze pairs wonderfully with bone-in ham and gives it a slightly fruity flavor. It works especially well for Easter dinners.
Maple and Cloves Glaze
For a fall-inspired flavor, mix maple syrup with a pinch of ground cloves and a splash of orange juice. This glaze adds warmth and depth to the ham. It is perfect for holiday meals when you want something a little different.
Dijon and Honey Glaze
Whisk together Dijon mustard, honey, and a splash of apple juice. This glaze has a nice kick of heat balanced with sweetness. It pairs well with both bone-in and boneless ham.
How To Tell When Your Ham Is Done
Knowing when your ham is ready is crucial. Since it is already cooked, you are mainly reheating it. But you still need to hit the right internal temperature for food safety and best taste.
The target internal temperature for a fully cooked precooked ham is 140°F. For a cook-before-eating ham, you need to reach 160°F. Always insert the thermometer into the thickest part of the meat, avoiding the bone if possible.
Other signs that your ham is done include:
- The ham feels firm but springy when pressed gently.
- The juices run clear, not pink or cloudy.
- The glaze has a deep golden-brown color.
- A meat thermometer reads at least 140°F in the center.
If you do not have a meat thermometer, you can cut into the thickest section. The meat should be hot all the way through with no cold spots. However, a thermometer is much more reliable and takes all the guesswork out of the process.
Common Signs of Overcooked Ham
Overcooked ham becomes dry and tough. The edges may look dark brown or even charred while the center is still warm. If you notice this happening, your oven may run hot or you baked the ham for too long.
To avoid this, check the temperature early and often. It is always better to pull the ham out slightly early and let carryover cooking finish the job. The internal temperature will continue to rise by a few degrees after you remove it from the oven.
Tips For Perfect Leftover Ham
One of the best things about baking a precooked ham is that there are always leftovers. The good news is that leftover ham reheats beautifully in the oven or microwave. Here are some tips for making the most of your leftovers.
Reheating Sliced Ham
Wrap individual slices in foil and place them in a 325°F oven for about 10 minutes. This warms them gently without drying them out. You can also reheat slices in the microwave for 30 to 60 seconds for a quick meal.
Using Leftover Ham in Recipes
Leftover ham is incredibly versatile. Try it in these popular dishes:
- Ham and cheese omelet: A quick and protein-packed breakfast.
- Ham fried rice: Chop the ham and toss it with rice, vegetables, and soy sauce.
- Ham and pea soup: Simmer leftover ham bones with peas, potatoes, and herbs for a hearty soup.
- Ham sliders: Layer thin ham slices on slider buns with cheese and pineapple rings.
- Ham pasta salad: Cube the ham and mix it with pasta, vegetables, and a creamy dressing.
Store leftover ham in the refrigerator within two hours of baking. It will keep for up to four days in the fridge or up to three months in the freezer. Proper storage keeps the ham fresh and safe to eat.
Common Mistakes When Baking Precooked Ham
Even though baking a precooked ham is simple, people still make mistakes that affect the final result. Here are some common pitfalls to avoid.
Adding the Glaze Too Early
This is the number one mistake people make. The sugars in glazes burn quickly at high temperatures. Adding the glaze at the start of baking leads to a bitter, blackened exterior. Always wait until the last 20 to 30 minutes to add your glaze.
Skipping the Meat Thermometer
Guessing the internal temperature can lead to undercooked or overcooked ham. A meat thermometer costs just a few dollars and takes all the guesswork out of the process. It is an essential tool for any home cook.
Not Letting the Ham Rest
Skipping the resting period means the juices run out when you cut into the ham. The meat ends up dry and less flavorful. Always let the ham rest for at least 15 minutes after it comes out of the oven.
Baking at Too High a Temperature
Some people crank the oven up to 375°F or higher to save time. This might work for raw meat, but it is a bad idea for precooked ham. High heat dries out the meat and burns the glaze before the inside is warm enough.
Forgetting to Score the Ham
Scoring the ham is not just about looks. The cuts allow the glaze to penetrate the meat and add flavor throughout. Skip this step, and you will end up with a ham that looks plain and tastes less flavorful.
Expert Tips for the Perfect Oven-Baked Ham
Professional chefs and home cooking experts share a few extra tips that can elevate your ham from good to outstanding.
Choose a good-quality ham. Look for hams that are labeled “natural juices” or “water-added.” These tend to be more flavorful than those packed in brine. A bone-in ham from a local butcher is often the best choice for flavor and moisture.
Use the broth from the package. If your ham came with a juice packet, you can use it to deglaze the pan. Add it to the water or juice in the bottom of your roasting pan for extra flavor.
Let the ham sit at room temperature before baking. This small step can reduce the overall baking time and help the ham heat more evenly. Just 20 to 30 minutes on the counter makes a big difference.
Baste the ham halfway through. Spoon the pan juices over the ham about halfway through the baking time. This adds moisture and flavor to the surface of the meat.
Add whole cloves or pineapple rings for presentation. Studding the ham with whole cloves or topping it with pineapple rings is a classic move. It looks beautiful on the table and adds a subtle flavor dimension.
Save the bone. After you carve the ham, do not throw away the bone. Ham bones make excellent stock for soups, beans, and stews. Freeze it until you are ready to use it.
How Much Ham To Buy Per Person
Planning the right amount of ham for your guests can be tricky. A good rule of thumb is about a half-pound of bone-in ham per person. For boneless ham, plan for about a quarter-pound per person.
Keep in mind that bone-in hams have less edible meat because of the bone. If you are serving a crowd, it is better to buy a slightly larger ham than you think you need. Leftover ham is always welcome, and it makes great meals for days afterward.
For a family of six, a 10 to 12-pound bone-in ham is a great choice. For a smaller gathering of four, a 7 to 8-pound ham should be plenty. Always check the package weight to make sure you are getting the right size for your needs.
Frequently Asked Questions
Can you bake a precooked ham at a higher temperature to save time?
It is not recommended. Baking at higher temperatures can burn the outside of the ham while the inside stays cold. Stick to 325°F for the best results. The extra time is worth the evenly heated, moist, and flavorful ham you will get in the end.
Do you need to cover a precooked ham with foil while baking?
Covering the ham with foil for the first part of baking helps keep it moist. You can remove the foil during the last 20 to 30 minutes to let the glaze brown and crisp up. This two-step approach gives you the best of both worlds: tender meat and a beautiful glaze.
What is the difference between a fully cooked ham and a cook-before-eating ham?
A fully cooked ham has already been roasted or smoked and is ready to eat after reheating. A cook-before-eating ham has been cured but not fully cooked and must reach 160°F internally before it is safe to eat. Always check the label on the package to know which type you have.
Can you freeze leftover baked ham?
Yes, you can freeze leftover baked ham for up to three months. Wrap it tightly in plastic wrap and then in aluminum foil, or store it in an airtight freezer bag. Thaw it in the refrigerator overnight before reheating for the best results.
How do you keep a baked ham from drying out?
The key is to add moisture during baking. Place water, broth, or juice in the bottom of the pan. Cover the ham with foil for most of the baking time. And always let the ham rest for 15 to 20 minutes after it comes out of the oven. These simple steps make a big difference in keeping the ham juicy.
What is the best way to reheat sliced precooked ham?
The best way is to wrap slices in foil and reheat them in a 325°F oven for about 10 minutes. This keeps the slices moist and warm without drying them out. For a quicker option, you can reheat slices in the microwave for 30 to 60 seconds at medium power.
Conclusion
Baking a precooked ham in the oven is one of the easiest and most rewarding things you can do in the kitchen. Once you understand how long to bake precooked ham in oven and the right temperature to use, the process becomes second nature. A 10 to 15 minute per pound rule at 325°F is your go-to guideline for almost any size ham.
Remember to use a meat thermometer, apply your glaze in the last 20 minutes, and always let the ham rest before slicing. These small steps make a huge difference in the final result. Your ham will be moist, flavorful, and beautifully glazed every time you bake it.
Whether you are serving a bone-in spiral ham for the holidays or a boneless ham for a casual weeknight dinner, the principles stay the same. Prep it, bake it, glaze it, and let it rest. That is all it takes to serve a stunning ham that your family and friends will love.
Now that you have all the tips and techniques, it is time to put them into practice. Pick up a quality precooked ham, grab your favorite glaze recipe, and get that oven preheated. You are going to bake the best ham you have ever made. Enjoy every bite and the compliments that are sure to follow.