How To Make Perfectly Crispy Onion Rings In The Oven
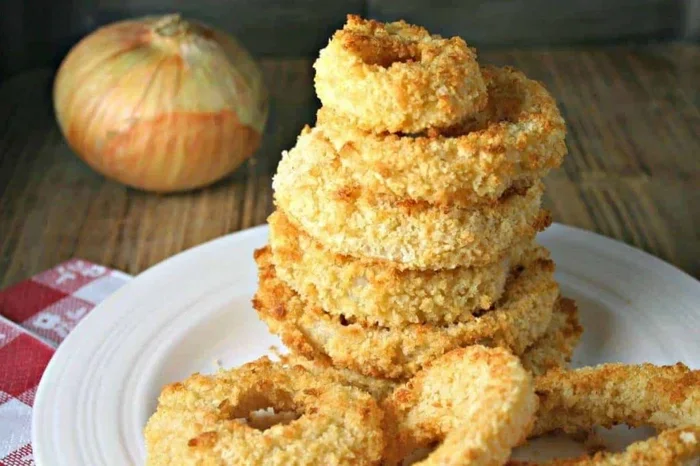
Learn how to make perfectly crispy onion rings in the oven with this simple, step-by-step guide. You will discover the secret to golden, baked onion rings that taste just like the deep-fried version but with much less grease. This easy recipe uses panko breadcrumbs and a buttermilk soak to create a savory snack everyone will love.
There is nothing quite like a plate of hot, crispy onion rings. They are the ultimate side dish or savory snack for any occasion. Whether you are watching a football game or hosting a family dinner, a plate of onion rings brings everyone together. But traditional deep-fried versions can feel heavy, greasy, and a bit intimidating to make at home. The smell of hot oil, the mess to clean up, and the worry of splashing burns can put a damper on the fun. That is exactly why learning how to make onion rings in the oven is a total game changer. You get all the satisfying crunch and savory flavor without the guilt of excess oil. It is a much simpler way to bring this beloved treat to your dinner table. You do not need any special equipment, just a hot oven and a little patience.
Making baked onion rings at home is easier than you might think. With the right crispy batter and a hot oven temperature, you can achieve golden brown perfection right on your baking sheet. This method turns a kitchen staple into a low-fat snack that the whole family will devour. Whether you are hosting a party or just craving a tasty treat, this approach works beautifully. The beauty of baking is that it is hands-off. You can prep the onions, mix the batter, and pop them in the oven. While they cook, you can prepare your other dishes or set the table. Let us dive into the secrets of making oven-fried onions that rival any restaurant.
When you bite into a perfectly baked ring, the sound of the crunch is music to your ears. The inside stays soft and sweet, while the outside is shatteringly crisp. Many people think you need a deep fryer to get this texture. But your standard home oven can do just as well, if not better. You just need to know the right techniques. This guide will walk you through every single step. You will learn how to prep the onions, mix the batter, and bake them to absolute perfection. By the end, you will be a pro at making how to make onion rings in the oven like a seasoned chef. We will cover everything from picking the right onions to serving them up hot. Get ready to elevate your snack game.
Key Takeaways
- Oven-baked onion rings are healthier: They use less oil than deep-fried versions.
- A wire rack is essential: It keeps the bottoms crispy and prevents sogginess.
- Buttermilk is the secret ingredient: It helps the batter stick perfectly.
- Panko breadcrumbs add extra crunch: They create a lighter, airier coating.
- Preheat your oven properly: A hot oven ensures the rings crisp up fast.
- Fresh onions work best: They hold their shape better during baking.
📑 Table of Contents
- Why Oven-Baked Onion Rings Are A Game Changer
- Ingredients You Need For The Perfect Crispy Coating
- Step-by-Step Instructions For Oven Onion Rings
- Expert Tips For Maximum Crispiness
- Common Mistakes To Avoid
- Oven-Baked vs Deep-Fried: A Comparison
- Choosing The Best Dipping Sauces
- How To Store Leftover Onion Rings
- Conclusion
Why Oven-Baked Onion Rings Are A Game Changer
When you crave crispy coating onion rings, the deep fryer often seems like the only option. However, your oven can do wonders. Baking is a much simpler way to get that satisfying crunch. It is also a fantastic deep-fried alternative that fits easily into a healthier lifestyle. You do not have to worry about splattering hot oil or filling your kitchen with smoke.
The Health Benefits
Deep frying soaks food in oil. This adds a lot of extra calories and fat. Baking uses cooking spray or a light brush of oil. You still get a crispy exterior but with a fraction of the calories. It is the perfect way to enjoy your favorite treats without the heavy feeling that comes after eating deep-fried food. Many people love homemade fries and baked goods for this exact reason. You get the flavor you crave, but with a much cleaner finish. Your body will feel lighter, and you will not feel weighed down.
Better Texture Than You Think
Some folks worry that baked onion rings will be soft or chewy. But if you follow the right steps, they turn out incredibly crunchy. The key lies in the batter and the oven setup. When done right, the crispy batter shatters with every bite. You will not miss the deep fryer one bit. The secret is all about removing moisture and using the right breading. Once you master these basics, the texture will blow you away.
Ingredients You Need For The Perfect Crispy Coating
Great oven-fried onions start with great ingredients. You do not need a long grocery list. Most items are probably already in your pantry. Having everything ready before you start is a great way to make the process smooth and fun. Here is what you need to gather before you begin.
Choosing The Right Onions
The foundation of any great ring is the onion itself. Fresh onions work best for this recipe. Sweet onions like Vidalia are a popular choice because they are mild and large. Yellow onions are also excellent. They hold their shape well during baking. Avoid using tiny onions, as they will fall apart in the oven. You want big, sturdy rings that can handle the crispy coating without getting mushy. The size of your onion also determines how long you need to bake them. Larger rings might need an extra minute or two.
The Batter Basics
The batter is what makes the magic happen. You need a few simple kitchen staples to put it together. Buttermilk is the MVP here. It tenderizes the onion and helps the breading cling perfectly. Panko breadcrumbs are the secret to ultimate crunch. They are lighter than regular breadcrumbs and bake up beautifully. They create air pockets that make the coating extra crispy. You will also need flour, eggs, and spices. Salt, pepper, and garlic powder add a nice savory kick. Paprika gives a subtle smoky flavor that pairs wonderfully with the sweetness of the onion.
Step-by-Step Instructions For Oven Onion Rings
Now comes the fun part. Making how to make onion rings in the oven is a simple process. Just follow these steps, and you will have a fantastic savory snack ready in no time. Take your time with the breading process. Rushing it is the quickest way to lose the coating.
Prepping The Onions
Start by peeling your fresh onions. Cut them into thick rings, about a quarter-inch wide. Separate the rings carefully. Some might break, and that is okay. You can use those broken pieces too. Place the rings in a bowl of cold water to remove any harsh sulfur taste. Pat them completely dry with paper towels. Moisture is the enemy of crispy batter. If the onions are wet, the flour will clump and the breading will slide right off. Take the time to dry each ring thoroughly. This small step makes a huge difference in the final result. You can also let them soak in a bowl of ice water for about thirty minutes. This not only removes the strong flavor but also makes the onion extra crunchy when baked. After soaking, make sure to dry them completely again. The drier the onion, the crispier the final product will be.
Building The Batter
Set up your breading station. You will need three shallow dishes. In the first, put all-purpose flour. In the second, whisk together eggs and buttermilk. In the third, combine panko breadcrumbs with your spices. Now, take each onion ring and dip it into the flour. Shake off the excess. Next, dip it into the egg mixture. Let the excess drip off. Finally, press it firmly into the panko. Make sure the coating is even and thick. This triple-dip method ensures nothing falls off during baking. The flour helps the egg stick, and the egg helps the panko stick. It is a simple science that works every time. Do not rush this process. Taking your time ensures each ring is fully covered. You can also add a little bit of cornstarch to your flour for an extra crispy texture. Cornstarch absorbs moisture and creates a lighter, airier crust. This is a secret trick used by many professional kitchens.
Baking To Perfection
Preheat your oven to 425 degrees Fahrenheit. Line a baking sheet with parchment paper. Place a wire rack on top of the sheet. This is crucial for even airflow. Spray the rack lightly with cooking spray. Arrange the breaded rings on the rack. Do not crowd them. Leave space between each ring so the hot air can circulate freely. Bake for about 15 to 20 minutes. Flip them halfway through using tongs. You know they are done when they look golden brown and sound hollow when tapped. The edges should be slightly darker than the center. Let them rest for a minute before serving. This helps the coating set and stay crisp. The resting time allows the internal structure to firm up. If you cut into them immediately, the soft onion inside might cause the coating to collapse. A little patience goes a long way toward perfect baked onion rings.
Expert Tips For Maximum Crispiness
Want your oven-fried onions to be absolutely perfect? A few simple tweaks can make a huge difference. These tips will elevate your crispy coating from good to restaurant-quality. Professional chefs use these tricks all the time to get that perfect crunch.
The Wire Rack Secret
Never place your onion rings directly on a flat baking sheet. The bottoms will steam and get soggy. A wire rack allows the hot air to flow all around the baked onion rings. It mimics the effect of a deep fryer perfectly. The result is an evenly crispy exterior on all sides. If you do not have a wire rack, you can use a cooling rack over your baking sheet. This is one of the most important steps for achieving that perfect crunch. The air circulation is what sets oven-baked rings apart from pan-fried ones. Without that airflow, the bottom of your rings will be pale and soft. Nobody wants a soggy bottom on their crispy snack.
Temperature Control
Oven temperature is everything. Make sure your oven is fully preheated before the rings go in. A hot oven immediately sets the batter. This creates a seal that keeps the onion moist inside. If the oven is too cool, the breading will absorb oil and become limp. Use an oven thermometer if you are unsure. Accuracy here is the difference between crispy and soggy. An oven that is just 25 degrees too low can change the entire outcome of your recipe. Trust the thermometer, not just the dial on your oven. Investing in a cheap oven thermometer is one of the best decisions a home cook can make. It takes the guesswork out of baking.
The Cold Batter Trick
Here is a pro tip that many people overlook. Keep your batter cold. Cold batter fries up harder and crispier than room-temperature batter. You can even place the breaded rings in the fridge for ten minutes before baking. This helps the coating set firmly. When it hits the hot oven, it puffs up and crisps immediately. It is a small trick that yields big results. Your oven-fried onions will have an even thicker, crunchier shell. The cold batter also prevents the onion from cooking too fast, ensuring a perfect texture contrast between the crunchy outside and the sweet inside.
Common Mistakes To Avoid
Even with a great recipe, small errors can ruin your crispy batter. Watch out for these common pitfalls when making how to make onion rings in the oven. Avoiding these mistakes will save you time and frustration in the kitchen.
Overcrowding The Pan
It is tempting to fit as many rings as possible on the sheet. But overcrowding traps steam. Steam makes the breading soft and prevents it from crisping up. Give your rings plenty of room. If you need to make a large batch, use two baking sheets. It is better to bake in two rounds than to ruin a whole tray. The space between the rings allows the heat to reach every surface. Think of it like parking cars; if they are too close, nothing can breathe. You want hot air to surround each ring completely. This ensures even browning and a consistent crunch across the entire batch.
Skipping The Soak
Raw onions can taste sharp and spicy. Soaking them in cold water removes that bite. It also pulls out excess moisture. If you skip this step, your onion rings might burn on the outside while staying raw inside. Take the extra ten minutes to soak and dry them. Your taste buds will thank you. A quick soak in salted water can also season the onion from the inside out, adding another layer of flavor to your savory snack. The salt draws out the water slowly, which helps the onion become tender without falling apart. It is a small step that makes a massive difference in the final eating experience.
Using Old Spices
Do not forget about your spices. Old, expired spices lose their flavor over time. If your garlic powder or paprika has been in the cabinet for over a year, it might be time to replace it. Fresh spices make a huge difference in the taste of your baked onion rings. They bring out the natural sweetness of the onion and add depth to the crispy batter. Smell your spices before using them. If they do not have a strong aroma, they will not add much flavor to your dish. Fresh ingredients are the foundation of any great recipe.
Oven-Baked vs Deep-Fried: A Comparison
How do baked onion rings really stack up against their deep-fried cousins? Let us look at the facts. Understanding the differences helps you choose the best method for your needs. Both have their place, but one might suit your lifestyle better than the other.
| Feature | Oven-Baked | Deep-Fried |
|---|---|---|
| Oil Usage | Minimal (cooking spray only) | High (full submersion) |
| Calorie Count | Lower | Higher |
| Texture | Crispy, slightly lighter | Ultra-crispy, heavier |
| Prep Time | 15 minutes | 15 minutes |
| Cook Time | 15-20 minutes | 2-3 minutes |
| Clean Up | Easy (baking sheet) | Messy (oil disposal) |
As you can see, baking wins in many categories. It is much easier to clean up, and you avoid the mess of disposing of hot oil. While deep-fried rings have a slightly denser crunch, the baked onion rings are still incredibly satisfying. For everyday snacking, the oven method is hard to beat. It is a deep-fried alternative that fits right into a busy lifestyle. You can make a large batch without worrying about oil splatter. It is also much safer for kids to help with. They can easily dip and bread the rings without any risk of burns. The oven method truly democratizes the joy of making onion rings at home.
Choosing The Best Dipping Sauces
No plate of oven-fried onions is complete without a great dipping sauce. The right sauce adds moisture and extra flavor. It can turn a simple snack into a gourmet experience. Sauces are the perfect way to customize your rings. You can make a different sauce for each member of the family. Here are a few fantastic options to try.
Classic ranch is a timeless favorite. The creamy, herby flavor pairs perfectly with the savory onion. For something a little tangier, try a honey mustard sauce. It adds a sweet and zesty kick that cuts through the richness of the batter. If you like spicy food, a sriracha mayo is an excellent choice. Mix some sriracha into mayonnaise, a squeeze of lime, and a pinch of salt. You can also keep it simple with ketchup. Sometimes the classics are the best. Experiment with different sauces to find your personal favorite. Aioli is another great option. Garlic aioli adds a rich, creamy texture that complements the crunch of the crispy coating beautifully.
How To Store Leftover Onion Rings
Sometimes you make more than you can eat. That is perfectly fine! Baked onion rings store well if you do it correctly. The biggest enemy of leftover rings is moisture. You want to keep them as dry as possible. Proper storage ensures you can enjoy your savory snack for days after you make them.
Let the rings cool completely on a wire rack. Do not put them in a sealed container while they are still warm. The trapped steam will make the coating soggy. Once cool, place them in an airtight container lined with a paper towel. You can store them in the refrigerator for up to three days. To reheat, place them back in the oven at 400 degrees for 5 to 7 minutes. Avoid using the microwave. It will make the coating chewy and soft. The oven brings back that golden brown crunch perfectly. This way, you can enjoy your oven-fried onions for days. Reheating in the oven is the only way to maintain that crispy coating texture. The microwave just steams the breading, which is the opposite of what you want.
Conclusion
Making how to make onion rings in the oven is a rewarding experience. You get to enjoy a delicious, low-fat snack that is crispy and satisfying. By using panko breadcrumbs and a wire rack, you achieve the perfect crunch. This deep-fried alternative proves that healthy does not mean sacrificing flavor. You can impress your guests or simply treat yourself to a guilt-free indulgence.
Next time you crave a savory snack or a great side dish, skip the deep fryer. Pull out your baking sheet and preheat the oven. With this guide, you can create golden brown oven-fried onions that everyone will love. Serve them with your favorite dipping sauce and enjoy the crisp, savory goodness. Your kitchen will smell amazing, and your waistline will thank you. Practice makes perfect, so do not be discouraged if your first batch is not flawless. Keep trying, adjust the seasonings to your liking, and soon you will be making the best baked onion rings on the block. Happy baking and enjoy every single crispy bite!
Frequently Asked Questions
Can I use regular breadcrumbs instead of panko?
Yes, you can, but panko is highly recommended. Panko creates a lighter, airier crunch that holds up better in the oven. Regular breadcrumbs can become dense and soggy if you are not careful. If you must use regular breadcrumbs, try toasting them first for a few minutes to add extra crunch before you coat the onions.
How do I prevent the onion rings from falling apart?
The triple-dip method is your best friend here. Make sure each ring is fully coated in flour, egg, and panko. Also, let the breaded rings rest on a wire rack for five minutes before baking. This allows the coating to set and adhere to the onion firmly. If you skip this resting step, the breading might slide off during cooking.
What is the best way to reheat leftover onion rings?
The oven is the only way to reheat them properly. Place them on a wire rack at 400 degrees Fahrenheit for about 5 to 7 minutes. Avoid the microwave at all costs, as it will make the coating chewy and soft. The oven restores the crispiness and keeps the inside warm and tender.
Can I freeze unbaked onion rings?
Absolutely! You can bread the rings and place them on a baking sheet lined with parchment paper. Freeze them until they are solid, then transfer them to a freezer bag. When you are ready to bake, do not thaw them first. Just add a few extra minutes to the baking time. This is a great meal prep trick for busy days.
Why are my baked onion rings soggy?
Sogginess usually comes from trapped moisture. Make sure you dry the onion rings thoroughly after soaking them. Also, avoid overcrowding the baking sheet, as this traps steam. Using a wire rack instead of a flat baking sheet is crucial for airflow. If you follow these steps, your crispy coating will stay perfectly crunchy.
Are oven-baked onion rings healthy?
They are a much healthier alternative to deep-fried rings. Baking uses minimal oil, which significantly reduces the calorie and fat content. You still get the savory flavor and crispy texture you love, but with a much lighter nutritional profile. They are a great low-fat snack that you can feel good about eating.