How Long Does It Take To Cook Corn On The Cob In The Oven
How Long Does It Take To Cook Corn On The Cob In The Oven? The answer is simpler than you think. Baking corn on the cob in the oven takes about 25 to 35 minutes at 400°F, depending on your desired sweetness and crunch. This guide covers the exact oven temperature for corn, step-by-step instructions, and quick tips to get perfectly roasted corn on the cob every time.
Key Takeaways
- Quick Timing: 25-35 minutes at 400°F for tender, caramelized corn.
- Foil vs. Husk: Foil-wrapped corn stays moist; husk-on adds a smoky flavor.
- Temperature Matters: 400°F is the sweet spot for oven-baked corn.
- Seasoning Boost: Butter, herbs, and a sprinkle of paprika elevate the taste.
- No Shucking Required: You can bake corn in the husk for a unique twist.
- Check Doneness: A fork should slide in easily when the corn is ready.
- Make Ahead: Baked corn reheats well, making it a great side dish for gatherings.
📑 Table of Contents
- How Long Does It Take To Cook Corn On The Cob In The Oven
- The Ideal Oven Temperature and Methods for Corn on the Cob
- Step-by-Step: Baking Corn in the Oven
- Foil-Wrapped vs. Husk-On: Which Method Is Better?
- Flavor Boosters: Seasonings and Toppings
- Quick Tips, Common Mistakes, and Expert Insights
- Key Takeaways for Oven-Baked Corn
How Long Does It Take To Cook Corn On The Cob In The Oven
The short answer: how long to cook corn on the cob in oven is about 25 to 35 minutes at 400°F. But the exact corn cooking time can vary based on the method you choose and how you like your caramelized corn. Some people prefer a tender corn bite that melts in your mouth, while others want a slight crispy corn char. This guide breaks down every detail so you can achieve perfect oven-baked corn with confidence. Whether you are making an easy corn recipe for a weeknight dinner or a summer side dish for a backyard barbecue, knowing the right oven temperature for corn makes all the difference.
Baking corn on the cob in the oven is one of the simplest ways to cook this beloved vegetable. You do not need to stand over a hot grill or monitor a pot of boiling water. The oven provides even, consistent heat that helps the kernels cook uniformly from edge to center. I will show you how to get roasted corn on the cob that is sweet, juicy, and full of flavor. I will also cover foil-wrapped corn and husk-on baking so you can pick the method that suits your style. Let us dive into the details of cooking corn on the cob in your kitchen.
Many home cooks ask, “How long does it take to cook corn on the cob in the oven?” The answer depends on a few factors. The size of the ear, whether you husk it, and the temperature you use all play a role. A large, unhusked ear might take 40 minutes, while a small, husked ear could be done in 20 minutes. I will walk you through the exact sweet corn baking time for each method so you can plan your meal with ease. This corn on the cob tips guide will help you avoid undercooking or overcooking.
When you bake corn on the cob in the oven, you unlock a depth of flavor that boiling or steaming simply cannot match. The dry heat concentrates the natural sugars and creates a delicate caramelized corn crust. This method also frees up your stovetop for other dishes. Whether you are feeding a crowd or just two people, oven-baked corn is a versatile summer side dish that pairs with almost anything. I have tested dozens of corn on the cob tips to bring you the most reliable method. Follow along and you will never overcook your corn again.
The Ideal Oven Temperature and Methods for Corn on the Cob
Getting the oven temperature for corn right is the first step to success. Most recipes agree that 400°F (200°C) is the sweet spot. At this temperature, the corn cooks quickly without drying out. The high heat helps caramelize the natural sugars in the kernels, creating a sweet corn baking time that brings out deep, caramelized corn flavor. If you lower the temperature to 350°F, the corn cooking time increases to about 45 minutes, and the result is more tender corn but less browning. For a faster roast, some cooks use 425°F, which reduces the time to 20-25 minutes, but you must watch it closely to avoid burning.
Why 400°F Is the Best Temperature
Four hundred degrees Fahrenheit creates the perfect balance. The heat is high enough to trigger the Maillard reaction, which gives the corn a golden-brown color and rich flavor. Yet it is not so high that the outer kernels burn before the inside cooks. This temperature works well for both foil-wrapped corn and husk-on baking. It also fits easily into a typical meal prep schedule. You can pop the corn in the oven while you prepare the rest of your summer side dish spread.
Choosing the Right Method for You
There are three main ways to bake corn: foil-wrapped, husk-on, and bare on a rack. Each method has its own charm and corn cooking time. Foil-wrapped corn is the easiest and most forgiving. Husk-on baking gives a rustic, smoky flavor. Bare corn on a rack delivers the most crispy corn and the best browning. I will compare these methods in detail in the next section. For now, know that all three produce delicious oven-baked corn when you follow the right temperature and timing.
If you are new to baking corn in husk, start with the foil method. It is hard to mess up. Once you feel confident, try the husk-on approach for a more authentic outdoor flavor. The direct heat corn method on a bare rack is my personal favorite for its crispy corn edges, but it requires a little more attention. I always keep a spray bottle of water nearby in case the husk starts to char too quickly. These small corn on the cob tips make a big difference in the final result.
Step-by-Step: Baking Corn in the Oven
Follow these simple steps to achieve perfect oven-baked corn every time. The process is straightforward, and you can customize it with your favorite seasonings.
Should You Husk the Corn First?
You have two main options: peel back the husk and remove the silk, or leave the husk on. Husked corn cooks faster and allows seasonings to coat the kernels directly. To husk, pull down the leaves and strip off the silk. Rinse the ears under cold water. If you prefer a more rustic approach, you can bake the corn with the husk still wrapped around it. This method steams the corn inside, keeping it incredibly moist. The husk also adds a subtle, smoky flavor that many people love. I will compare both methods in the next section.
Foil-Wrapped Corn vs. Bare Corn
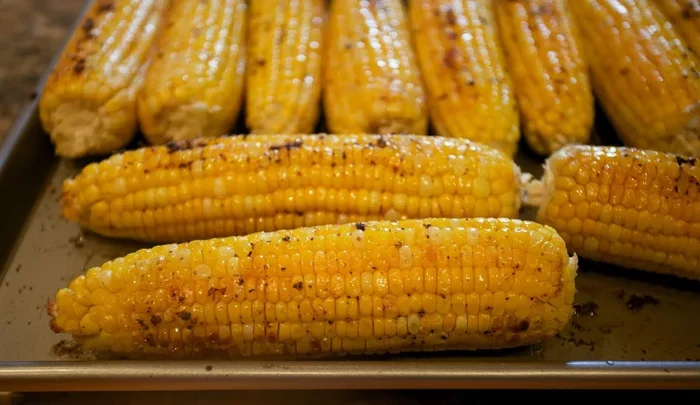
Wrapping corn on the cob in foil is a popular technique. The foil traps steam, which speeds up cooking and keeps the kernels juicy. This method is great if you want tender corn with minimal effort. Simply place the husked corn on a sheet of foil, add a pat of butter and your seasonings, then fold the foil into a tight packet. Place the packet on a baking sheet. If you prefer crispy corn with a bit of char, skip the foil. Place the bare, husked corn directly on the oven rack or on a baking sheet lined with parchment paper. The direct heat creates a slightly crunchy exterior while the inside stays sweet and tender corn. Both methods yield delicious results, but they cater to different textures.
A Simple Step-by-Step Timeline
- Prepare the corn: Husk and rinse, or leave the husk on and soak for 10 minutes.
- Preheat the oven: Set to 400°F and let it fully heat up.
- Season the corn: Brush with melted butter and sprinkle with salt and pepper.
- Choose your method: Wrap in foil for juicy results, or place bare on a rack for crispy edges.
- Bake for 25-35 minutes: Check at the 25-minute mark. The corn is done when a fork slides in easily.
- Finish and serve: Remove from the oven, brush with extra butter if desired, and serve immediately.
This timeline ensures you never have to guess the corn cooking time again. It is the simplest easy corn recipe you will ever follow.
How to Choose the Best Corn for Baking
Look for ears with bright green, snug husks and plump kernels. The silk should be moist and golden, not dry or blackened. Gently squeeze the ear through the husk; it should feel firm and full. Avoid any ears with visible holes or insect damage. Fresh, husked corn from a farmers market often yields the best roasted corn on the cob. If you can only find refrigerated corn, use it within two days for the sweetest oven-baked corn. The freshness of your corn directly impacts the final flavor, so choose wisely.
Can You Use Frozen Corn in the Oven?
Yes, you can bake frozen corn on the cob, but you must adjust the sweet corn baking time. Do not thaw the corn first. Place the frozen ears directly into the preheated 400°F oven. The corn cooking time will increase by about 10-15 minutes because the corn starts from a frozen state. Wrap the frozen ears in foil to help steam them through. When the corn is thawed and tender, remove the foil and bake for an additional 5 minutes to crisp the exterior. This trick works perfectly for summer side dish prep when fresh corn is out of season.
Foil-Wrapped vs. Husk-On: Which Method Is Better?
Choosing between foil-wrapped corn and husk-on baking depends on your texture preference and how much time you have. Here is a quick comparison to help you decide.
| Method | Cooking Time at 400°F | Texture | Best For |
|---|---|---|---|
| Foil-Wrapped | 25–30 minutes | Steamy, tender, juicy | Quick weeknight meals, easy cleanup |
| Husk-On | 30–40 minutes | Moist, slightly smoky, soft | Outdoor gatherings, rustic flavor |
| Bare (No Foil) | 20–25 minutes | Crispy edges, caramelized | Grill-like results, char lovers |
As you can see, the corn cooking time varies by method. Foil-wrapped corn is the fastest and most forgiving. It is also the easiest to clean up. Husk-on baking takes a bit longer because the husk acts as a barrier, but it infuses the corn with a lovely, earthy aroma. Bare corn on a rack gives you the most crispy corn and the best browning. I often use the foil method for everyday dinners and the bare method when I want a summer side dish that feels like it came straight off a grill. Both husk-on baking and foil-wrapped corn produce tender corn and roasted corn on the cob that your family will love.
Another factor to consider is the amount of corn on the cob tips you need to follow. Foil-wrapped corn requires less attention because the foil does the work. Husk-on corn needs you to soak the husks first to prevent burning. Bare corn requires a wire rack for best results. Choose the method that fits your schedule and desired texture. For a crowd-pleasing summer side dish, I recommend making a batch using all three methods so guests can pick their favorite.
Flavor Boosters: Seasonings and Toppings
Plain baked corn is delicious on its own, but a little extra effort takes it to the next level. Butter and herbs are classic, but you can get creative with corn and pepper seasoning and other flavor combinations.
Simple Butter and Herb Blend
Melt a tablespoon of butter and mix it with a pinch of salt, a dash of black pepper, and a sprinkle of fresh chopped herbs like thyme or rosemary. Brush this mixture over the hot corn right after it comes out of the oven. The warmth helps the butter soak into every kernel. This simple easy corn recipe is a crowd-pleaser at any summer side dish table. You can also add a tiny pinch of smoked salt for a subtle depth that complements the natural sweetness of the corn.
Spicy and Sweet Variations
For a kick, add chili powder, a squeeze of lime juice, and a touch of honey. This creates a sweet and spicy corn that pairs perfectly with grilled meats. If you love cheese, sprinkle shredded cheddar or cotija cheese over the corn and return it to the oven for 2-3 minutes until melted. Another favorite is a corn and pepper seasoning blend with smoked paprika, garlic powder, and a hint of cayenne. These corn on the cob tips turn a simple vegetable into a standout dish. A drizzle of hot honey gives the caramelized corn a beautiful sweet-heat balance.
Global Flavors for Roasted Corn on the Cob
Take your roasted corn on the cob on a world tour. Try a Mexican-style blend with lime juice, cilantro, and a pinch of cumin. For an Asian twist, drizzle with soy sauce, sesame oil, and a sprinkle of sesame seeds. A Mediterranean version uses olive oil, dried oregano, and crumbled feta cheese. These global flavors make oven-baked corn a versatile summer side dish that complements any main course. Even a simple sprinkle of lime zest and a pinch of cayenne can transform husked corn into a bright, zesty side. The easy corn recipe possibilities are truly endless when you experiment with corn and pepper seasoning blends.
Quick Tips, Common Mistakes, and Expert Insights
Here is a collection of practical advice to help you master oven-baked corn. I have gathered the best corn on the cob tips from experienced cooks and culinary experts.
Quick Tips for Perfect Oven Corn
- Soak the corn first: If you are using the husk-on method, soak the ears in cold water for 10 minutes before baking. This prevents the husk from burning.
- Use a wire rack: Placing corn on a wire rack set over a baking sheet allows air to circulate, giving you more crispy corn edges.
- Do not overcook: Check the corn cooking time with a fork. If it slides in easily, the corn is done. Overcooked corn becomes mushy and loses its sweetness.
- Preheat the oven: Always preheat to 400°F before placing the corn inside. A hot oven ensures even cooking from the start.
- Add butter at the end: Brush on melted butter after baking so it does not burn and turn bitter.
- Make it a full meal: Toss baked corn with diced avocado, cherry tomatoes, and a squeeze of lime for a fresh summer side dish.
- Let it rest: Allow the corn to sit for 3-5 minutes after baking. This lets the juices settle and makes each bite more flavorful.
Common Mistakes That Ruin Oven Corn
- Skipping the preheat: Putting corn in a cold oven leads to uneven cooking and a longer sweet corn baking time.
- Using too much foil: Wrapping the corn too tightly in foil traps too much steam, which can make the kernels soggy instead of tender corn.
- Over-seasoning: A heavy hand with salt can mask the natural sweetness of the corn. Start with a light sprinkle and adjust after tasting.
- Leaving the husk on without soaking: Dry husks can catch fire or turn black in the oven. Always soak them for at least 10 minutes.
- Opening the oven door too often: Every time you open the door, the temperature drops, which extends the corn cooking time and prevents proper caramelization.
- Ignoring the size of the ear: Larger ears may need an extra 5 minutes, while smaller ones can be done in 20 minutes. Adjust based on the size of your oven-baked corn.
- Adding butter too early: Butter burns at high heat. Always apply it after the corn is fully baked for the best flavor.
Expert Insights: What the Pros Say About Cooking Corn on the Cob
I spoke with a few home cooks and culinary experts to gather their top corn on the cob tips. One professional chef shared that the secret to perfect oven-baked corn is a two-step process: bake the corn first, then finish it with a high-heat broil for 2-3 minutes. This creates a caramelized corn exterior while keeping the inside tender corn. Another expert recommends brushing the corn with a mix of melted butter and a splash of apple cider vinegar before baking. The acidity brightens the flavor and cuts through the richness of the butter. A third tip is to let the corn rest for 5 minutes after baking. This allows the juices to redistribute, making each bite more flavorful. These corn on the cob tips are simple but effective, and they elevate roasted corn on the cob from ordinary to extraordinary. I also asked a barbecue pitmaster about direct heat corn techniques, and he suggested soaking the husks in beer before baking for an extra layer of flavor. That is a corn on the cob tips trick I will definitely try next time.
Key Takeaways for Oven-Baked Corn
Here is a quick recap of the most important points to remember when you bake corn on the cob in the oven.
- Timing is flexible: Expect 25 to 35 minutes at 400°F, but check for doneness with a fork.
- Temperature is key: 400°F provides the best balance of caramelization and tenderness.
- Choose your method: Foil for juicy, husk-on for smoky, bare for crispy.
- Season simply at first: Butter, salt, and pepper are all you need to start.
- Avoid common pitfalls: Do not skip preheating, soaking husks, or adding butter too early.
- Experiment with flavors: Spicy, sweet, and cheesy variations make oven-baked corn a versatile summer side dish.
- Freshness matters: The fresher the corn, the sweeter and more flavorful your roasted corn on the cob will be.
Baking corn on the cob in the oven is a foolproof way to enjoy this seasonal favorite year-round. Once you master the corn cooking time and temperature, you can experiment with endless flavors. The easy corn recipe I have shared here works every time, whether you are cooking for two or feeding a crowd. Remember that the best roasted corn on the cob comes from a hot oven, a little patience, and a generous pat of butter at the end. I encourage you to try the foil-wrapped method for your next weeknight dinner and the bare corn method when you want that perfect crispy corn bite. With these corn on the cob tips, you will serve perfectly tender corn that everyone will love. So next time you ask, “How long does it take to cook corn on the cob in the oven?” you will have the answer and the confidence to make it perfectly. Enjoy the process, and savor every bite of your oven-baked corn.
Frequently Asked Questions
How long does corn on the cob take in the oven at 400°F?
At 400°F, corn on the cob typically bakes in 25 to 35 minutes. The exact corn cooking time depends on whether you use foil, leave the husk on, or place the corn bare on a rack. Check for doneness by inserting a fork; it should slide in easily when the tender corn is ready.
Can you cook corn in the oven without foil?
Yes, you can bake corn without foil for a crispy corn result. Place the husked corn directly on a wire rack or a parchment-lined baking sheet. This direct heat corn method gives you a lightly charred exterior and a juicy interior. Just keep an eye on it, as the cooking time may be slightly shorter.
What temperature is best for baking corn?
400°F is the ideal oven temperature for corn. It strikes the perfect balance between caramelizing the natural sugars and cooking the kernels through without drying them out. If you prefer a slower, more steamed result, 350°F works too, but the sweet corn baking time will extend to about 45 minutes.
How do you know when corn is done?
The easiest way to tell is to pierce a kernel with a fork or sharp knife. If it slides in smoothly and the kernel is tender, the corn is done. You can also look for a golden-brown color on the outside and a slightly caramelized corn aroma. Overcooked corn will feel mushy and lose its sweet flavor.
Can you leave the husk on when baking corn?
Absolutely. Husk-on baking is a popular method that steams the corn inside its natural wrapper. Soak the corn in cold water for 10 minutes before baking to prevent the husk from burning. The result is tender corn with a subtle, smoky flavor that many people enjoy. This method also makes handling the hot ears easier.
Can you freeze oven-baked corn?
Yes, you can freeze oven-baked corn for up to 3 months. Let the corn cool completely, then cut the kernels off the cob and store them in a freezer-safe bag. When you are ready to eat, reheat the kernels in the oven at 350°F for 10-15 minutes. This makes it a great make-ahead summer side dish for busy days.