How To Make A Coffee Facial Scrub At Home With Simple Steps
Making a coffee facial scrub at home is simple, affordable, and incredibly effective for glowing skin. This guide walks you through easy steps using just a few kitchen ingredients. You’ll learn how coffee grounds exfoliate, brighten, and rejuvenate your face naturally with a homemade recipe.
Have you ever looked at your morning coffee and thought, “This could do more than just wake me up”? Well, it can. A coffee facial scrub is one of the easiest and most effective DIY skincare treatments you can make right in your kitchen. If you have been searching for a natural face scrub that actually works, this guide is for you. We will walk you through every step of creating your own homemade facial scrub using simple ingredients you probably already have at home.
The beauty of a coffee scrub lies in its simplicity. Coffee grounds are packed with antioxidants and natural acids that help exfoliate dead skin cells, improve blood flow, and leave your face looking refreshed. Whether you are new to DIY skincare or a seasoned homemade beauty enthusiast, this coffee beauty recipe will become a staple in your routine. Let us dive into why coffee is so good for your skin and how to get started.
Key Takeaways
- Easy Ingredients: You only need coffee grounds, a carrier oil, and a natural sweetener to make an effective coffee facial scrub at home.
- Budget-Friendly: DIY coffee scrubs cost pennies compared to store-bought skincare products.
- Multiple Skin Benefits: Coffee exfoliates, reduces inflammation, fights free radicals, and promotes blood circulation for a radiant glow.
- Customizable: You can adjust the recipe based on your skin type, whether dry, oily, or sensitive.
- Quick To Make: The entire process takes less than five minutes with items already in your kitchen.
- Safe And Natural: Using organic ingredients means you avoid harsh chemicals found in commercial products.
📑 Table of Contents
- Why Coffee Is Great For Your Skin
- What You Need To Make A Coffee Facial Scrub
- Step By Step Guide To Making Your Coffee Facial Scrub
- Customizing Your Coffee Scrub For Different Skin Types
- How Often Should You Use A Coffee Facial Scrub
- Storing Your Homemade Coffee Scrub
- Common Mistakes To Avoid When Making A Coffee Scrub
- Expert Insights On Coffee Skincare
- Quick Tips For The Best Results
- Final Thoughts On Making A Coffee Facial Scrub
Why Coffee Is Great For Your Skin
Before we get into the steps, it helps to understand why coffee works so well as a skincare ingredient. Coffee is not just a morning pick-me-up. It has real, science-backed benefits for your skin that make it a standout choice for a natural exfoliator.
Exfoliation And Dead Skin Removal
The coarse texture of coffee grounds makes them a perfect natural exfoliant. When you gently massage them onto your face, they sweep away dead skin cells and unclog pores. This process, known as skin exfoliation, reveals the fresh, smooth skin underneath. Regular exfoliation helps your other skincare products absorb better too.
Antioxidant Powerhouse
Coffee is rich in antioxidants, especially chlorogenic acid. These antioxidants fight free radicals that damage your skin and cause premature aging. A caffeine skincare routine can help reduce the appearance of fine lines and keep your skin looking youthful.
Improved Blood Circulation
When you apply coffee to your skin, the caffeine stimulates blood flow to the surface. This increased circulation brings more oxygen and nutrients to your skin cells. The result is a natural, healthy glow that no store-bought product can fully replicate.
Anti-Inflammatory Properties
If you deal with redness or inflammation, coffee can help. Its natural anti-inflammatory compounds calm irritated skin and reduce puffiness. This makes a coffee face mask especially helpful for those with sensitive or acne-prone skin.
What You Need To Make A Coffee Facial Scrub
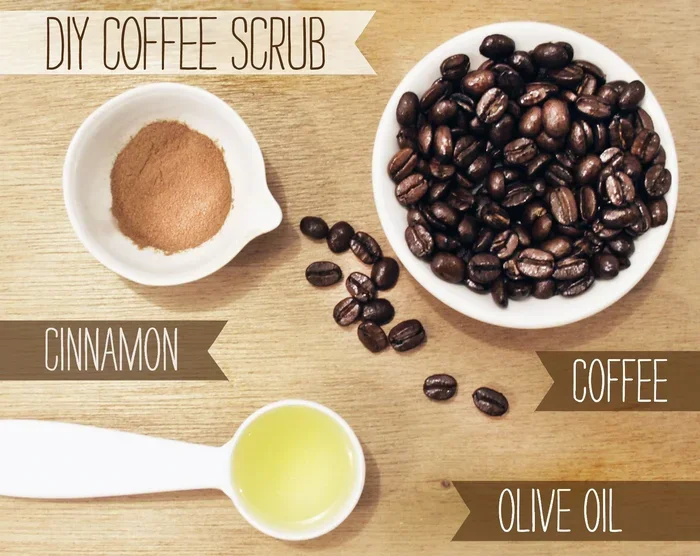
One of the best things about making a coffee scrub at home is that you need very few ingredients. Most of these are probably sitting in your kitchen right now. Here is what you will need:
- Used or fresh coffee grounds: One to two tablespoons. Used grounds work perfectly fine and are more eco-friendly.
- Carrier oil: Two tablespoons of coconut oil, olive oil, or sweet almond oil. These oils moisturize your skin while the coffee exfoliates.
- Natural sweetener (optional): One teaspoon of honey or brown sugar. Honey adds antibacterial benefits, while brown sugar provides extra gentle exfoliation.
- A small bowl and spoon: For mixing your scrub.
- A clean jar (optional): If you want to store your scrub for later use.
For the best results, choose organic coffee grounds whenever possible. Organic ingredients mean fewer pesticides and chemicals, which is especially important when you are putting something on your face. If you are new to kitchen skincare, start with this basic recipe and adjust from there.
Step By Step Guide To Making Your Coffee Facial Scrub
Now that you have your ingredients ready, let us make your coffee facial scrub. Follow these simple steps, and you will have a fresh, homemade natural skincare routine product in under five minutes.
Step One: Gather Your Ingredients And Tools
Place your small bowl on a clean surface. Measure out one to two tablespoons of coffee grounds. If you are using fresh grounds, let them cool completely first. Fresh hot grounds can irritate your skin. Next, measure two tablespoons of your chosen carrier oil and set them aside along with your honey or brown sugar.
Step Two: Mix The Coffee Grounds And Oil
Add the coffee grounds to your bowl. Pour the carrier oil over them. Using your spoon, mix the two together until the grounds are evenly coated. The oil should soak into the grounds just enough to make them moist but not dripping wet. This balance is key for a scrub that exfoliates without being too harsh.
Step Three: Add Your Sweetener Or Extra Exfoliant
If you are using honey, stir in one teaspoon now. Honey acts as a natural humectant, meaning it draws moisture into your skin. If you prefer a bit more texture, add one teaspoon of brown sugar instead. Brown sugar granules dissolve gently, adding a second layer of gentle exfoliator action.
Step Four: Test The Consistency
Pick up a small pinch of your mixture. It should hold together when pressed but not be runny. If it feels too dry, add a few more drops of oil. If it feels too wet, sprinkle in a little more coffee grounds. The perfect consistency is similar to wet sand.
Step Five: Apply To Your Face
Wash your face with warm water to open your pores. Using clean fingertips, take a small amount of the scrub and gently massage it onto your face in circular motions. Focus on areas like your nose, chin, and forehead where pores tend to be larger. Avoid the delicate skin around your eyes. Massage for about thirty seconds to one minute.
Step Six: Rinse And Moisturize
Rinse your face thoroughly with lukewarm water. Make sure to remove all coffee grounds, especially if you have smaller pores that could get clogged. Pat your face dry with a clean towel and follow up with your regular moisturizer. Your skin should feel soft, smooth, and immediately refreshed.
Customizing Your Coffee Scrub For Different Skin Types
Not all skin is the same, and your coffee beauty tips should reflect that. The basic recipe works well for most skin types, but you can tweak it to get even better results. Here is how to customize your DIY coffee mask for different needs.
For Dry Skin
If your skin tends to feel tight or flaky, increase the oil amount to three tablespoons. Avocado oil is an excellent choice for dry skin because it is rich in fatty acids. You can also add half a mashed ripe banana to the mix for extra hydration. Skip the brown sugar and stick with honey for a gentler touch.
For Oily Skin
Oily skin benefits from lighter oils. Switch to jojoba oil, which closely mimics your skin’s natural sebum and helps regulate oil production. Add a few drops of lemon juice for its astringent properties. Lemon juice helps control shine and can reduce the appearance of pores.
For Sensitive Skin
Sensitive skin needs the gentlest approach. Use finely ground coffee rather than coarse grounds. Skip the brown sugar entirely and use only honey as your additive. Coconut oil is soothing and less likely to cause irritation. Always patch test any new scrub on the inside of your wrist before applying it to your face.
For Acne-Prone Skin
Tea tree oil is a natural antibacterial agent that pairs wonderfully with coffee for acne-prone skin. Add two to three drops of tea tree essential oil to your scrub. Honey also has antibacterial properties, making it a great addition. Avoid using brown sugar if you have active breakouts, as the larger granules could irritate inflamed skin.
How Often Should You Use A Coffee Facial Scrub
Frequency matters when it comes to exfoliation. Using your coffee scrub too often can strip your skin of its natural oils and cause irritation. On the other hand, using it too rarely means you miss out on the benefits.
For most skin types, using a coffee facial scrub two to three times per week is ideal. This gives your skin enough time to benefit from the exfoliation and antioxidant properties without overdoing it. If you have sensitive skin, start with once a week and see how your skin responds before increasing frequency.
Pay attention to how your skin feels after each use. If it feels tight, dry, or irritated, you are exfoliating too often or the scrub is too coarse for your skin type. Adjust accordingly. Your skin will tell you what it needs.
Storing Your Homemade Coffee Scrub
You can make a batch of your coffee scrub ahead of time, but proper storage is important. Since this scrub contains no preservatives, it has a shorter shelf life than commercial products. Here is how to store it properly.
- Refrigerate: Store your scrub in an airtight container in the refrigerator. It will last up to one week.
- Freeze: For longer storage, freeze the scrub in ice cube trays. Pop out a cube when you need it. Frozen scrub lasts up to one month.
- Make Fresh: The best option is to make a small batch fresh each time. This ensures maximum potency and avoids any bacterial growth.
Always use clean, dry hands or a spoon to scoop out your scrub. Introducing bacteria into the mixture can cause skin problems. If your scrub develops an off smell or changes color, discard it immediately and make a fresh batch.
If you enjoy making things in the kitchen, you might also enjoy making smores at home without an oven as a fun and easy treat. Similarly, for a coffee-inspired dessert after your skincare routine, you can try baking a cheesecake in the oven with a coffee twist. And if you want something quick and sweet, making a cake in a microwave oven takes just minutes and pairs perfectly with a homemade coffee beauty treatment.
Common Mistakes To Avoid When Making A Coffee Scrub
Even though making a coffee scrub is straightforward, there are a few common mistakes that can reduce its effectiveness or even harm your skin. Here is what to watch out for.
- Using too coarse grounds: Extra coarse coffee grounds can create tiny abrasions on your skin. Choose a medium or fine grind for facial use. Save the extra coarse grounds for body scrubs.
- Scrubbing too hard: Vigorous scrubbing does not make the scrub work better. It can damage your skin barrier and cause redness. Use gentle, circular motions with light pressure.
- Skipping the patch test: Even natural ingredients can cause allergic reactions. Always test a small amount on your inner wrist and wait twenty-four hours before applying it to your face.
- Using the scrub on broken skin: If you have cuts, active acne, or open blemishes, skip the scrub. The coffee grounds can introduce bacteria and cause infection.
- Forgetting to moisturize after: Exfoliation removes dead skin but also some moisture. Always follow up with a good moisturizer to lock in hydration.
Expert Insights On Coffee Skincare
Dermatologists and skincare experts have long recognized the benefits of coffee for skin health. According to research published in the Journal of Cosmetic Dermatology, caffeine applied topically can help protect against UV damage and reduce the signs of photoaging. The antioxidants in coffee neutralize free radicals caused by sun exposure and pollution.
Many estheticians recommend coffee beauty recipes as a cost-effective alternative to expensive commercial exfoliants. The key is using fresh, quality ingredients and maintaining a consistent routine. A homemade facial scrub made with coffee grounds delivers real results when used properly and regularly.
One expert tip is to apply your coffee scrub before showering. The warm steam from your shower opens your pores and softens the dead skin, making the exfoliation more effective. After scrubbing, rinse with cool water to close your pores and seal in moisture. This simple technique elevates your natural skincare routine and maximizes the benefits of your coffee scrub.
Quick Tips For The Best Results
- Always use lukewarm water to rinse your face after scrubbing. Hot water can strip natural oils and dry out your skin.
- Do not use your coffee scrub on the same day you use a chemical exfoliant like glycolic acid. This can cause over-exfoliation and irritation.
- Add a few drops of lavender essential oil for a calming scent and additional skin-soothing benefits.
- Use your scrub in the evening. Your skin repairs itself during sleep, and exfoliating at night allows your products to penetrate more effectively.
- If your scrub feels too gritty, blend the coffee grounds briefly in a spice grinder to create a finer texture.
- Pair your scrub with a healthy diet and plenty of water for the best overall skin health.
Final Thoughts On Making A Coffee Facial Scrub
Creating your own coffee facial scrub at home is one of the simplest and most rewarding things you can do for your skin. With just a few ingredients from your kitchen, you get a powerful natural exfoliator that brightens, smooths, and refreshes your complexion. The process takes less than five minutes, costs almost nothing, and gives you full control over what goes on your face.
A homemade facial scrub like this is a perfect addition to any natural skincare routine. It works gently yet effectively, making it suitable for most skin types when used correctly. The antioxidant and anti-inflammatory properties of coffee make it more than just a scrub, it is a genuine skincare treatment.
Now that you know how easy it is to make your own coffee scrub, there is no reason not to try it. Gather your ingredients, follow the steps, and enjoy the satisfying feeling of smooth, radiant skin. Your face will thank you. Start today, and make coffee beauty a regular part of your self-care routine.
Frequently Asked Questions
Can I use any type of coffee grounds for a facial scrub?
Fine or medium ground coffee works best for facial scrubs. Coarse grounds meant for French press coffee can be too rough for your face and may cause micro-tears in the skin. If you only have coarse grounds, you can grind them down in a spice grinder to create a finer texture suitable for your skin.
How long can I store a homemade coffee facial scrub?
A fresh coffee scrub stored in the refrigerator in an airtight container lasts up to one week. For longer storage, freeze the scrub in ice cube trays where it will keep for up to one month. Always use clean utensils when scooping out the scrub to avoid introducing bacteria.
Will a coffee scrub stain my skin or face?
No, coffee grounds do not permanently stain your skin. Any slight discoloration from the scrub washes off easily with water. However, be careful around light-colored towels or clothing, as coffee can cause temporary stains on fabric.
Can I use a coffee scrub on my body as well?
Yes, a coffee scrub works wonderfully on the body too. You can use a slightly coarser grind for areas like elbows, knees, and feet. The scrub helps exfoliate dry skin, improve circulation, and may even reduce the appearance of cellulite over time with regular use.
Is it safe to use a coffee scrub every day?
Daily use of a coffee scrub is not recommended. Exfoliating too often can damage your skin barrier and cause irritation, redness, and dryness. Stick to two to three times per week for most skin types, and reduce to once a week if you have sensitive skin.
What should I do if my skin reacts to the coffee scrub?
If you experience redness, itching, or irritation after using a coffee scrub, rinse your face immediately with cool water. Discontinue use and apply a gentle moisturizer. If the irritation persists, consult a dermatologist. Always perform a patch test before using any new skincare product, even homemade ones.