How To Bake St Louis Ribs In The Oven Step By Step
Baking St Louis ribs in the oven is easier than you think. This step-by-step guide walks you through trimming, seasoning, and slow-baking pork ribs to perfection. You will learn how to get fall-off-the-bone tender ribs with a beautiful caramelized glaze right at home. No smoker or grill needed — just your oven and a little patience.
There is nothing quite like pulling a rack of St Louis ribs out of the oven. The kitchen smells like a backyard BBQ. The meat is tender, juicy, and practically falling off the bone. And the glaze on top? Pure magic. If you have always wanted to make restaurant-quality ribs at home, you are in the right place.
In this guide, we will show you exactly how to bake St Louis ribs in the oven step by step. Whether you are a beginner or a seasoned home cook, this method works every time. We will cover trimming, seasoning, baking, and saucing. By the end, you will feel confident enough to make this dish for your next family dinner or weekend gathering.
Key Takeaways
- Trim to a St Louis style: Removing the rib tips and membrane creates a neat, even rack that cooks beautifully.
- Low and slow is the way to go: Baking at 275°F ensures tender, juicy pork ribs without drying them out.
- A dry rub does the heavy lifting: A simple mix of brown sugar, paprika, and spices builds deep flavor before the sauce even touches the meat.
- Wrap in foil for tenderness: The Texas crutch method locks in moisture and speeds up the cooking process.
- Sauce it late: Applying BBQ sauce in the last 15-20 minutes prevents burning and lets it caramelize perfectly.
- Rest before slicing: Letting the ribs rest for 10 minutes keeps the juices locked inside every bite.
- Internal temperature matters: Aim for 195-203°F for the best texture and doneness.
📑 Table of Contents
- What Are St Louis Style Ribs?
- Tools and Ingredients You Will Need
- Step 1: Prep and Trim the Ribs
- Step 2: Set Up Your Oven
- Step 3: Bake the Ribs Low and Slow
- Step 4: Apply the Glaze
- Step 5: Rest and Serve
- Pro Tips for Perfect Ribs Every Time
- How to Store and Reheat Leftover Ribs
- Frequently Asked Questions
- Conclusion
What Are St Louis Style Ribs?
Before we get into the cooking, let us talk about what makes St Louis ribs special. St Louis style ribs come from the pork belly area. They are also called spare ribs, but they are trimmed differently. The rib tips are cut off, and the flap of cartilage is removed. This leaves you with a neat, rectangular rack that cooks evenly.
St Louis Ribs vs Baby Back Ribs
It helps to know the difference. Baby back ribs come from the top of the rib cage near the spine. They are smaller and leaner. St Louis ribs come from the belly side. They are fattier and have more connective tissue. That extra fat is a good thing. It melts during slow baking and makes the meat incredibly juicy. Many pitmasters prefer St Louis ribs because they have more flavor and a richer texture.
Why Bake Ribs in the Oven?
You might wonder why you should bake ribs in the oven instead of grilling or smoking them. The truth is, oven baking gives you excellent control. You set the temperature, and the oven does the work. No flare-ups. No weather worries. And the results are consistently delicious. Oven baked ribs can be just as good as smoked ribs when you follow the right steps.
Tools and Ingredients You Will Need
Getting ready is the first step to great ribs. You do not need a lot of fancy equipment. Here is what you will need.
Essential Tools
- Heavy-duty baking sheet or roasting pan — something that can handle the heat and catch drips.
- Wire rack — this lifts the ribs off the pan and lets hot air circulate evenly.
- Aluminum foil — for wrapping the ribs during the low-temperature phase.
- Meat thermometer — this is non-negotiable. You need to check the internal temperature.
- Sharp knife and cutting board — for trimming the rib tips and membrane.
- Pastry brush or spoon — for applying the sauce.
Ingredients for the Dry Rub
- 2 tablespoons brown sugar
- 1 tablespoon smoked paprika
- 1 tablespoon garlic powder
- 1 teaspoon onion powder
- 1 teaspoon chili powder
- 1 teaspoon cumin
- 1 teaspoon salt
- 1/2 teaspoon black pepper
- 1/2 teaspoon cayenne pepper (optional, for heat)
Ingredients for the Glaze
- 1 cup BBQ sauce (your favorite brand)
- 2 tablespoons apple cider vinegar
- 1 tablespoon honey
- 1 tablespoon brown sugar
Step 1: Prep and Trim the Ribs
Trimming is the step most people skip. But it makes a big difference. A well-trimmed rack of ribs cooks evenly and looks beautiful on the plate.
Remove the Rib Tips
Lay the rack of ribs bone-side up on your cutting board. You will see thin, cartilaginous tips at one end. Use a sharp knife to slice them off. Save the tips if you want. They are full of flavor and great for snacking or adding to soups. But for baking, they can burn and get tough.
Peel Off the Membrane
Flip the ribs over so the bone side faces up. You will see a thin, translucent membrane covering the bones. This membrane does not soften when you cook it. It can also block your dry rub from reaching the meat. Use a butter knife to loosen one corner. Then grab it with a paper towel for grip and peel it off in one piece. It might take a little practice, but it is worth the effort.
Pat Dry and Season
Once trimmed, pat the ribs dry with paper towels. This helps the rub stick better. Now apply your dry rub generously on all sides. Press it into the meat with your hands. For the best flavor, wrap the ribs in plastic wrap and refrigerate them for at least 2 hours. Overnight is even better. The rub will penetrate deeper into the meat and start breaking down the proteins.
Step 2: Set Up Your Oven
Setting the right temperature is the key to oven baked ribs. You want low and slow. This is the same principle used in smoking ribs, but your oven handles the work for you.
Why Low and Slow?
Ribs are made of tough connective tissue and collagen. When you cook them at a low temperature for a long time, that collagen breaks down into gelatin. This is what makes the meat so tender and juicy. If you crank the heat up, the outside will burn before the inside has time to soften.
Ideal Oven Temperature
Preheat your oven to 275°F. This is the sweet spot for pork ribs. Some recipes go as low as 225°F, but 275°F saves time without sacrificing quality. Place the oven rack in the center position. This ensures even heat distribution around the ribs.
Line the Baking Sheet
Line your baking sheet with aluminum foil. This makes cleanup a breeze. Place the wire rack on top of the foil. The wire rack is essential. It lifts the ribs above the pan so hot air can flow all around them. Without a rack, the bottom of the ribs will sit in liquid and get soggy.
Step 3: Bake the Ribs Low and Slow
This is where the magic happens. The ribs will bake for about 2.5 to 3 hours at 275°F. It is a slow process, but the results are worth every minute.
Wrapping in Foil (The Texas Crutch)
After the first 2 hours, it is time to wrap the ribs. This technique is called the Texas crutch. It was made famous by pitmasters who use it to speed up the cooking process and lock in moisture. Here is how to do it.
- Remove the baking sheet from the oven.
- Place a large sheet of aluminum foil on the counter.
- Flip the ribs meat-side down onto the foil.
- Add a splash of apple juice, broth, or apple cider vinegar to the pan. This creates steam.
- Wrap the ribs tightly in the foil, sealing all edges.
- Place the wrapped ribs back on the baking sheet, seam-side up.
- Return to the oven for another 1 to 1.5 hours.
The foil traps steam and heat. This braises the ribs gently and makes them incredibly tender. You will notice a big difference in texture after unwrapping.
Check for Doneness
After the second phase of baking, check the ribs. The meat should have pulled back from the bone tips by about half an inch. The rack should bend and crack slightly when you pick it up from one end with tongs. Use a meat thermometer to check the internal temperature. You want 195°F to 203°F at the thickest part of the meat. This is the range where collagen has fully broken down and the ribs are perfectly tender.
Step 4: Apply the Glaze
Now comes the fun part. The glaze is what gives oven baked ribs that sticky, sweet, caramelized finish. But timing is everything here.
When to Sauce
Do not add the sauce too early. The sugars in BBQ sauce burn easily at high temperatures. You want to apply the glaze in the last 15 to 20 minutes of baking. This gives it time to thicken and stick without scorching.
How to Glaze
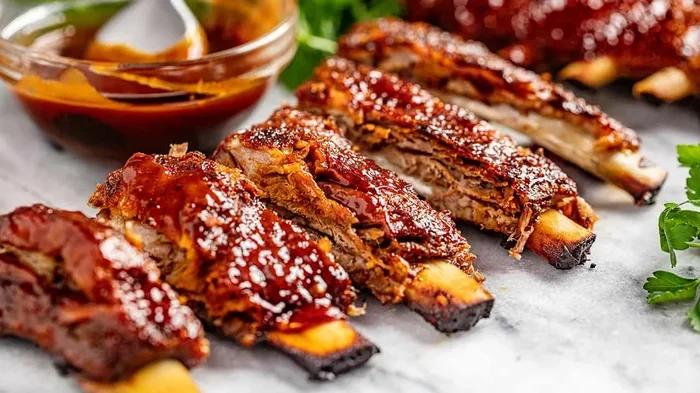
Unwrap the ribs and remove the foil. Increase the oven temperature to 375°F. Brush a generous layer of your BBQ glaze on all sides of the ribs. Place them back in the oven uncovered. Bake for 15 to 20 minutes. Every 5 minutes, open the oven and brush on another coat of sauce. Three coats is usually the sweet spot. You want a thick, sticky, glossy finish.
Making a Simple Glaze
If you do not have store-bought BBQ sauce, you can make a quick glaze. Mix together BBQ sauce, apple cider vinegar, honey, and brown sugar. Heat it gently in a small saucepan until it thickens slightly. This homemade glaze adds a nice tang and shine to the ribs.
Step 5: Rest and Serve
This step is just as important as the baking. Resting the ribs allows the juices to redistribute throughout the meat. If you cut into them right away, the juices will run out and the ribs will dry out faster.
How Long to Rest
Transfer the ribs to a cutting board and tent them loosely with aluminum foil. Let them rest for 10 to 15 minutes. The temperature will hold and the meat will firm up slightly, making it easier to slice.
How to Slice
Use a sharp knife to cut between the bones. Each piece should have one bone and a good amount of meat attached. Serve them on a platter with extra glaze on the side. Pair with coleslaw, cornbread, or baked beans for a complete meal.
Common Mistakes to Avoid
- Skipping the membrane removal. This is the number one mistake. The membrane blocks seasoning and creates a rubbery texture.
- Baking at too high a temperature. High heat dries out the meat before the connective tissue has time to break down.
- Adding sauce too early. Burnt sauce tastes bitter and ruins the ribs.
- Not using a meat thermometer. Guessing leads to undercooked or overcooked ribs every time.
- Cutting too soon. Resting is essential for juicy, tender results.
Pro Tips for Perfect Ribs Every Time
Even with a great recipe, a few pro tips can take your ribs from good to outstanding.
- Use a dry brine. Salt the ribs the night before and leave them uncovered in the fridge. This dries out the surface slightly and helps the rub adhere better. It also seasons the meat deeper.
- Experiment with wood chips. If you want a hint of smoke flavor in your oven baked ribs, soak wood chips in water for 30 minutes. Spread them on a sheet of foil in the oven while the ribs bake. The smoke will infuse into the meat.
- Let the rub sit overnight. The longer the rub sits on the meat, the deeper the flavor goes. If you have time, season the ribs the night before and let them rest in the fridge.
- Use a digital instant-read thermometer. Probe thermometers give you the most accurate reading. They take the guesswork out of knowing when your ribs are done.
- Keep a spray bottle handy. If you notice the ribs drying out during the unwrapped phase, spritz them with apple juice or apple cider vinegar. This adds moisture and helps the glaze adhere better.
How to Store and Reheat Leftover Ribs
Ribs taste great the next day, and they store well too. Here is how to handle leftovers properly.
Let the ribs cool to room temperature before storing. Wrap them tightly in aluminum foil or place them in an airtight container. They will keep in the refrigerator for up to 4 days. To reheat, wrap the ribs in foil and place them in the oven at 250°F for about 15 to 20 minutes. This warms them through without drying them out. You can also reheat in the microwave, but the oven method gives better results.
If you have leftover glaze, store it separately. It makes a great addition to scrambled eggs or as a dipping sauce for chicken tenders.
Frequently Asked Questions
Can I bake St Louis ribs at 350°F instead of 275°F?
You can, but the results will be different. Higher temperatures cook the ribs faster, but they may dry out more easily. The low and slow method at 275°F gives you the most tender, juicy results. If you are short on time, you can bake at 325°F, but keep a close eye on them and use a meat thermometer to avoid overcooking.
How long does it take to bake St Louis ribs in the oven?
At 275°F, plan for about 3 to 3.5 hours total. This includes the initial unwrapped phase of about 2 hours and the foil-wrapped phase of about 1 to 1.5 hours. Add 15 to 20 minutes for the glazing phase at 375°F. So the full process takes roughly 3.5 to 4 hours from start to finish.
Do I need to wrap ribs in foil?
Wrapping in foil is optional, but it is highly recommended. The foil traps steam and moisture, which braises the meat and makes it incredibly tender. It also speeds up cooking time. If you prefer a drier, chewier bark, you can skip the foil. But for fall-off-the-bone tender ribs, the foil method is the way to go.
What temperature should St Louis ribs be when done?
The ideal internal temperature is between 195°F and 203°F. At this range, the collagen in the meat has fully broken down, and the ribs are tender and juicy. If you pull them too early, they may be tough. If you wait too long, they can dry out. A good meat thermometer is your best friend here.
Can I use a different BBQ sauce for the glaze?
Absolutely. You can use any BBQ sauce you like. If you prefer a spicy kick, go with a habanero or chipotle-based sauce. For a sweeter finish, a Kansas City-style thick and sweet sauce works great. You can also make your own glaze from scratch using ketchup, vinegar, honey, and spices. The key is to add it in the last 15 to 20 minutes so it caramelizes without burning.
Are St Louis ribs the same as spare ribs?
St Louis ribs are a style of spare ribs, but they are trimmed differently. Regular spare ribs include the rib tips and a flap of cartilage. St Louis ribs have those parts removed, leaving a cleaner, more uniform rack. The trimming also removes some of the fattier, less tender parts, resulting in a more consistent eating experience.
Conclusion
Baking St Louis ribs in the oven is one of the most rewarding things you can do in the kitchen. It is a dish that looks impressive but is surprisingly simple to make. The secret is patience. Low temperature, long cooking time, and a good glaze are all you need.
Start by trimming the rib tips and removing the membrane. Apply a flavorful dry rub and let it work its magic overnight if you can. Bake low and slow at 275°F, wrap in foil for tenderness, and finish with a sticky, sweet glaze under the broiler or at higher heat. The result is a rack of ribs that rivals anything you would find at a BBQ joint.
Once you master this method, you will never go back to dry, overcooked ribs again. Practice makes perfect, and every batch teaches you something new. So fire up your oven, grab a rack of pork ribs, and get ready to make the best St Louis ribs you have ever tasted. Your family and friends will thank you.
Now that you know how to bake St Louis ribs in the oven step by step, it is time to put this guide to work. Print it out, save it to your phone, or pin it for later. The next time someone asks for ribs, you will be the hero of the kitchen.