How To Bake Cheesecake In Oven With This Easy Guide
Baking cheesecake in the oven is simpler than most people think. This guide walks you through every step, from choosing the right cheesecake ingredients to pulling out a perfectly smooth, creamy dessert. You will learn oven temperature secrets, crust tricks, and water bath methods that pros use.
There is something truly magical about a homemade cheesecake fresh out of the oven. It is rich, creamy, and feels like a real treat. Many people think baking a cheesecake recipe at home is hard. But honestly, it is not. Once you understand a few simple tricks, you will wonder why you ever ordered cheesecake from a bakery.
This guide is for anyone who wants to bake cheesecake in their oven with confidence. Whether you are a total beginner or someone who has tried before and ended up with cracks, this guide has you covered. We will go through every single step in detail. You will learn about the right oven temperature, the best springform pan to use, and the water bath method that makes all the difference.
By the end, you will have all the knowledge you need to make a creamy cheesecake that looks beautiful and tastes amazing. Let us get started.
Key Takeaways
- Low and slow baking is the secret to a crack-free cheesecake.
- A water bath helps create an even, creamy texture every time.
- Room temperature ingredients mix smoother and bake more evenly.
- Proper cooling matters just as much as the baking process itself.
- A springform pan makes removing your cheesecake easy and clean.
- Graham cracker crust is the classic choice, but you can get creative.
- Patience is key — never rush the cooling or chilling step.
📑 Table of Contents
What You Need to Bake Cheesecake in the Oven
Before you turn on your oven, you need the right tools and cheesecake ingredients. Having everything ready makes the whole process smoother and more fun. Here is what you will need.
Essential Ingredients for a Classic Cheesecake
The beauty of baking cheesecake is that the ingredient list is short and simple. You do not need fancy items from specialty stores. Here is what goes into a basic cheesecake filling:
- Cream cheese — This is the star of the show. Use full-fat cream cheese for the best texture.
- Sugar — Granulated white sugar works perfectly. You can also use vanilla sugar for extra flavor.
- Eggs — Large eggs at room temperature blend better and create a smoother batter.
- Sour cream — This adds a lovely tang and keeps the cheesecake moist.
- Vanilla extract — A good quality vanilla makes a big difference in flavor.
- Lemon zest — Optional, but it adds a fresh, bright note that balances the richness.
- Flour or cornstarch — Just a small amount helps set the filling without making it dense.
Tools You Will Need
You do not need a lot of equipment. Most of these items are probably already in your kitchen:
- Springform pan — A 9-inch pan is the standard size. The removable sides make serving so much easier.
- Aluminum foil — You will use this to wrap the bottom of your pan for the water bath.
- Large roasting pan — This holds your springform pan inside the oven during the water bath method.
- Mixing bowls — One large bowl for the filling and one for the crust.
- Electric mixer — A hand mixer or stand mixer makes quick work of blending the filling.
- Parchment paper — Line the bottom of your pan to prevent sticking.
Quick Tips for Ingredient Prep
One of the most common cheesecake tips is to take all your ingredients out of the fridge at least one hour before you start. Room temperature ingredients mix together much more smoothly. Cold cream cheese can leave lumps in your batter, which leads to an uneven texture. So plan ahead and let everything come to room temperature.
Also, make sure your eggs are not too cold. Cold eggs can cause the cream cheese to curdle. If you forget to take them out early, place them in warm water for about 10 minutes. This small trick can save your batter from getting lumpy.
How to Prepare the Perfect Cheesecake Crust
The crust is the foundation of your cheesecake. A good crust adds crunch and flavor that complements the creamy filling. Making a crust from scratch is easy and takes just a few minutes.
The Classic Graham Cracker Crust
The graham cracker crust is the most popular choice for a reason. It is simple, delicious, and pairs perfectly with any cheesecake recipe. Here is how to make it:
- Crush about 2 cups of graham crackers into fine crumbs. You can use a food processor or place them in a zip-lock bag and crush with a rolling pin.
- Melt 5 tablespoons of butter in a microwave or on the stove.
- Mix the crumbs and melted butter together in a bowl. Add 2 tablespoons of sugar and stir until combined.
- Press the mixture firmly into the bottom of your springform pan. Use the bottom of a measuring cup or glass to make it flat and even.
- Place the pan in the fridge while you prepare the filling. This helps the crust set.
Alternative Crust Ideas
Want to mix things up? There are many great crust options besides graham crackers:
- Oreo cookie crust — Use Oreo cookies instead of graham crackers. Remove the filling first for a chocolatey base.
- Digestive biscuit crust — Popular in the UK, these biscuits add a slightly sweet, nutty flavor.
- Shortbread crust — Crushed shortbread cookies create a buttery, rich base.
- Nut crust — Ground almonds or pecans mixed with butter make a gluten-free option.
Expert Insight: Why the Crust Matters
Many people rush through the crust step, but it actually sets the foundation for your entire baking cheesecake experience. A well-pressed crust prevents the filling from seeping underneath. It also adds a textural contrast that makes each bite more interesting. Take your time with this step — it only takes a few minutes but makes a big difference.
Making the Creamy Cheesecake Filling
The filling is where all the magic happens. Getting the right consistency is key to a smooth cheesecake that slices beautifully. Here is exactly how to do it.
Step-by-Step Filling Instructions
Follow these steps for a perfect cheesecake filling every time:
- Beat the cream cheese in a large bowl using an electric mixer on medium speed. Beat for about 2 minutes until it is smooth and fluffy.
- Add the sugar gradually while the mixer is running. Scrape down the sides of the bowl as you go.
- Add the eggs one at a time. Mix on low speed after each addition. Do not overmix — this is one of the most important cheesecake tips.
- Add the sour cream, vanilla extract, and flour. Mix until just combined.
- Pour the filling over the prepared crust in the springform pan.
Common Mistakes When Making the Filling
Avoid these errors to keep your cheesecake smooth and crack-free:
- Overmixing — This incorporates too much air, which causes cracks when the cheesecake cools.
- Adding cold eggs — This can cause the cream cheese to curdle and create a lumpy batter.
- Skipping the sour cream — The sour cream adds moisture and a nice tang that balances the sweetness.
- Using low-fat cream cheese — Full-fat cream cheese gives you the richest, creamiest result.
Quick Tips for the Perfect Filling
Here are a few extra tricks that experienced bakers swear by. First, always start your cream cheese on low speed. High speed can whip in too much air. Second, if you see any lumps, pass the filling through a fine mesh sieve. Third, tap the filled pan gently on the counter a few times. This releases any air bubbles trapped in the batter.
For a sour cream cheesecake variation, you can swirl a layer of sweetened sour cream on top of the filling before baking. This creates a beautiful marbled effect and adds extra creaminess to every bite.
Baking the Cheesecake With a Water Bath
This is the step that separates a good cheesecake from a great one. The water bath method, also called a bain-marie, creates gentle, even heat around the pan. This prevents the cheesecake from cracking and gives it that signature silky texture.
What Is a Water Bath and Why Use It?
A water bath simply means placing your springform pan inside a larger pan filled with hot water. The steam from the water surrounds the cheesecake and cooks it gently. Without a water bath, the oven’s direct heat can cause the edges to cook too fast while the center remains unset. This temperature difference leads to cracks and a dense texture.
How to Set Up a Water Bath
Here is how to do it properly:
- Wrap the outside bottom and sides of your springform pan with two layers of aluminum foil. This prevents water from seeping into the pan.
- Place the wrapped springform pan inside a larger roasting pan or baking dish.
- Pour hot (not boiling) water into the roasting pan. The water should come about halfway up the sides of the springform pan.
- Carefully place the roasting pan on the middle rack of your preheated oven.
The Best Oven Temperature for Cheesecake
Temperature control is everything when you bake cheesecake in oven. The ideal oven temperature for most cheesecake recipes is 325°F (163°C). This low temperature allows the cheesecake to cook slowly and evenly from edge to center.
| Cheesecake Type | Recommended Temperature | Baking Time |
|---|---|---|
| Classic New York Style | 325°F (163°C) | 55-65 minutes |
| Sour Cream Cheesecake | 325°F (163°C) | 60-70 minutes |
| No-Bake Style (chilled) | N/A — refrigerate | 4+ hours chilling |
| Low-Fat Cheesecake | 300°F (149°C) | 70-80 minutes |
As you can see, low and slow is the general rule. Higher temperatures cause the cheesecake to rise too quickly and then collapse, which leads to cracks.
How to Know When Your Cheesecake Is Done
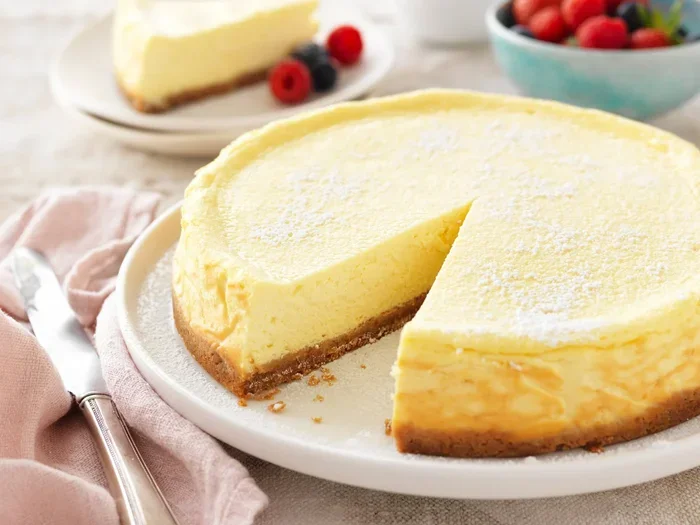
This is one of the trickiest parts of baking cheesecake. The cheesecake should still have a slight wobble in the center when you gently shake the pan. It should look like set Jello, not liquid. The edges will be firm, but the middle will jiggle just a little.
Do not overbake. This is the number one mistake people make. The cheesecake continues to cook as it cools, so pulling it out slightly underdone is actually the right move. Use a toothpick test if you are unsure — insert a toothpick near the center. If it comes out clean or with just a few moist crumbs, your cheesecake is done.
Expert Insight: The Water Bath Debate
Some bakers skip the water bath for convenience. While you can bake a cheesecake without one, the results are not as smooth. The water bath adds moisture to the oven, which prevents the top from drying out and cracking. If you are serious about making restaurant-quality cheesecake at home, the extra effort is well worth it.
Cooling and Storing Your Cheesecake
Many people think the baking is the hardest part, but cooling your cheesecake properly is just as important. Rushing this step is the fastest way to get cracks and a dense texture.
The Cooling Process
Follow these steps for the perfect cool-down:
- Turn off your oven and crack the door open about one inch. Let the cheesecake sit inside for one hour. This gradual temperature change prevents shock.
- After one hour, remove the cheesecake from the oven and let it cool on the counter for another two hours.
- Once it is at room temperature, cover it loosely with plastic wrap and refrigerate for at least four hours, or overnight.
How to Store Cheesecake
A properly stored cheesecake stays fresh and delicious for several days:
- In the fridge: Store in the springform pan or slice and place in an airtight container. It keeps for up to 5 days.
- Freezing: Wrap individual slices tightly in plastic wrap and foil. Frozen cheesecake keeps for up to 2 months.
- Never freeze without wrapping: This causes the cheesecake to absorb freezer odors and become dry.
Quick Tips for Serving
Use a sharp knife dipped in hot water to cut clean slices. Wipe the knife clean between cuts for the nerest presentation. If your cheesecake has a cheesecake topping like fruit compote or chocolate ganache, add it just before serving so it stays fresh and vibrant.
Common Mistakes to Avoid When Baking Cheesecake
Even experienced bakers make mistakes sometimes. Here are the most common errors and how to avoid them.
Mistake 1: Using the Wrong Pan
Do not use a regular cake pan or a glass dish for baking cheesecake. A springform pan is essential because it allows you to remove the sides cleanly. Glass pans can cause the bottom to overbake, and regular cake pans make it nearly impossible to get the cheesecake out in one piece.
Mistake 2: Opening the Oven Door Too Often
Every time you open the oven door, the temperature drops significantly. This causes the cheesecake to sink and crack. Resist the urge to check on it. Use the oven light to monitor the progress instead.
Mistake 3: Skipping the Room Temperature Step
Cold ingredients do not blend well. Taking your cream cheese and eggs out an hour before baking makes a noticeable difference in the smoothness of your cheesecake filling.
Mistake 4: Overbaking
This cannot be stressed enough. An overbaked cheesecake becomes dry, rubbery, and prone to cracking. Always pull it out when the center still has a slight wobble.
Mistake 5: Not Using a Water Bath
While not absolutely mandatory, skipping the water bath greatly increases your chances of cracks and an uneven texture. If you want the best results, do not skip this step.
Easy Cheesecake Variations to Try
Once you master the basic cheesecake recipe, you can get creative with flavors and toppings. Here are some popular variations to try:
- Chocolate Cheesecake: Add 1/2 cup of cocoa powder to the filling. Top with chocolate ganache for an indulgent treat.
- Berry Swirl Cheesecake: Layer a berry compote between the filling for a fruity contrast.
- Lemon Cheesecake: Add extra lemon juice and zest to the filling for a bright, tangy flavor.
- Caramel Cheesecake: Drizzle caramel sauce over the top and add a sprinkle of sea salt.
- Pumpkin Cheesecake: Add 1 cup of pumpkin purée and pumpkin spice for a seasonal twist.
Each variation follows the same basic method. Once you understand the fundamentals of how to bake cheesecake in oven, you can experiment with endless flavors and toppings. The possibilities are truly endless.
Conclusion
Baking cheesecake in the oven does not have to be intimidating. With the right cheesecake ingredients, the correct oven temperature, and a little patience, you can create a stunning homemade cheesecake that rivals any bakery. Remember to use a springform pan, wrap it with foil for the water bath, and keep the temperature low and steady.
The most important cheesecake tips are to take your time, avoid overmixing, and never overbake. Once you master these basics, you can make any cheesecake recipe you want. Try the classic graham cracker crust version first, and then experiment with flavors as your confidence grows.
So go ahead, preheat your oven, and give it a try. Your kitchen is about to smell incredible, and your family and friends are going to be impressed. Happy baking!
Frequently Asked Questions
What temperature should I bake cheesecake at?
The recommended oven temperature for most cheesecake recipes is 325°F (163°C). This low temperature allows the cheesecake to cook slowly and evenly, reducing the risk of cracks and ensuring a creamy texture throughout.
Do I really need a water bath for baking cheesecake?
While not strictly required, a water bath is highly recommended for the best results. The steam from the water creates gentle, even heat that prevents the cheesecake from drying out, cracking, or developing an uneven texture. It is the secret to professional-quality cheesecake at home.
How long does it take to bake a cheesecake?
Most cheesecakes bake for 55 to 75 minutes at 325°F. The exact time depends on your oven, the size of the pan, and the type of cheesecake recipe you are using. Always check for a slight wobble in the center, which indicates the cheesecake is perfectly set.
Can I use a different type of pan instead of a springform pan?
A springform pan is the best choice because the removable sides make serving easy and clean. However, you can use other pans in a pinch. Just be aware that removing the cheesecake may be more difficult, and you may need to line the pan with parchment paper to prevent sticking.
How do I prevent cracks on my cheesecake?
To avoid cracks, do not overmix the batter, do not overbake, use a water bath, and cool the cheesecake gradually. Turn off the oven and let the cheesecake cool inside with the door cracked open. Then refrigerate it slowly overnight for the smoothest result.
Can I freeze cheesecake for later?
Yes, cheesecake freezes very well. Wrap individual slices tightly in plastic wrap followed by aluminum foil. Place them in an airtight freezer bag and freeze for up to 2 months. Thaw in the refrigerator overnight before serving for the best texture and flavor.