How To Cook Baby Back Ribs In An Oven Perfectly Tender
Learning how to cook baby back ribs in an oven is easier than you think. With the right temperature, a simple rub, and a little patience, you can make tender, fall-off-the-bone ribs that taste like they came from a barbecue pit. This guide walks you through every step, from prep to plating, so your ribs turn out perfect on the first try.
Key Takeaways
- Low and slow is the way to go: Cooking ribs at 275°F to 300°F ensures tender, juicy meat that pulls away from the bone effortlessly.
- A dry rub does the heavy lifting: A simple blend of paprika, brown sugar, garlic powder, and salt creates deep, smoky flavor without any fuss.
- Wrapping in foil halfway through keeps moisture locked in: This technique, often called the Texas crutch, speeds up cooking and keeps ribs succulent.
- Always use a meat thermometer: Internal temperature of 195°F to 203°F means your ribs are done and perfectly tender.
- Let the ribs rest before slicing: Resting for 10 to 15 minutes allows juices to redistribute for a better bite.
- You can use store-bought sauce or make your own: Both options work great, but homemade glaze adds a personal touch and custom flavor.
- Remove the membrane first for the best texture: Peeling off the thin membrane on the back of the rack lets seasoning penetrate deeper.
📑 Table of Contents
- Why Oven-Roasted Baby Back Ribs Are a Game Changer
- What You Need Before You Start
- Step-by-Step Guide: How To Cook Baby Back Ribs In An Oven
- Tips for Maximum Flavor and Tenderness
- Common Mistakes to Avoid
- Serving Ideas and Storing Leftovers
- Expert Insights on Oven Ribs
- Comparing Oven Ribs vs Smoker Ribs
- Final Thoughts
Why Oven-Roasted Baby Back Ribs Are a Game Changer
There is something magical about how to cook baby back ribs in an oven and pull out a rack of perfectly smoked, tender ribs without ever stepping outside. You do not need a big smoker or a backyard grill. Your oven can do the same job with stunning results.
Baby back ribs are the leanest and most tender cut of pork ribs. They come from the top of the rib cage, near the spine. Because they have less fat than spare ribs, they cook faster and stay moist when you handle them right. This makes them the ideal choice for oven cooking.
Many people think ribs need a smoker or a grill. That is not true. Oven roasting gives you even heat, hands-off cooking, and a beautiful caramelized crust. Plus, you have full control over the temperature. No flare-ups. No wind. Just perfectly cooked ribs on a weeknight or a lazy weekend.
The beauty of oven ribs is consistency. Every time you follow the same steps, you get the same great outcome. Once you master this method, you will never go back to overcooked, dry ribs again.
What You Need Before You Start
Ingredients for the Perfect Rib Rub
A great rib rub is the foundation of amazing oven ribs. You do not need a long ingredient list. Here is what works best:
- Brown sugar — adds sweetness and helps create a sticky bark
- Paprika — gives color and a mild smoky flavor
- Garlic powder — brings savory depth
- Onion powder — adds a subtle sweetness
- Salt — enhances every flavor in the rub
- Black pepper — adds a gentle bite
- Cumin — a small pinch adds warmth and complexity
- Chili powder — gives a mild heat that builds slowly
Mix all of these together in a small bowl. You can double or triple the recipe depending on how many racks you are cooking. Store extra rub in a sealed jar for your next batch of tender ribs.
Tools You Will Need
You do not need fancy equipment. Here is a simple list of what works:
- A rimmed baking sheet or a roasting pan
- Heavy-duty aluminum foil
- A meat thermometer (this is non-negotiable)
- Sharp kitchen scissors or a knife
- A cutting board for resting and slicing
That is it. You are ready to start once you have these items on hand. Keep your pork ribs in the fridge until you are ready to prep them.
Step-by-Step Guide: How To Cook Baby Back Ribs In An Oven
Step 1: Prep the Ribs
Take your rack of ribs out of the packaging and pat it dry with paper towels. Lay the rack bone-side down on a cutting board. You will see a thin, translucent membrane on the back of the bones. This is the rib membrane, and you need to remove it.
Use a butter knife to loosen one corner of the membrane. Grab it with a paper towel for a better grip. Pull it off slowly and steadily. It might take a little effort, but removing it makes a huge difference. The membrane blocks seasoning from reaching the meat and can turn chewy when cooked.
Once the membrane is off, flip the rack over. Pat it dry again. This step is essential for getting a great bark on your fall off the bone ribs.
Step 2: Apply the Rub
Generously coat all sides of the ribs with your rib rub. Press it into the meat with your hands. Do not be shy. The rub needs to stick to the surface to form that delicious crust later.
For the best flavor, let the rubbed ribs sit in the fridge for at least one hour. Overnight is even better. The salt in the rub draws moisture to the surface, which then dissolves the spices and creates a flavorful crust as the ribs cook.
Step 3: Set Up Your Oven
Preheat your oven to 275°F. This low temperature is the secret to tender, juicy oven ribs. High heat dries out the meat before the collagen has time to break down. Low and slow is the golden rule of barbecue ribs in the oven.
Line a baking sheet with foil and place a wire rack on top. This setup allows air to circulate around the ribs and catches any drips. If you do not have a wire rack, you can cook the ribs directly on the foil, but a rack gives better results.
Step 4: Wrap and Cook
Place the ribs bone-side down on the rack. Wrap the entire rack tightly in aluminum foil. This creates a sealed environment that traps steam and keeps the meat moist.
Put the wrapped ribs in the oven. Cook for about 2.5 to 3 hours at 275°F. The exact time depends on the thickness of the rack and how many racks you are cooking side by side.
This method is similar to the famous 3-2-1 method used in smoking, but simplified for the oven. The foil does the work of keeping things moist so you do not need to spritz or baste.
Step 5: Unwrap and Sauce
After 2.5 hours, carefully remove the ribs from the oven. Use oven mitts — the foil will be hot and steamy. Unwrap the foil slowly, letting the steam escape away from your face.
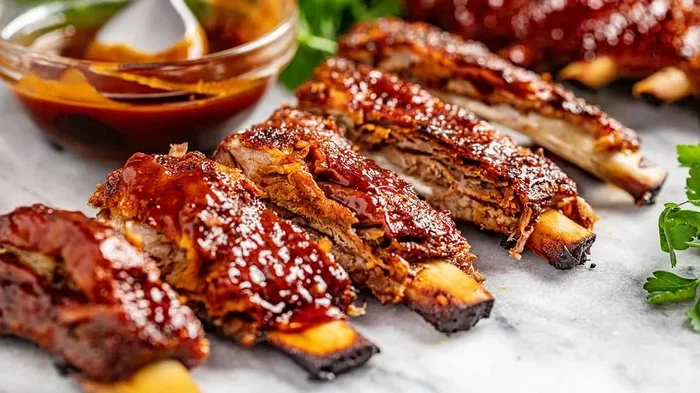
Brush a thin layer of barbecue sauce on both sides of the ribs. You can use store-bought sauce or a homemade glaze. Honey-based sauces work wonderfully because they caramelize in the oven.
Return the ribs to the oven, this time without the foil. Cook for another 20 to 30 minutes. This opens up the sauce and creates a sticky, glossy finish. Watch them closely so the sauce does not burn.
Step 6: Rest and Serve
Remove the ribs from the oven. They should feel tender when you wiggle a bone — it should move easily. Use a meat thermometer to confirm the internal temperature is between 195°F and 203°F.
Let the ribs rest for 10 to 15 minutes before cutting. This resting period allows the juices to settle back into the meat. If you cut too soon, the juices run out and your ribs dry out fast.
Slice between the bones to serve individual portions. Arrange them on a platter and drizzle any extra sauce from the pan over the top.
Tips for Maximum Flavor and Tenderness
Use a Meat Thermometer Every Time
This is the single most important tool for making tender ribs in the oven. Visual cues can trick you. The meat might look done on the outside but still be tough inside. A probe thermometer takes the guesswork out completely.
Insert the thermometer into the thickest part of the meat, avoiding the bone. When the temperature hits 195°F to 203°F, the collagen in the connective tissue has fully broken down. That is when baby back ribs reach their peak tenderness.
Do Not Skip the Foil Wrap
Some people skip the foil step to get a crunchier bark. While that is fine for some styles, foil wrapping is the best way to ensure fall off the bone ribs. The steam inside the foil gently cooks the meat and keeps it juicy.
After the final bake without foil, the surface will still develop a nice tacky glaze. You get the best of both worlds — tender meat inside and a flavorful crust outside.
Choose the Right Sauce
The sauce you choose matters more than people think. A thin, vinegar-based sauce works great for tangy flavor. A thick, tomato-based sauce gives you that classic barbecue taste. A honey or brown sugar glaze adds sweetness and caramelization.
Apply sauce in the last 20 to 30 minutes of cooking. If you put it on too early, the sugars burn and turn bitter. A light coat is better than a heavy one. You can always add more sauce at the table.
Let the Ribs Come to Room Temperature
Take the ribs out of the fridge about 30 minutes before cooking. This small step helps the ribs cook more evenly. Cold meat going into a hot oven creates uneven cooking — the edges overcook while the center stays underdone.
Common Mistakes to Avoid
Cooking at Too High a Temperature
The biggest mistake people make is cranking the oven up to 350°F or higher. This dries out the meat before the collagen has time to dissolve. Baby back ribs need gentle, low heat to become truly tender.
Resist the urge to speed things up. The extra time is what transforms tough, chewy meat into something that melts in your mouth. Set a timer and be patient.
Forgetting to Remove the Membrane
The membrane on the back of the rack is tough and rubbery when cooked. It also blocks your rub from reaching the meat. Some butchers remove it for you, but many do not. Always check before cooking.
Removing the membrane takes about 30 seconds and makes a noticeable difference in texture and flavor absorption.
Over-Saucing
It is tempting to douse the ribs in sauce, especially if you love barbecue flavor. Too much sauce, especially sugary ones, will burn in the oven. A thin, even layer is all you need.
Save extra sauce for serving on the side. That way, everyone can add as much as they want without risking burnt, bitter ribs.
Cutting Too Soon
Hot ribs look juicy, but cutting immediately after pulling them from the oven releases all the moisture. The juices run out onto the cutting board instead of staying in the meat.
Give your ribs that 10 to 15 minute rest. You will notice the difference in every bite. The meat firms up slightly and the juices redistribute evenly.
Serving Ideas and Storing Leftovers
Great Side Dishes for Rib Night
Oven ribs pair wonderfully with simple sides. Here are some crowd-pleasers:
- Coleslaw — the crunch and coolness balance the rich, smoky ribs
- Cornbread — perfect for soaking up extra sauce
- Baked beans — a classic barbecue side that complements pork ribs
- Grilled corn on the cob — adds a sweet, charred element to the plate
- Mac and cheese — creamy comfort food that goes hand in hand with barbecue ribs
How to Store and Reheat Leftover Ribs
Leftover tender ribs are even better the next day. Store them in an airtight container in the fridge for up to 4 days.
To reheat, wrap the ribs in foil and place them in the oven at 250°F for about 15 minutes. This warms them gently without drying them out. You can also reheat in the microwave, but the oven method keeps the texture much better.
Freezing is another option. Wrap individual portions tightly in foil and place them in freezer bags. They keep for up to 3 months. Thaw overnight in the fridge before reheating.
Expert Insights on Oven Ribs
Professional pitmasters agree that the oven can produce results nearly identical to a smoker. The key is controlling temperature and moisture. When you cook baby back ribs in an oven, you are essentially creating a mini smoker environment inside your kitchen.
The low temperature slowly breaks down the collagen in the connective tissue. This is what transforms a tough piece of meat into fall off the bone ribs. Collagen starts to dissolve at around 160°F and is fully converted by 203°F. That is why internal temperature matters so much.
Another expert tip is to use a water pan in the oven. Place a shallow pan of hot water on the rack below the ribs. This adds humidity to the oven environment and prevents the meat from drying out. It is a small trick that makes a big difference in the final result.
Some cooks like to add wood chips to a foil pouch and place it in the oven. This infuses a subtle smoky flavor into the pork ribs without needing a smoker. Hickory and applewood chips work best for baby back ribs. Soak the chips in water for 30 minutes before wrapping them in foil with a few holes poked in the top.
Comparing Oven Ribs vs Smoker Ribs
| Factor | Oven Ribs | Smoker Ribs |
|---|---|---|
| Equipment Needed | Oven, foil, baking sheet | Smoker or grill with charcoal/wood |
| Cooking Time | 3 to 3.5 hours | 4 to 6 hours |
| Temperature Control | Very precise | Requires monitoring and adjusting |
| Smoke Flavor | Subtle (with wood chips) | Deep, authentic smoke flavor |
| Ease of Cooking | Very easy, hands-off | Requires more attention |
| Best For | Weeknights, beginners, consistent results | Weekend projects, flavor enthusiasts |
Both methods produce excellent results. The oven method wins for convenience and consistency. The smoker wins for deep, complex flavor. But for most home cooks, oven ribs are the practical choice that still delivers restaurant-quality tender ribs.
Final Thoughts
How to cook baby back ribs in an oven is one of the most rewarding skills you can learn in the kitchen. It requires minimal equipment, affordable ingredients, and a little patience. The result is a rack of ribs that tastes like it has been smoking all day long.
Start with a simple rub, cook low and slow, wrap in foil to keep moisture in, and finish with a light coat of sauce. Follow these steps and your oven ribs will be the best thing you ever made in your kitchen.
Do not be afraid to experiment with different rubs and sauces. Once you master the basic method, you can customize it to your taste. Try a spicy rub one weekend. Try a honey-mustard glaze the next. The possibilities are endless when you know how to handle pork ribs in the oven.
So fire up your oven, grab a rack of baby back ribs, and get ready to make the most tender, flavorful ribs you have ever tasted. Your family and friends will be asking for this recipe every time you fire up the oven.
Frequently Asked Questions
Can I cook frozen baby back ribs in the oven?
Yes, you can, but it will take significantly longer — about 5 to 6 hours at 275°F. It is always better to thaw ribs in the fridge overnight before cooking. Thawed ribs cook more evenly and absorb the rub better. If you must cook from frozen, add an extra hour to the wrap phase and check the internal temperature carefully.
What temperature should baby back ribs be cooked to in the oven?
The ideal internal temperature for baby back ribs is 195°F to 203°F. At this range, the collagen in the meat has fully broken down, making the ribs tender and juicy. Use a reliable meat thermometer inserted into the thickest part of the meat, avoiding the bone, for the most accurate reading.
How long does it take to cook ribs in the oven at 275°F?
At 275°F, a single rack of baby back ribs typically takes 2.5 to 3 hours when wrapped in foil. If you skip the foil, add about 30 minutes. The total time can vary based on the thickness of the rack and how many racks are in the oven at once.
Can I use spare ribs instead of baby back ribs for this recipe?
Absolutely. Spare ribs have more fat and connective tissue, which means they need a slightly longer cook time — closer to 3.5 to 4 hours at 275°F. They also benefit even more from the foil wrapping method. The flavor is richer, but the cooking process is very similar to cooking baby back ribs in the oven.
Do I need to flip the ribs during cooking?
No, you do not need to flip the ribs. The foil wrap creates an even cooking environment on all sides. The steam inside the foil circulates and cooks the meat uniformly. When you unwrap for the final bake, you can brush sauce on both sides, but flipping is not necessary for even cooking.
What is the best barbecue sauce for oven ribs?
A thick, tomato-based sauce works best for oven ribs because it caramelizes well without burning. Look for sauces with a balance of sweetness and tang. If you prefer a glaze, mix equal parts barbecue sauce and honey and brush it on during the last 20 minutes of cooking. Avoid very thin, vinegar-heavy sauces for the oven — they tend to burn before the ribs are done.
=== CONCLUSION ===
How to cook baby back ribs in an oven is a straightforward process that delivers impressive, restaurant-quality results every single time. By keeping the temperature low, using a flavorful rub, wrapping in foil for moisture, and finishing with a light sauce, you create ribs that are tender, juicy, and full of flavor.
Remember to remove the membrane, use a meat thermometer, and let the ribs rest before serving. These small steps make a huge difference in the final product. With practice, you will be able to make perfect oven ribs without even thinking about it.
Now it is your turn. Grab a rack of baby back ribs, preheat your oven, and put this guide to work. You will be amazed at how easy it is to make ribs that rival any barbecue joint. Enjoy every bite and share the recipe with friends who still think ribs can only be made on a grill.