How To Deep Clean Your Ninja Air Fryer Oven Like New
Deep cleaning your Ninja Air Fryer Oven keeps it running efficiently and extends its lifespan. This guide shows you exactly how to clean every part, from the basket to the interior, using simple household items. You’ll learn the best techniques for removing stubborn grease, preventing odors, and maintaining your appliance between deep cleans.
Your Ninja Air Fryer Oven does an amazing job at making crispy fries, roasted veggies, and even baked treats with little to no oil. But here is the thing — all that delicious cooking leaves behind a mess. Grease splatters, food crumbs, and stubborn residue build up fast. If you skip cleaning, your appliance starts to smell, cook unevenly, and even affect the taste of your food.
This is exactly why you need to know how to deep clean your Ninja Air Fryer Oven like new. A proper deep clean removes all the built-up grime and keeps your machine running smoothly. The good news? You do not need expensive cleaners or special tools. With a few simple household items and some elbow grease, your air fryer oven will look and perform like the day you unboxed it.
In this guide, we walk you through every single step. We cover which parts to clean, what supplies to use, and how to tackle the toughest stains. Whether you use your Ninja Air Fryer Oven daily or a few times a week, this cleaning routine will become your new best friend. Let us get into it.
Key Takeaways
- Regular deep cleaning prevents buildup: Grease and food residue affect performance and flavor.
- Household items work great: Baking soda, vinegar, and dish soap handle most cleaning jobs.
- Soak removable parts for best results: A warm soapy soak loosens stuck-on grime easily.
- Never use steel wool on nonstick surfaces: It damages the coating and reduces lifespan.
- Clean after every use: Quick wipe-downs make deep cleans less frequent and easier.
- Replace worn parts when needed: Damaged accessories can affect cooking results and safety.
📑 Table of Contents
- Why Deep Cleaning Your Ninja Air Fryer Oven Matters
- What You Will Need for a Deep Clean
- Step-by-Step Deep Cleaning Process
- Cleaning the Removable Parts
- Tackling Stubborn Grease and Residue
- Maintaining Your Ninja Air Fryer Oven Between Deep Cleans
- Common Mistakes to Avoid When Cleaning
- Expert Tips for a Sparkling Clean Air Fryer Oven
- When to Replace Parts Instead of Cleaning
- Conclusion
Why Deep Cleaning Your Ninja Air Fryer Oven Matters
Many people think a quick wipe-down after cooking is enough. And sure, that helps on the surface. But a true deep clean goes much further. It reaches the hidden grease and baked-on food that a quick clean simply cannot touch.
Here is why deep cleaning matters so much for your air fryer oven:
- Better tasting food: Old grease and residue transfer flavors to your next meal. Nobody wants their fresh vegetables tasting like last night’s fries.
- Improved cooking performance: Built-up grime blocks heat circulation. This means uneven cooking and longer prep times.
- Longer appliance life: Regular deep maintenance prevents wear and tear on internal components.
- Odor control: Lingering food smells can permeate your kitchen. A thorough clean eliminates these odors completely.
- Hygiene and safety: Old food particles and grease can harbor bacteria. A deep clean ensures your cooking surface is truly sanitary.
The Ninja Air Fryer Oven is a significant investment. Protecting that investment through proper cleaning is a no-brainer. A little effort now saves you from costly repairs or premature replacement later.
How Often Should You Deep Clean?
For most households, a deep clean every two to four weeks works well. If you use your air fryer oven daily, aim for every two weeks. Light users can stretch it to once a month. The key is to pay attention to your appliance. If you notice smoke during cooking, lingering smells, or visible buildup, it is time for a deeper clean regardless of your schedule.
What You Will Need for a Deep Clean
Before you start, gather everything you need. Having all your supplies ready makes the process faster and smoother. You do not need anything fancy — most items are already in your kitchen.
Essential Cleaning Supplies
- Warm water
- Dish soap (a gentle, grease-cutting formula works best)
- Baking soda
- White vinegar
- Soft microfiber cloths
- Soft sponge or non-abrasive scrubber
- Toothbrush or small soft brush (for tight corners)
- Drying rack or clean towel
- Rubber gloves (optional but recommended)
What to Avoid
Some cleaning tools and products can damage your Ninja Air Fryer Oven. Avoid the following:
- Steel wool or abrasive pads: These scratch the nonstick coating and permanent damage the surface.
- Harsh chemical cleaners: Bleach and strong solvents can leave toxic residues that transfer to your food.
- Abrasive scouring powders: These are too rough for the interior and accessories.
- Dishwasher for non-removable parts: Only use the dishwasher for parts explicitly labeled as dishwasher safe.
Sticking to gentle, natural cleaners like baking soda and vinegar keeps your air fryer oven safe and effective. These ingredients cut through grease without causing harm.
Step-by-Step Deep Cleaning Process
Now let us get into the actual cleaning. Follow these steps in order for the best results. The process is simple, but each step plays an important role in getting your appliance truly spotless.
Step One: Unplug and Cool Down
Safety comes first. Always unplug your Ninja Air Fryer Oven before cleaning. Let it cool completely if you just finished cooking. Cleaning a hot appliance can cause burns and may even crack certain parts. Give it at least 30 minutes to reach room temperature.
Step Two: Remove All Removable Parts
Take out every removable component. This includes the air fry basket, the baking tray, the crumb tray, and any other detachable pieces. Check your user manual if you are unsure which parts come out. Removing these parts gives you full access to the interior for a thorough clean.
Step Three: Shake Out Loose Debris
Turn the appliance upside down over a trash can and give it a gentle shake. This removes loose crumbs and food particles from the bottom and corners. Do this over a sink or trash can to keep things tidy.
Step Four: Wipe Down the Interior
Dip a soft cloth in warm soapy water and wring it out well. Wipe the inside walls, the ceiling, and the floor of the oven cavity. Use gentle circular motions. For stubborn spots, let the soapy cloth sit on the area for a few minutes before wiping again.
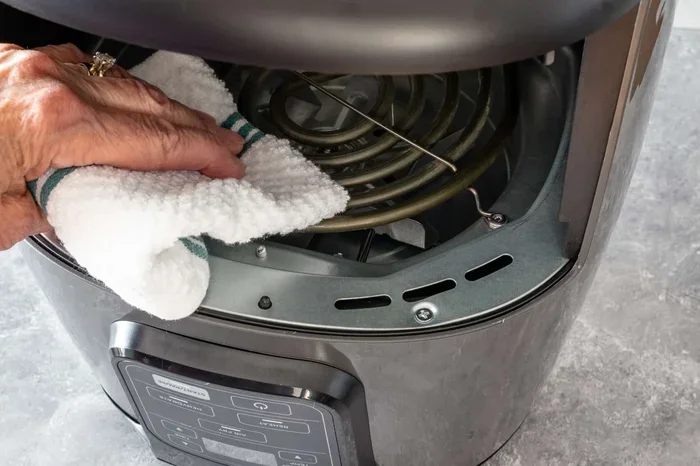
Step Five: Deep Clean the Heating Element Area
The heating element deserves special attention. Use a dry soft brush or a clean, dry toothbrush to gently remove any food particles or grease around it. Never use water directly on the heating element. Moisture near electrical components is a safety risk.
Step Six: Clean the Exterior
Wipe down the exterior with a damp microfiber cloth. For the stainless steel finish, use a dedicated stainless steel cleaner or a mix of baking soda and water. This restores the shine and removes fingerprints and smudges.
Step Seven: Dry Everything Thoroughly
After cleaning, dry all parts completely with a clean towel or let them air dry on a rack. Moisture left behind can lead to rust or mold. Make sure every piece is fully dry before reassembling your Ninja Air Fryer Oven.
Cleaning the Removable Parts
The removable parts of your air fryer oven take the most beating. They collect the most grease and food residue. Giving them extra attention during your deep clean makes a huge difference.
Cleaning the Air Fry Basket
The basket is the workhorse of your Ninja Air Fryer Oven. Start by soaking it in warm soapy water for 15 to 20 minutes. This loosens baked-on grease and food particles. After soaking, use a soft sponge to gently scrub all surfaces. For stuck-on residue, make a paste of baking soda and water. Apply it to the tough spots and let it sit for 10 minutes before scrubbing gently.
Rinse the basket thoroughly with clean water. Check for any remaining food particles in the mesh or corners. A toothbrush works great for getting into those tight spots.
Cleaning the Baking Tray and Crumb Tray
The baking tray and crumb tray follow the same soaking method. Fill your sink with warm water and add a few drops of dish soap. Submerge both trays and let them soak for at least 15 minutes.
After soaking, scrub with a non-abrasive sponge. For trays with heavy grease buildup, sprinkle baking soda directly on the surface and add a splash of vinegar. The fizzing reaction helps lift stubborn grime.
Rinse both trays well and dry them completely before putting them back in the oven. Trapped moisture can cause rust and affect your next cooking session.
Cleaning the Accessories and Attachments
If your Ninja Air Fryer Oven came with additional accessories like a roasting rack or pizza tray, include them in the cleaning process. Soak all accessories together in warm soapy water. Clean each piece individually to make sure no residue is left behind.
Pay extra attention to any attachment with small holes or grooves. Food particles love to hide in these spaces. A toothbrush or small soft brush helps you reach them effectively.
Tackling Stubborn Grease and Residue
Sometimes regular soap and water are not enough. Heavy grease buildup and baked-on food require a stronger approach. Here are some proven methods for the toughest cleaning challenges.
The Baking Soda Paste Method
Mix three parts baking soda with one part water to create a thick paste. Apply this paste to all stubborn grease spots and let it sit for 20 to 30 minutes. The baking soda works as a gentle abrasive that breaks down grease without scratching surfaces.
After the waiting period, scrub with a damp soft sponge. The grime should lift away easily. Repeat if needed for particularly tough spots.
The Vinegar Steam Method
For interior grease that feels impossible to remove, try the steam method. Fill a heat-safe bowl with equal parts water and white vinegar. Place it inside the Ninja Air Fryer Oven and run it on air fry mode at 350 degrees for 10 minutes. The steam loosens the hardened grease and makes it much easier to wipe away.
After the steam cycle, let the oven cool for a few minutes. Then wipe the interior with a damp cloth. You will be surprised at how much easier the grease comes off.
Dealing with Burnt-On Food
Burnt food is one of the most frustrating cleaning challenges. For burnt spots on the interior walls, apply a thick layer of baking soda paste and let it sit for at least 30 minutes. For extra cleaning power, spray the paste with undiluted white vinegar after it has been sitting. Let the reaction work for a few minutes, then scrub gently with a soft sponge.
For burnt-on food on the basket or trays, try soaking them overnight in warm soapy water with a tablespoon of baking soda dissolved in the water. This overnight soak works wonders on even the most stubborn burnt residue.
Maintaining Your Ninja Air Fryer Oven Between Deep Cleans
Deep cleaning is important, but daily maintenance keeps your appliance in top shape and reduces how often you need a full deep clean. Here is how to maintain your Ninja Air Fryer Oven between those deeper sessions.
Quick Wipe-Down After Every Use
After each cooking session, let the oven cool slightly and wipe the interior with a damp cloth. This takes less than two minutes and prevents grease from hardening. A quick wipe after every use means your deep cleans are faster and easier.
Line the Bottom with Foil or Parchment
Using aluminum foil or parchment paper on the baking tray catches drips and crumbs before they reach the bottom of the oven. This simple trick reduces mess significantly. Just make sure the foil or parchment does not touch the heating element.
Empty the Crumb Tray Regularly
Check and empty the crumb tray after every few uses. A full crumb tray can cause smoke and even trigger the safety shut-off on some models. Making this a quick habit keeps your oven running clean and safe.
Store It Properly
When not in use, store your Ninja Air Fryer Oven in a dry, cool place. If you need to cover it, use a breathable cloth cover rather than plastic. Plastic traps moisture and can lead to mold or mildew buildup.
Inspect Parts Regularly
Every month or so, inspect all removable parts for wear and tear. Look for scratches, warping, or coating damage on the nonstick surfaces. Replace any damaged parts promptly. Using worn accessories can affect cooking performance and even pose health risks if the coating flakes off into your food.
Run a Self-Clean Cycle if Available
Some newer models of the Ninja Air Fryer Oven include a self-clean or steam clean function. If your model has this feature, use it after heavy cooking sessions. It is not a replacement for a full deep clean, but it helps maintain cleanliness between deeper sessions.
Common Mistakes to Avoid When Cleaning
Even with the best intentions, people make mistakes that can damage their air fryer oven. Here are the most common errors and how to avoid them.
- Using abrasive cleaners or pads: These destroy the nonstick coating. Once the coating is damaged, it cannot be repaired.
- Submerging the main unit in water: The motorized base should never be immersed. Only clean removable parts in water.
- Skipping the drying step: Moisture left on parts leads to rust and unpleasant odors in your next cook.
- Using too much water on the heating element: Water near electrical components is dangerous and can ruin the appliance.
- Ignoring the fan and ventilation areas: Blocked vents reduce airflow and cooking efficiency. Keep these areas clear of grease and debris.
- Reassembling parts while still wet: Always dry everything completely before putting the Ninja Air Fryer Oven back together.
Avoiding these mistakes protects your investment and ensures your air fryer oven continues to perform at its best for years to come.
Expert Tips for a Sparkling Clean Air Fryer Oven
Here are some bonus tips from cleaning professionals and experienced home cooks that take your Ninja Air Fryer Oven maintenance to the next level.
- Clean in the morning: Food residue is easier to remove when it has not had time to harden overnight. Clean your air fryer oven the morning after heavy use.
- Use lemon for odors: After cleaning, place a bowl of water with lemon slices inside the oven and run it for five minutes. This leaves a fresh, clean scent.
- Keep a cleaning kit ready: Store a dedicated sponge, cloth, and brush near your air fryer oven. When cleaning supplies are close, you are more likely to do quick maintenance.
- Label your parts: If you have multiple accessories, label storage spots so nothing gets misplaced during reassembly.
- Clean the outside with the inside: Grease splatters on the exterior are often missed. Wipe down the outside every time you clean the interior.
These small habits add up. Over time, they make deep cleaning faster and keep your appliance in exceptional condition.
When to Replace Parts Instead of Cleaning
Not every part can be saved through cleaning. Knowing when to replace is just as important as knowing how to clean.
Replace the nonstick basket or tray if you notice:
- Flaking or peeling coating
- Deep scratches that go through the surface
- Warping that prevents proper fit
- Rust that does not come off with cleaning
- Handles that are loose or damaged
Using damaged parts in your Ninja Air Fryer Oven affects cooking results and can release harmful particles into your food. When in doubt, check with the manufacturer or a trusted retailer for replacement parts.
Conclusion
Deep cleaning your Ninja Air Fryer Oven does not have to be a chore. With the right supplies, the right technique, and a consistent routine, it takes just 30 to 45 minutes to get your appliance looking and performing like new. The steps are simple, the supplies are affordable, and the results are worth every minute spent.
Remember that regular maintenance between deep cleans makes the entire process easier. A quick wipe after each use, an empty crumb tray, and lined baking trays all contribute to a cleaner oven that lasts longer. Your Ninja Air Fryer Oven delivers great meals every time — and with proper care, it will keep doing so for years.
Start your deep clean today. Your future self — and your taste buds — will thank you. A clean air fryer oven is a happy air fryer oven, and a happy oven means better food on your table every single time.
Frequently Asked Questions
Can I put the Ninja Air Fryer Oven basket in the dishwasher?
Most Ninja Air Fryer Oven baskets are dishwasher safe, but always check your specific model’s user manual first. Hand washing with warm soapy water is gentler and helps extend the life of the nonstick coating. If you do use the dishwasher, place the basket on the top rack to avoid damage from intense heat.
How do I remove tough grease stains from the air fryer oven interior?
The baking soda paste method works best for tough grease stains. Mix baking soda with water to form a thick paste, apply it to the greasy areas, and let it sit for 20 to 30 minutes. Then scrub gently with a soft sponge and wipe clean with a damp cloth. For persistent grease, the vinegar steam method softens the buildup before you scrub.
Is it safe to use vinegar to clean a Ninja Air Fryer Oven?
Yes, white vinegar is safe and effective for cleaning your air fryer oven. It cuts through grease naturally and eliminates odors without leaving harmful residues. Just avoid using vinegar directly on the heating element or any electrical components. Always dilute vinegar with water for interior cleaning and use it in moderation.
How do I get rid of bad smells from my Ninja Air Fryer Oven?
Bad smells usually come from trapped grease and old food particles. A deep clean with soapy water and baking soda removes the source of the odor. After cleaning, run a quick steam cycle with a bowl of water and a few slices of lemon inside the oven. This leaves a fresh, clean scent behind.
How often should I replace the nonstick basket or tray?
With proper care, the nonstick basket and tray should last one to two years of regular use. Replace them sooner if you notice flaking, deep scratches, or warping. Using damaged nonstick surfaces can affect food quality and may release harmful particles into your meals.
Can I use oven cleaner on my Ninja Air Fryer Oven?
It is best to avoid commercial oven cleaners on your Ninja Air Fryer Oven. These products contain harsh chemicals that can damage the nonstick coating and leave toxic residues. Stick to gentle, food-safe cleaners like baking soda, vinegar, and dish soap. They are just as effective and completely safe for your appliance.