How Long To Sear Steak Before Putting In Your Oven
Discover the perfect timing for searing steak before oven finishing. This guide reveals exactly how long to sear steak before putting it in the oven, ensuring a flavorful crust and juicy interior. You’ll learn the traditional sear method, reverse sear technique, and key temperatures for steak doneness.
There is nothing quite like a steak with a deep, caramelized crust and a juicy, pink center. The secret to that perfect steak lies in the how long to sear steak before putting in your oven process. Many home cooks wonder whether they should just pop a steak in the oven or give it a hard sear first. The answer is a resounding yes—sear it first.
Searing before oven finishing builds flavor fast. The high heat creates the Maillard reaction, that beautiful brown crust that makes your mouth water. Then the gentle oven heat brings the steak to the exact doneness you want. This two-step method gives you restaurant-quality results in your own kitchen.
In this guide, we break down the exact timing, temperatures, and techniques. You will learn how long to sear steak before putting it in the oven, whether you prefer a thick ribeye or a lean filet. We also cover the reverse sear method, common mistakes, and pro tips that elevate your steak game. By the end, you will know exactly how to cook a steak that wows every time.
Key Takeaways
- Sear time matters: Most steaks need 2–3 minutes per side in a screaming hot pan before oven finishing.
- Temperature control is key: Use a meat thermometer to hit your perfect doneness without guessing.
- Cast iron is king: A heavy skillet holds heat best for a deep, golden crust.
- Rest your steak: Let it sit for 5–10 minutes after cooking to keep juices locked in.
- Reverse sear works great: Oven first, then a quick sear gives even doneness and a beautiful crust.
- Avoid common mistakes: Don’t overcrowd the pan, skip the rest, or use a cold steak.
📑 Table of Contents
Why Searing Steak Before Oven Matters
Some people skip the sear and just bake the steak. That works, but it lacks the deep flavor and texture that a good sear provides. Searing is not just about looks. It is a flavor-building powerhouse.
The Maillard Reaction: Flavor You Can Taste
When a steak hits a hot pan, the amino acids and sugars on the surface react. This is called the Maillard reaction. It creates hundreds of new flavor compounds. The result is a rich, savory crust that you cannot get from oven heat alone. The sear adds a complex, roasted, almost nutty taste that makes every bite memorable.
Why Not Just Use the Oven?
An oven cooks steak evenly, but it does not create a crust. The dry heat slowly warms the meat, which can lead to a gray, uniform texture. A sear gives you contrast—crispy outside, tender inside. It also adds a visual appeal with those beautiful golden-brown marks. How long to sear steak before putting in your oven is the question that unlocks this contrast.
Quick Tip: Pat your steak completely dry with paper towels before searing. Moisture is the enemy of a good crust. Dry surface equals better browning.
The Perfect Sear: Time and Temperature
The golden rule for how long to sear steak before putting in oven is simple: 2 to 3 minutes per side. But the exact time depends on the steak’s thickness, the pan temperature, and the fat content. Let us break it down.
How Long to Sear Each Side
For a standard 1-inch thick steak, 2 minutes per side is ideal. For a thicker 1.5-inch steak, go 3 minutes per side. You want a deep brown crust, not just a quick tan. Here is a quick guide:
- 1-inch steak: 2 minutes per side in a 450°F (230°C) pan.
- 1.5-inch steak: 3 minutes per side in a 450°F (230°C) pan.
- 2-inch steak: 3–4 minutes per side, or use the reverse sear method.
Pan and Oil Selection
Use a cast iron skillet or stainless steel pan. These hold heat well and distribute it evenly. Avoid non-stick pans for searing—they cannot handle the extreme heat needed for a good crust. Choose an oil with a high smoke point, like avocado oil, grapeseed oil, or clarified butter. Regular butter will burn quickly and add a bitter taste.
Quick Tip: Heat the pan until it just starts to smoke lightly. That is the perfect temperature. A drop of water should sizzle and evaporate instantly.
| Steak Thickness | Sear Time Per Side | Pan Temperature | Best Pan Type |
|---|---|---|---|
| 1 inch | 2 minutes | 450°F (230°C) | Cast iron |
| 1.5 inches | 3 minutes | 450°F (230°C) | Cast iron |
| 2 inches | 3–4 minutes | 475°F (245°C) | Cast iron or stainless steel |
Step-by-Step: Searing Then Oven Finishing
Now that you know the timing, let us walk through the full process. Following these steps ensures a perfect sear and an evenly cooked steak every time.
Step 1: Prep the Steak
Remove the steak from the refrigerator 30–45 minutes before cooking. Let it come to room temperature. Cold steak seizes in a hot pan and cooks unevenly. Pat it dry with paper towels. Season generously with coarse salt and freshly ground black pepper. You can add garlic powder or smoked paprika for extra flavor, but salt and pepper are the foundation.
Step 2: Heat the Pan
Place your cast iron skillet on the stove over high heat. Let it get ripping hot. Add about 1 tablespoon of avocado oil. Wait until the oil shimmers and just begins to smoke. This is your signal that the pan is ready.
Step 3: Sear the Steak
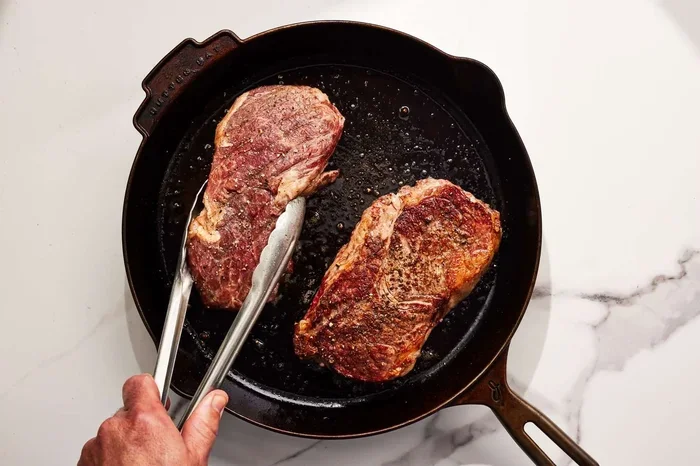
Lay the steak away from you to avoid oil splatter. Do not move it. Let it sear undisturbed for 2–3 minutes. You will see the edges turn brown and the steak release naturally from the pan. Flip it using tongs. Sear the other side for the same amount of time. For a thick steak, you can also sear the edges for 30 seconds each to render the fat cap.
Step 4: Transfer to the Oven
Immediately place the entire skillet into a preheated oven. Set the temperature based on your desired doneness. The oven finish gently brings the steak to the perfect internal temperature without overcooking the crust.
Quick Tip: If you do not have an oven-safe skillet, transfer the steak to a sheet pan lined with a wire rack before putting it in the oven. This keeps the bottom from steaming and losing its crust.
Reverse Sear Method: Oven First, Then Sear
The reverse sear flips the traditional method on its head. You start in the oven and finish with a quick, hard sear. This method is perfect for thick steaks (2 inches or more) because it gives you edge-to-edge perfect doneness with a stunning crust.
When to Use the Reverse Sear
Use the reverse sear when you want a steak that is pink all the way through, with no gray band. It is ideal for thick-cut ribeyes, tomahawks, and bone-in steaks. It also gives you more control because the oven does the gentle cooking, and the sear is just for flavor and texture.
Reverse Sear Timing and Temperature
Start by placing the steak on a wire rack set over a baking sheet. Put it in a low oven, around 225°F (110°C). Cook until the internal temperature is about 10–15 degrees below your target doneness. This takes roughly 20–30 minutes for a 2-inch steak. Then, remove it and sear in a blazing hot cast iron skillet for 1–2 minutes per side. The result is a uniform pink steak with a deep, flavorful crust.
Expert Insight: Chef Michael Symon says the reverse sear is the best method for thick cuts because you “cook the steak gently and evenly, then finish with a hard sear for the crust you crave.”
Steak Doneness and Internal Temperatures
Knowing the right internal temperature is the most important part of cooking steak. The sear time gets you the crust, but the oven time brings the inside to perfection. Use a digital meat thermometer inserted into the thickest part of the steak.
Temperature Guide for Perfect Doneness
Here is a quick reference for steak internal temperatures right when you pull the steak from the oven. The temperature will rise 5–10 degrees while resting.
- Rare: 120°F (49°C) – cool red center
- Medium Rare: 130°F (54°C) – warm red center
- Medium: 140°F (60°C) – pink center
- Medium Well: 150°F (66°C) – slight pink
- Well Done: 160°F (71°C) – no pink
Resting the Steak
Resting is not optional. When you cut into a hot steak, the juices run out onto the plate. Resting lets the juices redistribute throughout the meat. Place the steak on a cutting board and tent it loosely with foil for 5–10 minutes. This simple step makes a huge difference in juiciness. How long to sear steak before putting in your oven is only half the battle—resting completes it.
Quick Tip: If you are cooking multiple steaks, rest them together on a warm plate. The carryover cooking will gently bring them to the final temperature.
Common Mistakes to Avoid
Even experienced cooks sometimes make errors that ruin a good steak. Here are the most common mistakes and how to avoid them.
Overcrowding the Pan
Never put more than one steak in the pan at a time. Overcrowding drops the pan temperature and creates steam instead of a sear. You will get gray, boiled meat instead of a beautiful crust. Cook one steak at a time, or use two pans.
Skipping the Rest
Cutting into a steak immediately after cooking releases all the juices. The steak will be dry and less flavorful. Always rest for at least 5 minutes. This is a non-negotiable step for juicy results.
Using a Cold Steak
A fridge-cold steak seizes in a hot pan, causing the center to undercook while the outside overcooks. Always bring the steak to room temperature for 30–45 minutes before searing. This promotes even cooking from edge to edge.
Not Preheating the Pan Enough
A lukewarm pan will not give you a sear. It will just cook the steak gently. Preheat the pan until it is smoking hot. If the steak sizzles gently when it hits the pan, the pan is not hot enough.
Moving the Steak Too Early
Let the steak sit undisturbed during the sear. If you move it around, you will break the crust and prevent proper browning. Wait until it releases naturally from the pan before flipping.
Expert Tips for a Restaurant-Quality Steak
Take your steak from good to unforgettable with these professional tips. These small details make a big difference in flavor and texture.
Seasoning Secrets
Salt the steak at least 40 minutes before cooking, or right before. Salting early draws out moisture, which dissolves the salt and gets reabsorbed. This seasons the meat deeply and helps create a better crust. If you are short on time, a heavy sprinkle of salt right before searing still works well.
Basting with Butter
During the oven finish, you can baste the steak with butter, garlic, and thyme. Tilt the skillet slightly and spoon the hot, flavored butter over the steak every minute. This adds richness and a nutty aroma that elevates the steak to a whole new level.
Slicing Against the Grain
When it is time to serve, look at the muscle fibers. Slice perpendicular to them, not parallel. This shortens the fibers and makes the steak much more tender. A sharp knife makes this step easy and clean.
Key Takeaways
- Sear for 2–3 minutes per side in a blazing hot cast iron skillet before oven finishing.
- Use a meat thermometer to hit your target internal temperature perfectly.
- Rest your steak for 5–10 minutes after cooking to keep juices locked in.
- Try the reverse sear for thick steaks to get even doneness and a great crust.
- Avoid cold steak, overcrowding, and skipping the rest for consistent, juicy results.
Conclusion
Mastering how long to sear steak before putting in your oven is the key to a perfect steak at home. The traditional method gives you a fast, flavorful crust and a tender interior in under 15 minutes. The reverse sear offers more control for thick cuts and a uniform pink center. Both methods rely on a hot pan, the right timing, and a reliable meat thermometer.
Remember the basics: dry the steak, hot pan, 2–3 minutes per side, and rest before slicing. Avoid common pitfalls like overcrowding and skipping the rest. With these techniques, you can serve steakhouse-quality meals that will impress your family and friends. So fire up your stove, preheat that oven, and get ready to cook the best steak of your life.
Frequently Asked Questions
How long should I sear a steak before putting it in the oven?
For most steaks, sear for 2–3 minutes per side in a smoking hot pan. Thicker steaks (1.5 inches or more) may need 3–4 minutes per side. The goal is a deep brown crust without burning the surface.
Can I sear steak in a stainless steel pan?
Yes, stainless steel works well for searing. It heats evenly and can reach high temperatures. Just make sure the pan is properly preheated and use a high-smoke-point oil like avocado oil or grapeseed oil.
What is the reverse sear method and when should I use it?
The reverse sear means cooking the steak in a low oven first (around 225°F) until it is 10–15 degrees below your target doneness, then searing it in a hot pan for 1–2 minutes per side. Use this method for thick steaks (2 inches or more) to get even doneness from edge to edge.
How do I know when the steak is done in the oven?
Use a digital meat thermometer. Insert it into the thickest part of the steak. Pull the steak when it is 5–10 degrees below your target temperature, because the temperature will rise during resting. Rare is 120°F, medium rare is 130°F, and medium is 140°F.
Why is my steak tough after searing and oven cooking?
Tough steak usually comes from overcooking or skipping the rest. Overcooking dries out the meat, and not resting lets the juices escape when you cut. Always use a thermometer and let the steak rest for at least 5 minutes before slicing.
Do I need to let the steak come to room temperature before searing?
Yes, taking the steak out 30–45 minutes before cooking helps it sear more evenly. A cold steak can cause the outside to burn before the inside is cooked. This simple step leads to a much better result.