How Do You Cook A Ham In The Oven And Get It Right
Learn how do you cook a ham in the oven and get perfect results every time. This guide covers everything from choosing the right ham to making a delicious glaze and hitting the ideal internal temperature. You will find easy step-by-step instructions, pro tips, and common mistakes to avoid.
Cooking a ham in the oven might seem intimidating at first. But once you understand the basics, it becomes one of the easiest and most rewarding meals you can prepare. Whether you are planning a holiday dinner or simply want a delicious centerpiece for your family table, learning how do you cook a ham in the oven is a skill that will serve you well for years to come.
The good news is that oven-baked ham is forgiving. Even if you are a beginner in the kitchen, you can produce a moist, flavorful, and beautifully glazed ham with the right guidance. This article walks you through every single step. From selecting the perfect ham at the store to pulling it out of the oven with a gorgeous golden glaze, we have you covered.
We will also share insider tips that professional cooks use. These ham cooking tips will help you avoid common mistakes and elevate your results. By the end of this guide, you will feel confident enough to tackle any ham recipe with ease.
Key Takeaways
- Choose the Right Ham: Bone-in hams offer more flavor, while boneless hams are easier to slice and serve.
- Preheat and Pat Dry: Always preheat your oven to 325°F and pat the ham dry for a crispier exterior.
- Glaze Late, Glaze Often: Apply your ham glaze in the last 15-20 minutes of cooking to prevent burning.
- Use a Meat Thermometer: The internal temperature should reach 140°F for fully cooked hams and 160°F for raw hams.
- Let It Rest: Allow the ham to rest for 10-15 minutes before carving to keep it juicy.
- Store Leftovers Properly: Wrap tightly and refrigerate within two hours for up to five days of enjoyment.
📑 Table of Contents
- Understanding the Different Types of Ham You Can Cook
- Preparing Your Ham for the Oven
- Setting the Right Oven Temperature and Cooking Time
- Making a Delicious Ham Glaze from Scratch
- Step-by-Step Guide to Cooking Ham in the Oven
- Slicing, Serving, and Storing Your Finished Ham
- Common Mistakes to Avoid When Cooking Ham
- Expert Insights on Perfect Oven-Baked Ham
- Frequently Asked Questions
- Conclusion
Understanding the Different Types of Ham You Can Cook
Not all hams are created equal. Before you start cooking, it helps to understand what kind of ham you are working with. The type of ham you choose affects your cooking time, temperature, and even the glaze you should use.
Bone-In Ham vs. Boneless Ham
A bone-in ham comes with the femur bone still inside the meat. This type of ham tends to have more flavor because the bone adds richness during cooking. It also looks impressive on a holiday table. The downside is that bone-in hams can be trickier to slice evenly.
A boneless ham has the bone removed, usually after the meat is pressed into a loaf shape. This makes it much easier to carve and serve. Boneless hams also cook a bit more evenly since there is no bone to conduct heat differently. Many home cooks prefer boneless hams for everyday meals.
Fully Cooked vs. Raw Ham
Most hams you buy at the grocery store are fully cooked. This means they have already been cured and smoked. You simply need to heat them through in the oven. These hams only need to reach an internal temperature of 140°F before they are safe to eat.
Raw ham, sometimes called fresh ham, has not been cured or smoked. This type needs to be cooked to 160°F to be safe. Raw ham is less common in most grocery stores but can be found at specialty butcher shops. Always check the label to know which type you have.
Spiral Ham and Other Popular Cuts
A spiral ham is a fully cooked ham that has been pre-sliced in a spiral pattern. This cut is incredibly popular for holiday meals because it is easy to serve. You simply place it in the oven, add a glaze, and heat it through. The pre-sliced nature means less work for you when it is time to serve.
Other popular cuts include the shank end and the butt end. The shank end comes from the lower portion of the leg and tends to be leaner. The butt end comes from the upper portion and has more fat, which means more flavor and moisture. Both cuts work wonderfully in the oven.
Preparing Your Ham for the Oven
Proper preparation is the foundation of a great ham. Skipping this step can lead to dry meat or uneven cooking. Take your time here, and the rest of the process will go smoothly.
Unwrapping and Rinsing the Ham
Start by removing the ham from its packaging. If it came in a vacuum-sealed bag, unwrap it carefully and discard the packaging. Some hams come with a netting wrapper, which you can leave on or remove depending on your preference.
Rinse the ham under cold running water. This removes any surface residue from processing. Pat the ham thoroughly dry with paper towels. A dry surface helps the glaze adhere better and promotes a nice caramelized crust during baked ham cooking.
Scoring the Ham
Scoring means cutting shallow diamond shapes into the surface of the ham. This is an important step for several reasons. First, it allows the glaze to penetrate deeper into the meat. Second, it creates attractive presentation lines that make the finished ham look professional. Third, scoring helps excess fat render out during cooking, which leads to a crispier exterior.
Use a sharp knife to cut shallow slits about a quarter-inch deep. Create a diamond pattern by cutting diagonal lines in both directions. Be careful not to cut too deep. You want to score the surface fat and meat, not cut all the way through.
Adding Flavor Before Cooking
Before placing the ham in the oven, consider adding whole cloves to the scored diamonds. Simply press a whole clove into the center of each diamond. Cloves add a warm, aromatic flavor that pairs beautifully with ham. This is a classic technique that many holiday ham recipes call for.
You can also rub a little mustard or olive oil over the surface before applying the glaze. The mustard acts as a sticky base that helps the glaze cling to the ham. This small step can make a big difference in the final result.
Setting the Right Oven Temperature and Cooking Time
Getting the temperature and timing right is the key to a perfectly cooked ham. Too hot and the outside will burn before the inside is heated through. Too cool and the ham will take forever to cook and may dry out.
Recommended Oven Temperature
The standard oven temperature for cooking ham is 325°F. This moderate heat allows the ham to warm through evenly without drying out the outer layers. Almost every ham recipe you will find recommends this temperature.
If you are in a rush, you can increase the temperature to 350°F. This will reduce cooking time slightly but requires more careful monitoring. You need to check the internal temperature more frequently to prevent overcooking.
For a slow and gentle approach, some cooks prefer 275°F. This lower temperature takes longer but can produce incredibly tender results. It is a great option if you have plenty of time and want to minimize the risk of drying out the meat.
Calculating Cooking Time
The general rule for cooking time is about 10 to 12 minutes per pound for a fully cooked ham at 325°F. So a 10-pound ham would take roughly 1 hour and 40 minutes to 2 hours. However, this is just a starting point.
Several factors affect how long your ham will take. A bone-in ham usually takes longer than a boneless ham of the same weight. The starting temperature of the ham also matters. A ham that has been sitting in the refrigerator will take longer than one that is at room temperature.
Always use a meat thermometer to check doneness rather than relying solely on the clock. This is the most reliable way to ensure your ham is perfectly cooked throughout.
Quick Tips for Timing
- Plan ahead: Factor in resting time after cooking. A ham needs 10 to 15 minutes to rest before carving.
- Start early: For a holiday dinner, start the ham at least 2 to 3 hours before serving time.
- Use a timer: Set multiple timers to check the temperature at different stages of cooking.
- Account for glaze time: The glaze goes on in the last 15 to 20 minutes, so factor that into your schedule.
Making a Delicious Ham Glaze from Scratch
The glaze is what transforms a good ham into a great ham. A well-made glaze adds sweetness, depth, and a beautiful glossy finish. Best of all, you can make it from scratch with just a few simple ingredients.
Classic Brown Sugar Glaze
The most popular glaze for brown sugar ham is simple and hard to mess up. You will need brown sugar, Dijon mustard, and a splash of pineapple juice or apple cider vinegar. Mix these together in a small bowl until smooth.
The brown sugar caramelizes in the oven, creating a sweet and slightly crispy crust. The mustard adds a tangy kick that balances the sweetness. This glaze works beautifully on spiral hams and is a crowd-pleaser at any gathering.
Honey and Herb Glaze
For a more complex flavor, try a honey-based glaze. Combine honey with a little olive oil, fresh thyme, and a pinch of garlic powder. This glaze adds a savory-sweet profile that pairs well with both bone-in and boneless hams.
You can also add a squeeze of orange juice to brighten the flavors. The citrus cuts through the richness of the pork and adds a refreshing note. This type of glaze is perfect for those who want their oven-baked ham to taste more sophisticated.
Maple Mustard Glaze
A maple mustard glaze combines pure maple syrup with whole grain mustard and a touch of apple cider. The result is a glaze that is both sweet and tangy with a rustic texture from the mustard seeds.
This glaze is especially popular during fall and winter holidays. It complements the natural smokiness of the ham beautifully. Apply it in the last 15 minutes of cooking for the best results.
When to Apply the Glaze
Timing is everything when it comes to glazing. You should apply the glaze during the last 15 to 20 minutes of cooking. If you put the glaze on too early, the sugars will burn and turn bitter.
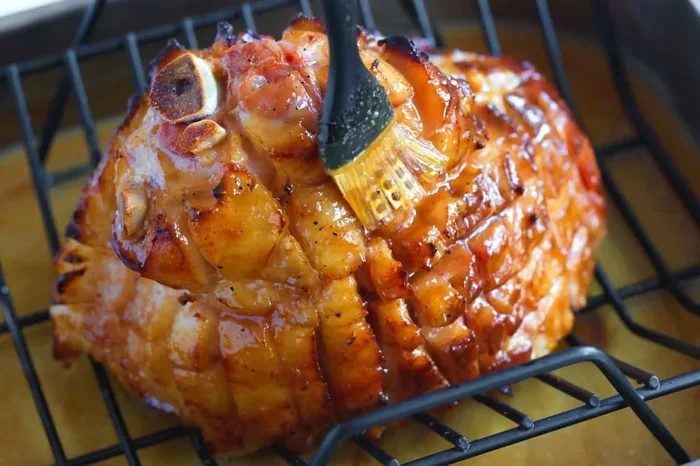
For the best results, apply the glaze in three layers. Spread a thin coat, wait five minutes, then add another coat. Repeat once more. This layering technique creates a thick, glossy, and deeply caramelized finish that looks and tastes amazing.
Step-by-Step Guide to Cooking Ham in the Oven
Now that you have prepared your ham and made your glaze, it is time to put everything together. Follow these steps for a foolproof baked ham every single time.
Step 1: Preheat the Oven
Preheat your oven to 325°F. Give it at least 15 to 20 minutes to reach the target temperature. A properly preheated oven ensures even cooking from the moment the ham goes in.
Step 2: Place the Ham in a Roasting Pan
Set the ham cut-side down in a roasting pan or baking dish. If you have a rack, use it. The rack allows hot air to circulate around the ham, promoting even cooking. If you do not have a rack, the ham will still cook fine, but you may need to baste it more often.
Add about a cup of water or apple juice to the bottom of the pan. This creates steam that keeps the ham moist during cooking. It also makes cleanup easier by preventing drippings from sticking to the pan.
Step 3: Cover and Cook
Cover the ham loosely with aluminum foil. The foil traps moisture and prevents the surface from drying out too quickly. Do not wrap the ham tightly in foil. You want some air circulation for even cooking.
Place the pan in the preheated oven and cook for about two-thirds of the total estimated time. For a 10-pound ham, this would be roughly one hour and 15 minutes. The ham should be heating through steadily during this phase.
Step 4: Apply the Glaze
Remove the foil and brush the first layer of glaze over the ham. Increase the oven temperature to 400°F for the final phase. This higher heat helps the glaze caramelize and form a beautiful golden-brown crust.
Return the ham to the oven uncovered. Continue cooking for the remaining time, basting with additional glaze every five minutes. The ham is done when the glaze is thick, glossy, and slightly caramelized at the edges.
Step 5: Check the Internal Temperature
Use a meat thermometer inserted into the thickest part of the ham. For a fully cooked ham, the target temperature is 140°F. For a raw ham, it should reach 160°F. Do not let the thermometer touch the bone, as this can give a false reading.
Once the ham reaches the correct temperature, remove it from the oven immediately. Let it rest for 10 to 15 minutes before carving. This resting period allows the juices to redistribute throughout the meat, resulting in a moister slice.
Step 6: Carve and Serve
Place the ham on a cutting board. If it is a bone-in ham, start by slicing along the bone to release whole slices. For boneless hams, simply slice against the grain into thin, even pieces. Arrange the slices on a serving platter and spoon any remaining pan juices over the top.
Ham carving does not need to be perfect. The slices will look rustic and homemade, which adds charm to any meal. Serve with your favorite sides like roasted potatoes, green beans, or a fresh salad.
Slicing, Serving, and Storing Your Finished Ham
Your ham is out of the oven and looking beautiful. Now what? Proper slicing, serving, and storage techniques will help you enjoy every last bite and make the most of your leftovers.
How to Slice Ham Properly
For bone-in hams, turn the ham with the cut side facing up. Slice downward along the bone, following its natural curve. This produces clean, even slices that are easy to serve. Cut slices about a quarter-inch thick for the best balance of meat and glaze.
For boneless hams, slice against the grain. This means cutting perpendicular to the direction of the muscle fibers. Slicing against the grain makes the meat more tender and easier to chew. If you are unsure which direction the grain runs, look for the lines of muscle fiber on the cut surface.
Serving Suggestions
Ham pairs well with a wide variety of sides. Classic combinations include scalloped potatoes, honey-glazed carrots, and dinner rolls. For a lighter meal, serve sliced ham alongside a fresh fruit salad and crusty bread.
Leftover ham makes excellent sandwiches the next day. Simply pile slices onto toasted bread with mustard, lettuce, and tomato. You can also chop ham and add it to omelets, soups, or pasta dishes. Savory ham leftovers are incredibly versatile.
Storing Leftover Ham
Wrap leftover ham tightly in plastic wrap or aluminum foil. Place it in an airtight container or zip-lock bag. Refrigerate within two hours of cooking. Properly stored ham keeps in the refrigerator for up to five days.
You can also freeze ham for longer storage. Wrap individual slices in freezer paper and place them in a freezer bag. Frozen ham keeps well for up to three months. Thaw slices in the refrigerator overnight before reheating.
Reheating Leftover Ham
To reheat ham without drying it out, wrap slices in foil and warm them in a 275°F oven for about 10 to 15 minutes. You can also reheat slices in a skillet with a little broth or water on low heat. The key is gentle heat and moisture to preserve the texture.
Common Mistakes to Avoid When Cooking Ham
Even experienced cooks can make mistakes when preparing ham. Being aware of these pitfalls helps you avoid them and achieve better results.
Overcooking the Ham
The most common mistake is overcooking. Ham is already fully cooked, so you are really just heating it through. Overcooking strips the meat of its moisture and leaves it dry and tough. Always use a meat thermometer and pull the ham as soon as it reaches the target temperature.
Applying the Glaze Too Early
Putting the glaze on too early is another frequent error. The sugars in the glaze burn at high temperatures over long periods. This creates a bitter, blackened exterior that ruins the appearance and taste. Always wait until the last 15 to 20 minutes to apply the glaze.
Skipping the Resting Period
Cutting into the ham immediately after removing it from the oven causes the juices to run out onto the cutting board instead of staying in the meat. The resting period is essential for a juicy, tender result. Be patient and let the ham sit for at least 10 minutes.
Not Letting the Ham Come to Room Temperature
Placing a cold ham straight from the refrigerator into a hot oven creates uneven cooking. The outside may overcook while the inside is still cold. Take the ham out of the fridge about 30 minutes before cooking to let it warm up slightly.
Expert Insights on Perfect Oven-Baked Ham
Professional chefs and experienced home cooks share a few secrets that can take your ham to the next level. These insights come from years of trial and error and can make a noticeable difference in your results.
One expert tip is to score the ham deeper than you think necessary. A deeper score allows the glaze to seep into the meat more effectively. Just be careful not to cut all the way through.
Another valuable insight is to baste the ham with its own pan juices during cooking. This adds flavor and moisture naturally. Simply spoon the liquid from the bottom of the pan over the ham every 20 to 30 minutes during the uncovered phase.
Some cooks swear by adding a whole pineapple ring on top of the ham during the last 30 minutes of cooking. The pineapple juices infuse the ham with a subtle tropical sweetness while the ring caramelizes beautifully. This technique works especially well with brown sugar glazes.
For the best holiday ham presentation, garnish the serving platter with fresh herbs like rosemary and thyme. Add some whole cloves in the scored diamonds just before serving. These small touches make a big visual impact and show your guests you put extra care into the meal.
Frequently Asked Questions
How long does it take to cook a ham in the oven?
It typically takes about 10 to 12 minutes per pound at 325°F for a fully cooked ham. So a 10-pound ham takes roughly 1 hour and 40 minutes to 2 hours. Always use a meat thermometer to confirm doneness rather than relying solely on the clock.
What temperature should ham be cooked to in the oven?
A fully cooked ham should reach an internal temperature of 140°F. A raw or fresh ham needs to reach 160°F. Always insert the thermometer into the thickest part of the meat, avoiding the bone, for an accurate reading.
Do you cover a ham with foil when baking it in the oven?
Yes, covering the ham with foil for most of the cooking time helps retain moisture and prevents the outside from drying out. Remove the foil during the last 15 to 20 minutes to allow the glaze to caramelize and the surface to become crisp.
Can you cook a spiral ham in the oven?
Absolutely. Spiral hams are designed to be cooked in the oven. Place them cut-side down in a roasting pan, cover with foil, and heat at 325°F. Apply your glaze in the last 15 minutes for a beautiful, caramelized finish.
How do you keep ham moist in the oven?
To keep ham moist, pat it dry before cooking, score it properly, and cover it with foil during most of the cooking process. Adding liquid like apple juice to the bottom of the pan creates steam that helps retain moisture. Also, do not overcook the ham and always let it rest before slicing.
What is the best glaze for ham?
The best glaze depends on your personal preference. A classic brown sugar and mustard glaze is the most popular and reliable. Honey glazes add a lighter sweetness, while maple mustard glazes offer a rich, complex flavor. You can also experiment with fruit-based glazes using pineapple or apricot preserves.
Conclusion
Learning how do you cook a ham in the oven is easier than you might think. With the right ham, the right temperature, and a delicious glaze, you can create a show-stopping centerpiece that your family and guests will love. The key is preparation, patience, and attention to detail.
Choose your ham wisely, whether it is bone-in or boneless, fully cooked or fresh. Score it properly, apply your glaze at the right time, and always use a meat thermometer to check for doneness. These simple steps will take your oven-baked ham from ordinary to extraordinary.
Remember that practice makes perfect. Every time you cook a ham, you will learn something new about your oven and your preferences. Soon, cooking ham in the oven will become second nature to you. You will be able to experiment with different glazes, adjust cooking times, and put your own creative spin on classic recipes.
So the next time you are planning a special meal or simply want to treat your family to something delicious, remember what you have learned here. Fire up your oven, grab a ham, and get cooking. You have got this, and the results will be well worth the effort.