How To Cook Beef Brisket In Dutch Oven Step By Step
Cooking beef brisket in a Dutch oven is the easiest way to get restaurant-quality results at home. This method uses low, slow heat to break down tough connective tissue and create melt-in-your-mouth meat. You will learn how to select the right cut, season it perfectly, and braise it to tender perfection. Our step-by-step instructions make it simple even for beginners. Dutch oven brisket turns out incredibly juicy with a rich, deep flavor that slow cookers and ovens cannot match.
There is something magical about a beef brisket cooked low and slow in a Dutch oven. The kitchen fills with a rich, smoky aroma that makes everyone in the house come running. Unlike grilling or smoking, this method gives you complete control over the cook. You do not need expensive equipment or years of experience. Just a good Dutch oven, a quality piece of meat, and a little patience.
If you have been wondering how to cook beef brisket in Dutch oven without drying it out, you are in the right place. This guide walks you through every single step from selecting the meat to slicing the finished product. We will cover seasoning, searing, braising liquid, oven temperature, and resting time. By the end, you will feel confident enough to make this your go-to weekend dinner. Dutch oven brisket is one of those dishes that impresses guests and feeds a crowd with ease.
Key Takeaways
- A Dutch oven is the best tool for cooking brisket: Its heavy lid and thick walls trap moisture and heat evenly for tender results.
- Low and slow cooking is the key: Cooking at 300°F for 4-6 hours breaks down collagen and creates juicy, fall-apart meat.
- Searing first adds deep flavor: A hot sear on all sides builds a rich bark and caramelized crust before braising.
- Resting the brisket matters: Letting it rest for 20-30 minutes redistributes juices for a better slice.
- Always slice against the grain: This simple step makes every bite tender and easy to chew.
- You can use leftovers creatively: Leftover brisket makes amazing sandwiches, tacos, and hash the next day.
📑 Table of Contents
- What Is a Dutch Oven and Why It Works for Brisket
- Choosing the Right Beef Brisket
- Essential Ingredients and Seasonings for Dutch Oven Brisket
- Step-by-Step Cooking Process for Dutch Oven Brisket
- Common Mistakes to Avoid When Cooking Brisket in a Dutch Oven
- Tips for Perfect Dutch Oven Brisket Every Time
- Expert Insights on Cooking Brisket Low and Slow
- What to Do with Leftover Brisket
- Conclusion
What Is a Dutch Oven and Why It Works for Brisket
A Dutch oven is a heavy cooking pot made of cast iron or enameled steel. It has a tight-fitting lid that locks in moisture. The thick walls distribute heat evenly across the entire surface. This creates a perfect environment for braised beef dishes like brisket. When you compare it to a slow cooker or a regular baking dish, the Dutch oven wins on flavor and texture.
The reason it works so well for brisket comes down to science. Brisket is a tough cut full of collagen and connective tissue. These need long, gentle heat to break down into gelatin. That is what gives the meat its silky, juicy texture. A Dutch oven traps steam and recirculates it over the meat. This keeps the cooking liquid rich and the beef moist throughout the entire process.
You can use a traditional seasoned cast iron Dutch oven or an enameled version. Both work great. The enameled ones are easier to clean, while the bare cast iron develops a natural nonstick surface over time. Either one will give you excellent results for oven-braised brisket. The key is choosing one that is large enough to hold the brisket comfortably.
Choosing the Right Beef Brisket
Brisket Flat vs Point
Not all brisket cuts are the same. The two main sections are the flat and the point. The flat is the leaner, thinner part. It looks like a long rectangle and slices neatly. The point is fattier, thicker, and more marbled with intramuscular fat. It is also called the deckle.
For Dutch oven cooking, many cooks prefer a whole packer brisket. This includes both the flat and the point connected together. It gives you more flavor and more variety in each slice. However, if you want leaner meat, go with the flat alone. A whole packer brisket usually weighs between 10 and 15 pounds. For a Dutch oven, you want a piece that fits snugly without folding over.
Selecting Quality Meat
When you are at the butcher or grocery store, look for bright red meat with white fat. Avoid any that looks gray or brown. The fat should be firm and creamy white. Marbling, those thin white streaks inside the muscle, is a good sign. It melts during cooking and adds flavor and juiciness.
Choose a brisket with a thick fat cap on one side. This fat layer renders during the cook and protects the meat from drying out. If you buy a pre-trimmed brisket, ask the butcher to leave a thin layer of fat. Too much fat will just render out into grease. Too little will leave the meat dry and tough.
For the best results, buy your brisket the same day you plan to cook it. If you need to store it, keep it in the coldest part of your refrigerator for up to two days. Let it come to room temperature for about one hour before cooking. This helps it cook more evenly throughout.
Essential Ingredients and Seasonings for Dutch Oven Brisket
The beauty of Dutch oven brisket is that you do not need a complicated ingredient list. Great meat needs simple seasoning to shine. Here is what you will need for a classic braised brisket:
- Beef brisket (one whole packer or flat, about 4-6 pounds)
- Kosher salt (about 2 tablespoons for a good coat)
- Black pepper, freshly ground (2 tablespoons)
- Beef broth or stock (2-3 cups for the braising liquid)
- Aromatic vegetables like onions, carrots, and celery (chopped roughly)
- Garlic cloves, smashed (4-6 cloves)
- Tomato paste (2 tablespoons for depth of flavor)
- Worcestershire sauce (1 tablespoon for tanginess)
- Bay leaves (2 dried bay leaves)
- Fresh thyme or rosemary (a few sprigs)
You can customize this based on your taste. Some people like to add a splash of beer or apple cider vinegar to the braising liquid. Others prefer a touch of brown sugar or honey for caramelization. The beef broth forms the base of the cooking liquid. It keeps the meat moist and creates a rich sauce as it cooks. Do not skip the aromatic vegetables. They add sweetness and depth that plain water or stock alone cannot provide.
For a smoked brisket alternative, you can add a teaspoon of smoked paprika or a few drops of liquid smoke to the seasoning mix. This gives you that barbecue flavor without needing a smoker or grill. The Dutch oven does most of the work for you.
Step-by-Step Cooking Process for Dutch Oven Brisket
Step 1: Season the Brisket
Start by patting the brisket dry with paper towels. Moisture on the surface prevents a good sear. Mix kosher salt and black pepper together in a small bowl. Rub the mixture generously over all sides of the meat. Do not be shy with the seasoning. The brisket needs a solid coat to build flavor.
Let the seasoned brisket sit at room temperature for 30 to 60 minutes. This helps the salt penetrate the meat and brings the temperature closer to room temp. Cold meat placed in a hot Dutch oven cooks unevenly. Taking this small step makes a big difference in the final result.
Step 2: Sear the Brisket
Place your Dutch oven on the stovetop over medium-high heat. Add a high-smoke-point oil like vegetable or canola oil. Let the oil get hot until it shimmers. This is when you add the brisket. Sear it on all sides until you get a deep brown crust. This usually takes about 3 to 4 minutes per side.
Use tongs to hold the brisket and sear the edges too. The fat cap side often takes a bit longer. You want a dark golden-brown color all over. This process is called the Maillard reaction. It creates hundreds of new flavor compounds that give your braised beef its rich, complex taste. Do not skip this step or rush it. The sear is the foundation of great flavor.
Once seared, remove the brisket and set it aside on a plate. Leave the drippings and browned bits in the bottom of the Dutch oven. Those bits are pure flavor gold. They will become part of your braising liquid.
Step 3: Build the Braising Liquid
Reduce the heat to medium. Add the chopped onions, carrots, and celery to the Dutch oven. Stir them around for about 5 minutes until they start to soften. Add the garlic and cook for one more minute until fragrant. Stir in the tomato paste and cook for 30 seconds. This concentrates the flavor and deepens the color.
Pour in the beef broth and Worcestershire sauce. Use a wooden spoon to scrape up all the browned bits from the bottom of the pot. These bits are called fond, and they dissolve into the liquid, adding incredible savory flavor. Add the bay leaves and thyme sprigs. Stir everything together and let it simmer for a couple of minutes.
Place the seared brisket back into the Dutch oven. The liquid should come about halfway up the sides of the meat. It should not cover the top. You want the meat to braise, not boil. Braising uses gentle, indirect heat to cook the meat slowly.
Step 4: Braise in the Oven
Preheat your oven to 300°F. This low temperature is the secret to tender Dutch oven brisket. Place the covered Dutch oven into the oven on the middle rack. The tight-fitting lid keeps all the moisture locked inside. Let the brisket cook for about 4 to 6 hours.
The exact time depends on the size of your brisket. A 4-pound flat might be done in 4 hours. A 10-pound packer could take 6 hours or more. The best way to tell if it is done is by internal temperature. Use a meat thermometer inserted into the thickest part of the meat. You are aiming for an internal temperature of 195°F to 205°F.
At this temperature, the collagen has fully broken down into gelatin. The meat will be tender and juicy. If the brisket is not yet at temperature but the time is up, keep cooking. Check it every 30 minutes. Patience is the most important ingredient in any low and slow cooking recipe.
Here is a quick reference table for timing:
| Brisket Weight | Approximate Cook Time at 300°F | Target Internal Temp |
|---|---|---|
| 4-5 lbs (flat) | 3.5 – 4.5 hours | 195°F – 205°F |
| 6-8 lbs (half packer) | 4.5 – 5.5 hours | 195°F – 205°F |
| 10-12 lbs (full packer) | 5.5 – 7 hours | 195°F – 205°F |
Step 5: Rest the Brisket
Once the brisket reaches the target temperature, remove the Dutch oven from the oven. Carefully take the brisket out and place it on a large cutting board. Cover it loosely with aluminum foil. Let it rest for at least 20 to 30 minutes. This step is critical.
During cooking, the juices in the meat get pushed toward the center by the heat. Resting allows those juices to redistribute evenly throughout the brisket. If you slice it immediately, the juices will run out onto the cutting board, and your meat will be dry. A good rest makes the difference between great brisket and amazing brisket.
While the brisket rests, you can strain the braising liquid and skim off the fat. The liquid makes a fantastic base for gravy or sauce. Just simmer it on the stovetop until it reduces and thickens slightly. Add a pinch of salt and pepper to taste.
Step 6: Slice and Serve
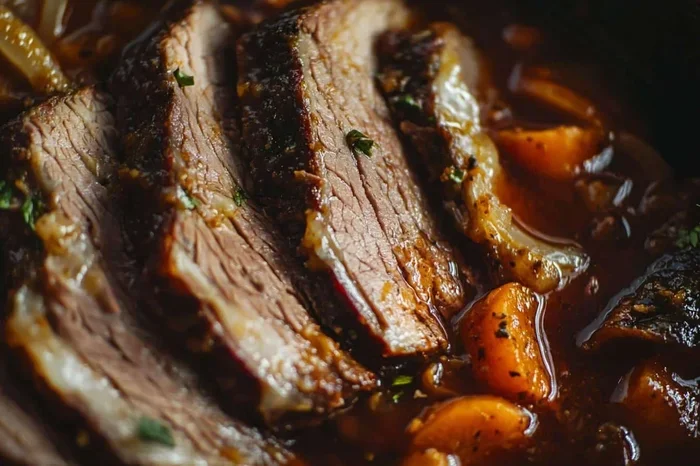
Now comes the rewarding part. Take your rested brisket and look at the grain of the meat. The grain is the direction of the muscle fibers. You need to slice against the grain. This means cutting perpendicular to those fibers. Each slice should be about a quarter-inch thick.
Use a sharp carving knife or a long slicing knife. A dull knife will shred the meat instead of giving you clean slices. Start on the flat side first, since it is more uniform. Then move to the point, which has more fat and may require a slightly different cutting angle to get the most tender slices.
Serve the sliced brisket with some of the braising liquid spooned over the top. Pair it with mashed potatoes, roasted vegetables, or crusty bread to soak up the sauce. For a beef brisket recipe that feels like a special occasion, add some roasted root vegetables from the Dutch oven. They absorb all that savory flavor and make a complete meal.
Common Mistakes to Avoid When Cooking Brisket in a Dutch Oven
Even experienced cooks make mistakes with Dutch oven brisket. Here are the most common ones and how to avoid them:
- Skipping the sear: Searing builds flavor. Without it, your brisket will taste flat and one-dimensional. Always take the time to get a good brown crust on all sides.
- Using too high an oven temperature: Cranking the heat up to cook faster is the fastest way to get tough, dry meat. Stick to 300°F and be patient. Low and slow cooking is the only way to break down the tough connective tissue properly.
- Overfilling with liquid: The braising liquid should come about halfway up the meat, not cover it. If the liquid covers the top, the meat will boil instead of braise, and you will lose that beautiful bark.
- Not letting the meat rest: Cutting into a hot brisket immediately releases all the juices. Give it at least 20 minutes under a loose foil tent.
- Slicing with the grain: This is the number one reason brisket feels chewy. Always check the grain direction and cut against it for tender slices.
- Opening the lid too often: Every time you open the lid, you lose heat and steam. Resist the urge to peek. Trust the process and check the temperature only when you think it might be done.
Tips for Perfect Dutch Oven Brisket Every Time
Use the Right Size Dutch Oven
Your Dutch oven should be large enough to hold the brisket flat without folding it. A 6-quart Dutch oven works well for most briskets under 6 pounds. For larger packer briskets, use an 8-quart or even 10-quart pot. The brisket should fit with a few inches of room around it. Crowding the pot leads to uneven cooking and poor braising.
Make Ahead and Reheat
Dutch oven brisket tastes even better the next day. Cook it a day ahead and store it in the refrigerator in its braising liquid. Reheat gently on the stovetop or in the oven at 275°F. The meat absorbs more flavor as it sits overnight. This makes it a great choice for dinner parties and holiday meals.
Add Wood Chips for Smoke Flavor
If you want a smoked brisket alternative without a smoker, try adding wood chips. Soak hickory, apple, or mesquite chips in water for 30 minutes. Wrap them in foil with a few holes poked in the top. Place the packet on the bottom of the Dutch oven before adding the brisket. The smoke flavor will infuse gently during the long braise. It is not the same as a real smoker, but it adds a nice subtle hint of smoke.
Save and Use the Braising Liquid
Do not throw away the liquid left in the Dutch oven after cooking. It is packed with flavor from the meat, vegetables, and seasonings. Strain it through a fine mesh sieve to remove the solids. Use it as a base for gravy, a cooking liquid for rice or grains, or a flavorful addition to soup. It freezes well too, so you can save it for future recipes.
Quick Tips for Success
- Bring the brisket to room temperature before cooking for even results.
- Use a meat thermometer. Do not rely on time alone.
- Pat the meat dry before seasoning for a better sear.
- Keep the oven temperature steady. Use an oven thermometer if your oven runs hot or cold.
- Let the brisket rest for at least 20 minutes before slicing.
- Slice thinly against the grain for the most tender bites.
Expert Insights on Cooking Brisket Low and Slow
Professional chefs and pitmasters agree that the Dutch oven is one of the best tools for home cooks to achieve pit-style brisket. The secret lies in the combination of heavy construction, tight lid seal, and gentle oven heat. This creates a mini smoker environment inside the pot. The braised beef develops a rich flavor profile that is hard to replicate with other methods.
One expert tip is to flip the brisket halfway through the cook. This ensures even exposure to the braising liquid and helps the fat cap render more evenly. Another tip is to add a small amount of coffee or cola to the braising liquid. The slight acidity and sugar content adds depth and helps create a darker, more flavorful bark.
Remember that every brisket is different. The thickness of the fat cap, the amount of marbling, and the exact shape of the cut all affect cooking time. Use the internal temperature as your guide, not the clock. When the meat pulls apart easily with a fork and the internal temperature is between 195°F and 205°F, it is done.
What to Do with Leftover Brisket
Dutch oven brisket makes excellent leftovers. Here are some easy ways to use it up:
- Brisket sandwiches: Pile sliced brisket on a soft bun with coleslaw and your favorite barbecue sauce.
- Brisket tacos: Warm the slices in a skillet with a little of the braising liquid. Serve in tortillas with fresh salsa and lime.
- Beef brisket hash: Dice the leftover meat and fry it with diced potatoes and onions for a hearty breakfast.
- Brisket chili: Add chunks of brisket to your favorite chili recipe for extra meaty depth.
- Brisket fried rice: Stir-fry leftover brisket with rice, vegetables, and eggs for a quick weeknight meal.
The rich flavor of oven-braised brisket only improves when reheated. The spices and braising liquid continue to develop overnight. This makes it one of the best meals for meal prep and feeding a crowd.
Conclusion
Learning how to cook beef brisket in Dutch oven is one of the most rewarding skills you can add to your cooking repertoire. It is simpler than most people think. You do not need a smoker, a special rub, or hours of babysitting. A good Dutch oven, a quality brisket, basic seasonings, and patience are all you need.
The process comes down to a few key steps. Season the meat generously. Sear it well to build flavor. Build a rich braising liquid with broth and aromatics. Cook low and slow at 300°F until the internal temperature reaches 195°F to 205°F. Rest the meat properly before slicing against the grain. Follow these steps and you will get tender, juicy, flavorful brisket every single time.
Dutch oven brisket is a dish that brings people together. It is perfect for family dinners, holiday gatherings, or a cozy weekend meal. The leftovers make fantastic sandwiches and next-day meals. Once you master this method, you will never go back to dry, tough brisket again. Give it a try this weekend and taste the difference for yourself.
Frequently Asked Questions
Can I use a regular oven-safe pot instead of a Dutch oven?
A Dutch oven works best because its heavy walls and tight lid trap moisture and heat evenly. A regular oven-safe pot may work if it has a snug-fitting lid, but the results will not be as consistent. The thick construction of a Dutch oven is what makes oven-braised brisket so successful.
How long does it take to cook brisket in a Dutch oven?
Cooking time depends on the size of the brisket. A 4-5 pound brisket takes about 3.5 to 4.5 hours at 300°F. A full packer brisket of 10-12 pounds can take 5.5 to 7 hours. Always use a meat thermometer and cook until the internal temperature reaches 195°F to 205°F for the best texture.
Do I need to sear the brisket before putting it in the Dutch oven?
Yes, searing is an important step. It creates a flavorful crust through the Maillard reaction and adds depth to the braising liquid. A good sear on all sides takes about 12 to 15 minutes total and makes a noticeable difference in the final flavor of your braised beef.
Can I cook beef brisket in a Dutch oven on the stovetop?
You can start the sear on the stovetop, but the braising is best done in the oven. The oven provides even, surrounding heat that cooks the meat gently from all sides. Stovetop-only cooking can lead to hot spots and uneven results. Transferring the covered Dutch oven to a 300°F oven is the recommended method.
What is the best temperature to cook brisket in a Dutch oven?
The ideal oven temperature is 300°F. This low temperature allows the collagen in the brisket to break down slowly without drying out the meat. Higher temperatures will cook the exterior too fast and leave the inside tough. Low and slow cooking at 300°F is the key to tender, juicy brisket.
How do I know when the brisket is done?
Use a meat thermometer to check the internal temperature. The brisket is done when it reaches 195°F to 205°F in the thickest part. Another sign is tenderness. If you can slide a fork into the meat and it pulls apart easily, it is ready. Always let it rest for 20 to 30 minutes before slicing.
=== META TITLE ===
How To Cook Beef Brisket In Dutch Oven Step By Step
=== SEO TITLE ===
How To Cook Beef Brisket In Dutch Oven Step By Step
=== URL SLUG ===
how-to-cook-beef-brisket-in-dutch-oven-step-by-step