How To Use Proofing Drawer In Oven For Perfect Bread
Using a proofing drawer in oven transforms your bread baking by giving the dough the perfect warm environment to rise. This guide covers everything from setup and temperature to timing and common mistakes. You will learn how to achieve bakery-quality loaves at home with simple, actionable steps.
Baking bread at home is one of the most rewarding things you can do in the kitchen. But here is the thing — great bread does not just come from a good recipe. It also depends on how well you let the dough rise. This is where the proofing drawer in oven becomes your best friend. If you have ever wondered why your bread turns out dense or flat, the answer might be simple: your dough did not proof properly.
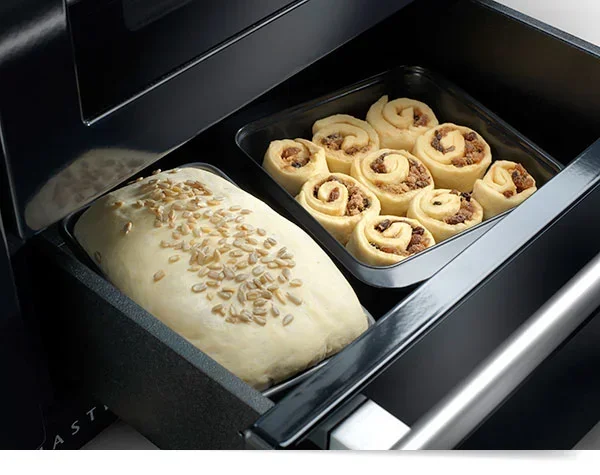
A proofing drawer in oven is a small, built-in compartment that provides a controlled warm environment for your dough to rise. Many modern ovens come with this feature, yet most home bakers barely use it. Whether you are making sourdough, sandwich bread, or a rustic artisan loaf, understanding how to use this feature can completely change your results. In this guide, we will walk you through everything you need to know about using the proofing drawer in oven for perfect bread every single time.
Key Takeaways
- A proofing drawer in oven creates the ideal warm, humid environment for dough to rise properly.
- The optimal proofing temperature ranges between 75°F and 85°F for most bread recipes.
- Using the proofing function correctly can cut your rising time in half compared to room temperature.
- Always check dough consistency before placing it in the proofing drawer.
- Avoid common mistakes like over-proofing or skipping the preheat step.
- The proofing drawer works great for sourdough, sandwich bread, and artisan loaves alike.
- Practicing with your oven’s proofing settings will help you bake perfect bread every time.
📑 Table of Contents
- What Is a Proofing Drawer in Oven?
- How to Set Up Your Proofing Drawer in Oven
- Best Temperature and Timing for Proofing Bread
- Step-by-Step Guide to Using the Proofing Drawer
- Common Mistakes to Avoid
- Tips for Perfect Bread Every Time
- Which Types of Bread Benefit Most from a Proofing Drawer?
- Conclusion
What Is a Proofing Drawer in Oven?
A proofing drawer is a small space inside your oven designed specifically for letting bread dough rise. Unlike the main oven cavity, the proofing drawer does not generate intense heat. Instead, it maintains a gentle, consistent warmth that encourages yeast activity. This warm environment speeds up the final rise of your dough, which is the last step before baking.
Most ovens with a proofing drawer also include a humidity control feature. This is important because dry dough can form a skin during rising, which restricts expansion. The moisture inside the drawer keeps your dough supple and elastic. Together, warmth and humidity create the perfect conditions for dough fermentation.
If you are new to bread making, the proofing drawer removes a lot of guesswork. You do not need to find a warm spot in your kitchen or wrap your dough in towels. The drawer handles everything for you. It keeps the temperature steady and the environment humid, giving your yeast exactly what it needs to thrive.
How Does Proofing Differ from Baking?
It is easy to confuse proofing with baking, but they are two completely different stages. Proofing is the resting phase where the dough rises due to yeast activity. Baking is the cooking phase where heat transforms the risen dough into a finished loaf. The proofing drawer in oven is only used during the proofing stage. You will switch to the main oven for baking.
Think of it this way. Proofing is like letting dough sleep and grow. Baking is like waking it up and giving it structure. The proofing drawer in oven gives your dough a cozy place to sleep before it goes into the hot main oven for baking.
How to Set Up Your Proofing Drawer in Oven
Setting up the proofing drawer in oven is straightforward, but a few small steps make a big difference. Before you place your dough inside, make sure everything is ready.
Step 1: Clean the Drawer
Start by giving the proofing drawer a quick wipe-down. Any food residue or grease from previous use can affect the temperature and humidity inside the drawer. A clean drawer ensures a consistent environment for your bread dough proofing.
Step 2: Prepare Your Dough
Your dough should be fully mixed and kneaded before it goes into the proofing drawer in oven. Check that the dough has passed the windowpane test. This means you can stretch a small piece thin enough to see light through it without it tearing. If the dough is not ready, it will not rise properly in the drawer.
Step 3: Place the Dough in a Suitable Container
Put your dough in a lightly greased bowl or a proofing basket. The container should fit comfortably inside the drawer without touching the sides. This allows air to circulate around the dough evenly. Cover the container with a damp cloth or plastic wrap to retain moisture.
Step 4: Set the Temperature
Most ovens with a proofing drawer allow you to set the temperature between 75°F and 100°F. For most bread recipes, 80°F is the sweet spot. Set the drawer to this temperature and let the dough do its work.
Step 5: Monitor the Dough
Keep an eye on your dough while it proofs. Most loaves need about one to two hours in the proofing drawer in oven. The dough should roughly double in size. You can check readiness by pressing a finger gently into the dough. If the indentation stays, the dough is ready.
Best Temperature and Timing for Proofing Bread
Temperature and timing are the two most important factors in bread dough proofing. Get these right, and your bread will have a light, airy crumb with a beautiful crust. Get them wrong, and you may end up with dense, flat loaves.
Ideal Proofing Temperature
The proofing bread in oven temperature should generally be between 75°F and 85°F. This range allows the yeast to activate without over fermenting the dough. At 75°F, the rise takes longer but develops more flavor. At 85°F, the rise is faster but the flavor may be slightly milder.
Some bakers prefer a cooler proofing temperature for artisan and sourdough proofing. A slower rise at lower temperatures allows complex flavors to develop over time. This is why many professional bakers use a proofing drawer in oven set to 75°F for sourdough loaves.
How Long Should You Proof?
Proofing time depends on the temperature and the type of dough you are working with. Here is a general guide:
- 75°F: 2 to 3 hours for standard yeast bread. 4 to 6 hours for sourdough.
- 80°F: 1.5 to 2 hours for standard yeast bread. 3 to 4 hours for sourdough.
- 85°F: 1 to 1.5 hours for standard yeast bread. 2 to 3 hours for sourdough.
These times are approximate. Always watch the dough, not the clock. The dough consistency and size are your best indicators of readiness.
Comparison: Room Temperature vs. Proofing Drawer
Many home bakers simply leave their dough on the counter to rise. While this works, it is less reliable than using a proofing drawer in oven. Here is a quick comparison:
| Factor | Room Temperature | Proofing Drawer |
|---|---|---|
| Temperature Control | Variable, depends on room | Consistent and precise |
| Humidity Control | Low, dough may dry out | Built-in moisture retention |
| Rising Time | Longer, less predictable | Faster and more consistent |
| Flavor Development | Depends on temperature | Can be optimized with settings |
| Convenience | Requires monitoring | Set and forget |
As you can see, the proofing drawer in oven offers clear advantages for consistent, high-quality homemade bread. It removes the variables that make counter proofing unreliable.
Step-by-Step Guide to Using the Proofing Drawer
Now that you understand the basics, let us walk through a complete proofing drawer in oven session from start to finish.
Step 1: Mix and Knead Your Dough
Start by mixing your flour, water, yeast, salt, and any other ingredients in your recipe. Knead the dough until it is smooth and elastic. This usually takes about 10 to 15 minutes by hand or 8 minutes with a stand mixer. The bread dough rising process begins once the dough is properly developed.
Step 2: First Rise (Bulk Fermentation)
Place the dough in a greased bowl and cover it. Let it undergo its first rise at room temperature or in a warm spot in your kitchen. This bulk fermentation stage typically takes one to two hours. The dough should grow to about double its original size.
Step 3: Shape the Loaf
Once the dough has completed its first rise, gently punch it down to release air bubbles. Then shape it into a loaf and place it in your baking pan or on a baking sheet. Cover the shaped dough loosely with a damp cloth.
Step 4: Place in the Proofing Drawer
Set your oven to the proofing mode. If your oven does not have a dedicated proofing mode, set it to the lowest temperature and turn it off after it reaches about 80°F. Place the covered dough inside the proofing drawer in oven and close the door.
Step 5: Wait and Watch
Let the dough proof for the recommended time. Check it periodically. The dough consistency should be soft and pillowy. When the dough has risen to about double its size and springs back slowly when poked, it is ready.
Step 6: Transfer to the Main Oven for Baking
Remove the dough from the proofing drawer in oven and preheat the main oven to the temperature specified in your recipe. Place the dough inside and bake until golden brown and the loaf sounds hollow when tapped on the bottom.
Common Mistakes to Avoid
Even experienced bakers make mistakes when using the proofing drawer in oven. Here are the most common errors and how to avoid them.
Over-Proofing the Dough
Over-proofing happens when the dough rises for too long. The yeast consumes all the available sugars, and the gluten structure breaks down. The result is a flat, dense loaf with poor texture. Always set a timer and check the dough regularly to prevent over-proofing.
Using Too High a Temperature
Cranking the proofing drawer in oven temperature above 90°F can kill the yeast or cause the dough to rise too quickly. This leads to poor flavor and an uneven crumb structure. Stick to the recommended range of 75°F to 85°F for the best results.
Skipping the Humidity Factor
Dry dough forms a skin during proofing, which prevents it from expanding properly. If your oven proofing drawer does not have a humidity setting, place a small oven-safe dish of water inside the drawer to add moisture to the environment.
Not Letting the Dough Rest After Shaping
Some bakers rush the process and skip the rest period after shaping. The dough needs time to relax and adjust to its new shape before it goes into the proofing drawer in oven. A 15 to 20 minute rest before proofing can significantly improve the final loaf.
Opening the Drawer Too Often
Every time you open the proofing drawer, you let out heat and moisture. This disrupts the stable environment your dough needs. Resist the urge to check on the dough too frequently. Check it only once or twice during the proofing period.
Tips for Perfect Bread Every Time
Getting great bread from your proofing drawer in oven takes practice, but these tips will help you succeed faster.
Use Quality Ingredients
The foundation of great bread is great ingredients. Use fresh yeast or active dry yeast that has not expired. Choose high-quality flour with good protein content for the best gluten development. Fresh ingredients make a noticeable difference in the final bread texture.
Invest in a Dough Thermometer
A simple dough thermometer takes the guesswork out of proofing. Check the internal temperature of your dough before placing it in the proofing drawer in oven. The ideal dough temperature for most bread recipes is around 78°F.
Experiment with Different Proofing Times
Every oven and every recipe is slightly different. Try proofing for different lengths of time to find what works best for your specific setup. Keep notes so you can replicate your best results.
Try Cold Proofing for Extra Flavor
Cold proofing, also known as retarding, involves placing the shaped dough in the refrigerator overnight. This slow, cold rise develops deep, complex flavors. You can use the proofing drawer in oven for the initial warm rise, then transfer the dough to the refrigerator for the final cold proof.
Practice Makes Perfect
Baking great bread is a skill that improves over time. Do not be discouraged by your first few loaves. Each bake teaches you something new about dough fermentation, bread dough rising, and how your specific oven performs.
Expert Insight
Professional bakers often say that proofing is the most important step in bread making. The proofing drawer in oven gives home bakers access to the same controlled environment that professional kitchens use. Mastering this step will elevate your baking bread at home to the next level.
Quick Tips
- Always grease your proofing container to prevent sticking.
- Use a kitchen scale for accurate flour measurements.
- Let the dough cool completely before slicing.
- Clean the proofing drawer after every use to prevent buildup.
- Keep a baking journal to track your best results.
Which Types of Bread Benefit Most from a Proofing Drawer?
The proofing drawer in oven works well for many types of bread. Here are some of the best candidates:
- Sourdough: The controlled warmth helps wild yeast ferment slowly and develop complex flavors.
- Sandwich Bread: Consistent proofing creates a soft, uniform crumb perfect for sandwiches.
- Artisan Loaves: The warm, humid environment helps achieve a beautiful oven spring and crispy crust.
- Brioche and Enriched Doughs: These rich doughs benefit from gentle, steady proofing without drying out.
- Dinner Rolls: Small rolls proof quickly in the drawer and come out perfectly puffed every time.
Whether you are a beginner or a seasoned baker, the proofing drawer in oven is a versatile tool that improves nearly every type of homemade bread.
Conclusion
Using a proofing drawer in oven is one of the simplest ways to improve your bread baking. It provides consistent warmth, proper humidity, and a controlled environment that helps your dough rise perfectly every time. From setting the right temperature to avoiding common mistakes, this guide has covered everything you need to know to get started.
The key to perfect bread lies in patience and practice. Once you understand how your proofing drawer in oven works, you will notice a dramatic improvement in the texture, flavor, and appearance of your loaves. Start with simple recipes, follow the steps outlined in this guide, and adjust as you go. Before long, you will be baking perfect bread with confidence and joy.
So go ahead. Preheat that drawer, prepare your dough, and let the proofing drawer in oven do the heavy lifting. Your kitchen will smell like a bakery, and your bread will taste like it came straight from a professional oven. Happy baking!
Frequently Asked Questions
Can I use my oven’s proofing drawer for sourdough bread?
Yes, absolutely. The proofing drawer in oven works wonderfully for sourdough. Set the temperature to around 75°F for a slow, flavorful rise. The controlled humidity in the drawer prevents the sourdough skin from drying out during proofing.
What temperature should I set my proofing drawer to?
For most bread recipes, set the proofing drawer in oven to 80°F. This temperature strikes the perfect balance between speed and flavor development. If you are making sourdough, try 75°F for a slower, more complex rise.
How long should I proof bread in the oven drawer?
Proofing time varies based on temperature and dough type. At 80°F, most yeast breads need 1.5 to 2 hours. Sourdough typically takes 3 to 4 hours. Always check the dough by pressing a finger into it to test readiness.
Can I proof bread without a dedicated proofing drawer?
Yes, you can. Place the dough in a microwave with a cup of hot water next to it, or use the oven with just the light on. However, a dedicated proofing drawer in oven provides much more consistent results with less monitoring.
Why is my bread dense even when using the proofing drawer?
Dense bread usually means the dough was under-proofed or over-proofed. Check that your dough consistency is right before proofing. Also verify the temperature setting. Too low a temperature slows yeast activity, while too high a temperature can weaken the gluten structure.
Is a proofing drawer the same as a dehydrator for bread?
No, they serve different purposes. A proofing drawer in oven provides warmth and humidity for dough to rise. A dehydrator removes moisture to preserve food. The drawer is specifically designed for bread dough proofing and should not be confused with a dehydrator.